In the following steps you will learn how to create a drum text effect in Adobe Illustrator. First, you will learn how to create the main shapes that will make up your text using some simple rectangles and some basic vector shape building techniques. Next, you will learn how to add color, shading and highlights using a bunch of gradients, the Appearance palette and several effects.
Create a New Document
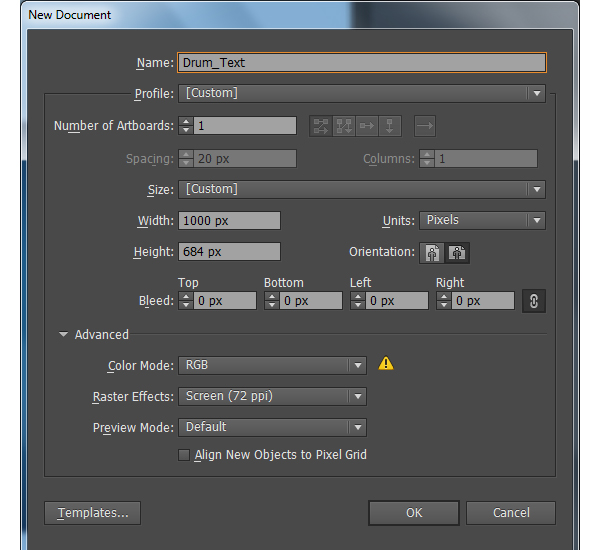
1. Launch Illustrator and then press (Ctrl + N) to create a New document. Select Pixels from the Units drop-down menu, enter 1000 in the width box and 684 in the height box then click on the Advanced button. Select RGB, Screen (72ppi) and make sure that the Align New Objects to Pixel Grid box is unchecked before you click OK.
Create the Main Shape
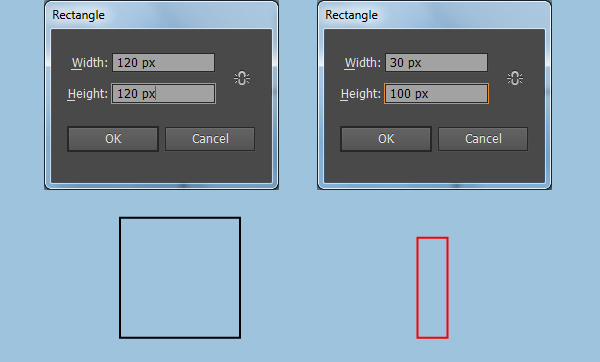
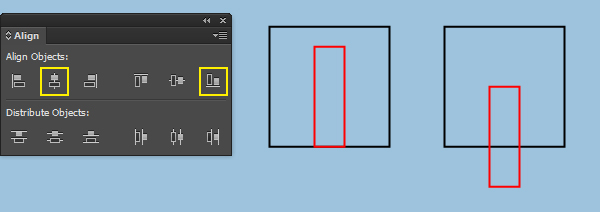
2. First of all, we’ll create the shape of the letter “M”. Pick the Rectangle Tool (M) and create two rectangles with dimensions: 120 by 120px and 30 by 100px. Select the two newly created rectangles, open the Align palette (Window > Align) and click on the Horizontal Align Center button, then click on the Vertical Align Bottom button. Next reselect the red rectangle and move it 40px down. Now select and group (Ctrl +G) the two rectangles created in this step, then name this group “Main_Shape”. Keep the newly created group selected and make a copy (Ctrl +C, Ctrl +F) of it, then move the copy 72px to the right.

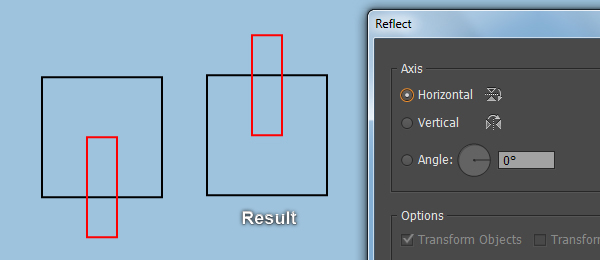
3. We are going to create the shape of the letter “U”. Select the “Main_Shape” group and make a copy (Ctrl +C, Ctrl +F) of it, then place the copy to another position. Make sure that the newly created group is still selected and double-click on the icon of the Reflect Tool (O) from the Toolbar. In the Reflect dialog box, check the Horizontal and click OK.
4. It’s time to draw the shape of the letter “S”. Select the two groups of the letter “M” created in the step 2 and make a copy (Ctrl +C, Ctrl +F) of them, then place these copies to other positions. Still the two newly created groups selected, double-click on the icon of the Rotate Tool (R) from the Toolbar. In the Rotate dialog box, enter a 90 degrees Angle and click OK. Next press (Ctrl +Shift +G) to ungroup the resulting groups. Finally select the lower red rectangle and move it 100px to the left.
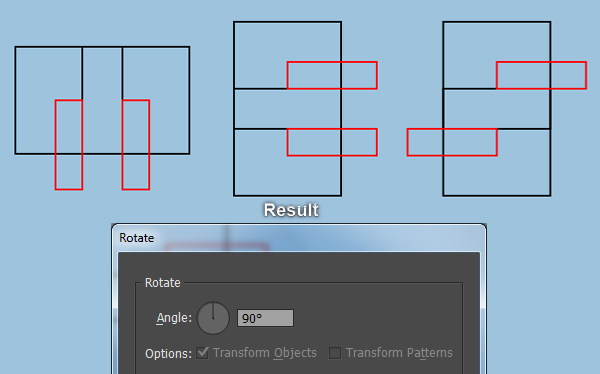
5. We will continue with the shape of the letter “I”.
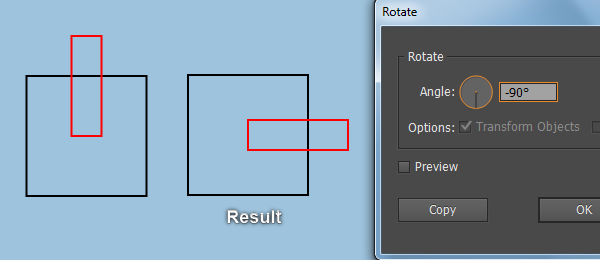
Pick the Rectangle Tool (T) and create a 50 by 120px rectangle. Next come the shape of the letter “C”. Select the “Main_Shape” group and make a copy (Ctrl +C, Ctrl +F) of it, then place the copy to another position. Still this newly created group selected, double-click on the icon of the Rotate Tool (R) from the Toolbar. In the Rotate dialog box, enter a -90 degrees Angle and click OK.

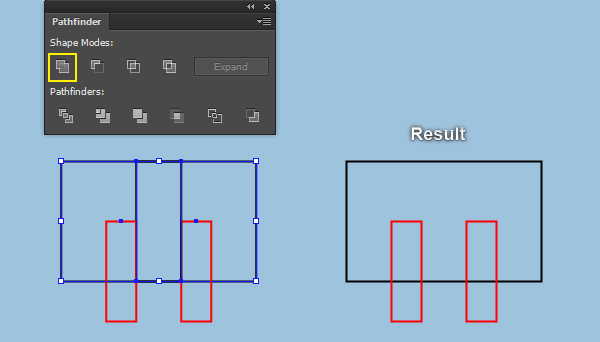
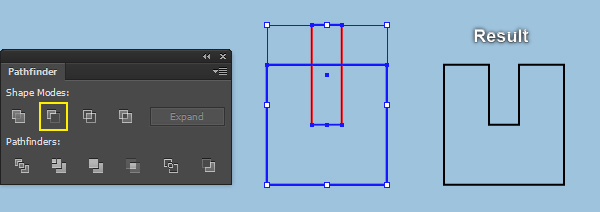
6. Focus on the letter “M”, select two groups of this letter and ungroup (Ctrl +Shift +G) them. Now select two black rectangles, open the Pathfinder palette (Window > Pathfinder) and click on the Unite button. Having the resulting rectangle selected, hold down the Shift and click on the two red rectangles, then click on the Minus Front button from the Pathfinder palette. The resulting object should look like the fourth image below. Next select the group of the letter “U” and click on the Minus Front button from the Pathfinder palette.
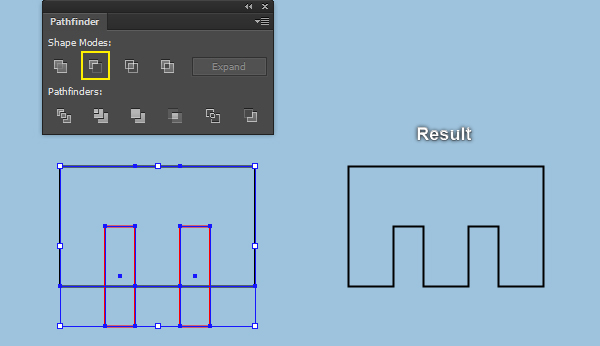
7. Focus on the letter “S”, select two black rectangles of this letter, open the Pathfinder palette (Window > Pathfinder) and click on the Unite button. Having the resulting rectangle selected, hold down the Shift and click on the two red rectangles, then click on the Minus Front button from the Pathfinder palette. The resulting object should look like the fourth image below. Next select the group of the letter “C” and click on the Minus Front button from the Pathfinder palette.
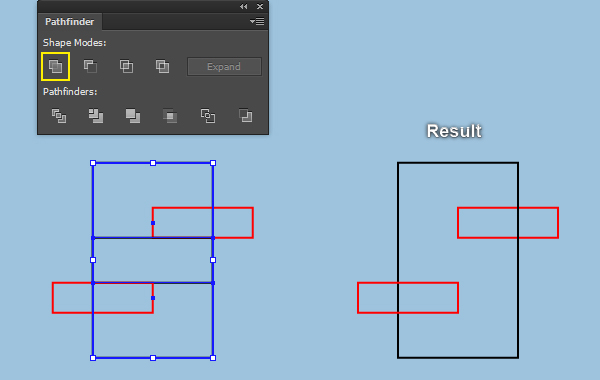
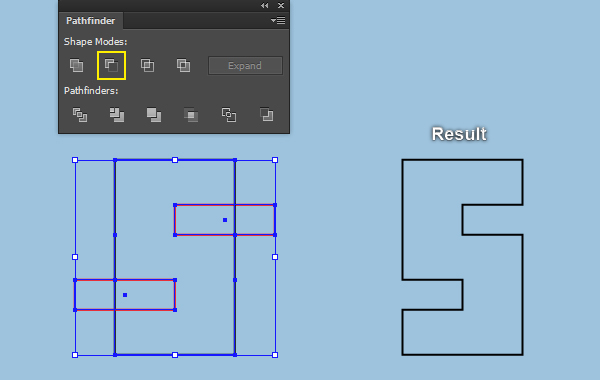

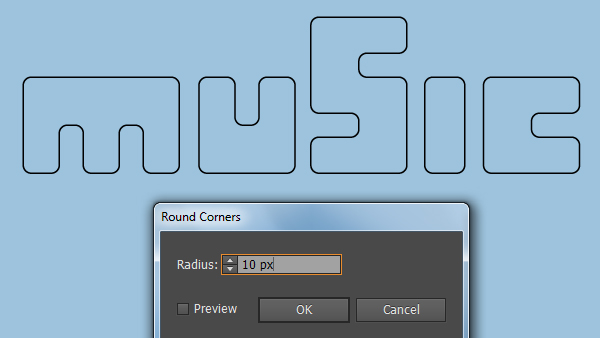
8. Place the newly created letters to the positions like you see in the image below. Next reselect all these letters and go to the Effect > Stylize > Round Corners… Enter a 10px Radius and click OK. Make sure that the resulting letters are still selected and make a copy (Ctrl +C, Ctrl +F) of them, then replace the existing stroke color of these copies with red. Keep the red letters selected and go to the Object > Expand Appearance. Finally move these red letters 50px down.

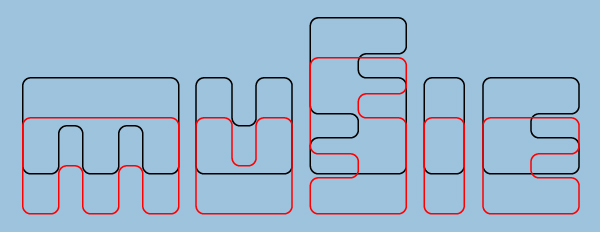
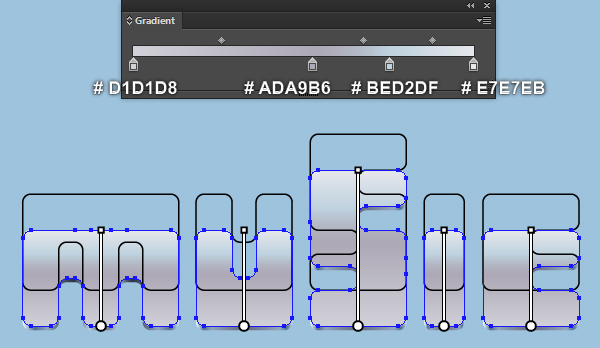
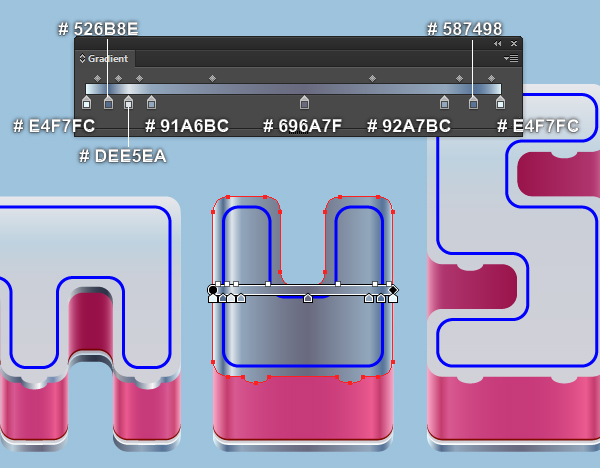
9. Focus on the letter “M”, select the red object of this letter and remove its troke, then fill this object with the linear gradient as shown below. Next select the red object of the letter “U”, remove its stroke and fill this object with the linear gradient like you see in the second image. Now select the red objects of the remaining three letters, then pick the Eyedropper Tool (I) and click on the shape you just filled with linear gradient of the letter “U”. At this point your text should look like in the final image.
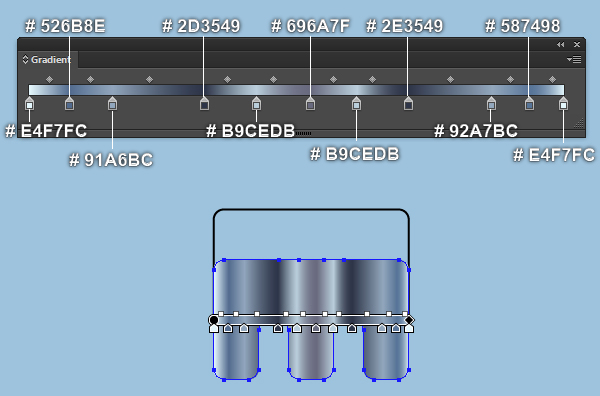
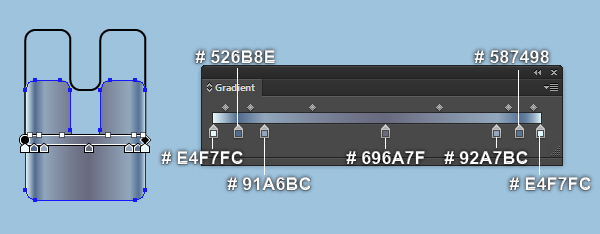
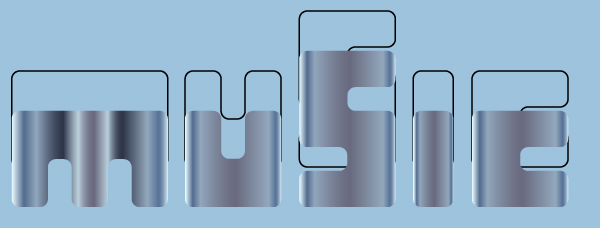
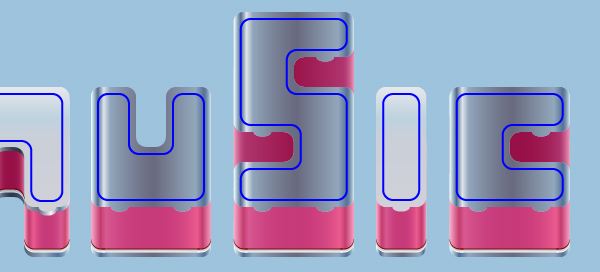
10. Select all shapes you just filled with linear gradient and send them to back (Ctrl +Shift +Left Square Bracket). Keep these shapes selected and make a copy (Ctrl +C, Ctrl +F) of them, then replace the existing color of the copies with new linear gradient as shown in the second image. Finally move the newly created shapes 5px up.

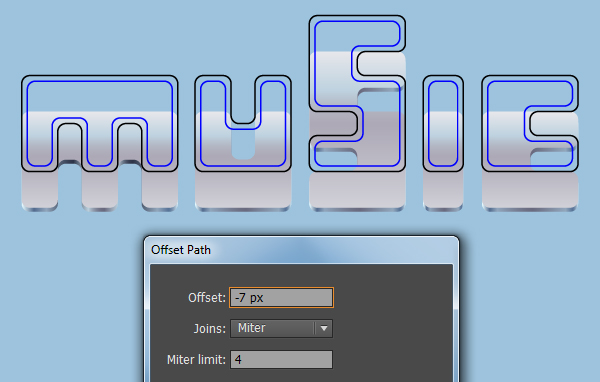
11. Select the black objects of the letters and go to the Object > Path > Offset Path… Enter a -7px Offset and click OK, then replace the existing stroke color of the copies with blue. With the Ellipse Tool (L), create a 17 by 9px red ellipse. Make some copies of this ellipse and then place them to the positions like you see in the images below.
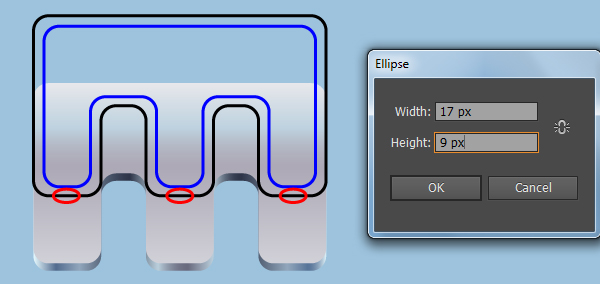
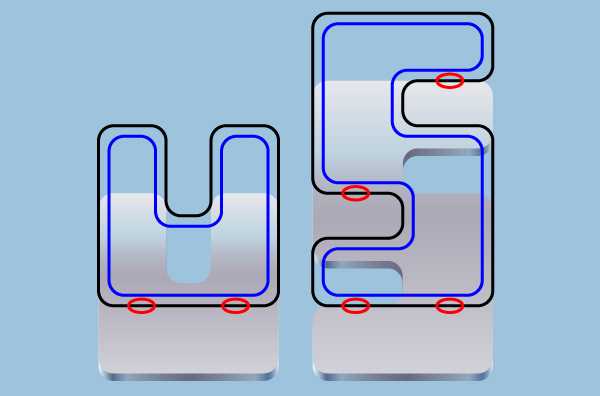
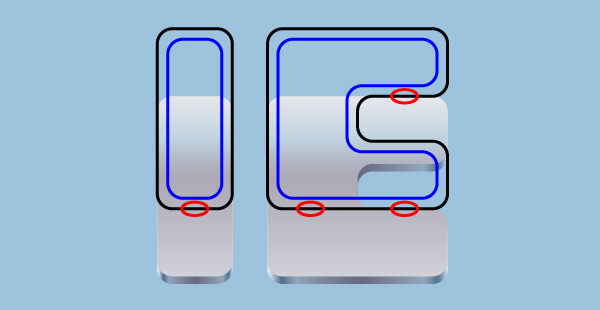
12. Focus on the letter “M”, select the black object and three red ellipses, then open the Pathfinder palette (Window > Pathfinder) and click on the Unite button. Likewise, repeat the same techniques for the remaining four letters.
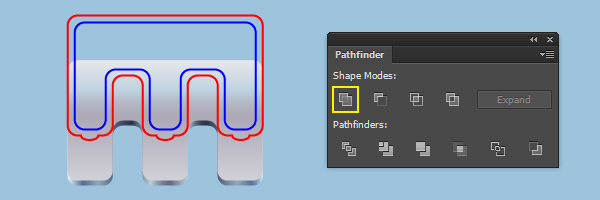
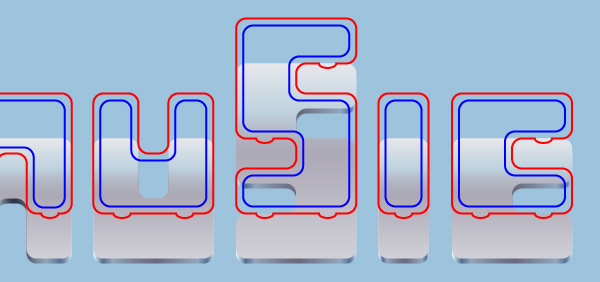
13. Before you continue, select all blue and red objects of the letters and press (Ctrl +3) to hide them. Now select the white shapes of the letters and make a copy (Ctrl +C, Ctrl +F) of them. Keep the newly created shapes selected and add a 1px black stroke for their shapes, then remove the fill color of them. Finally move the resulting objects 3px up.

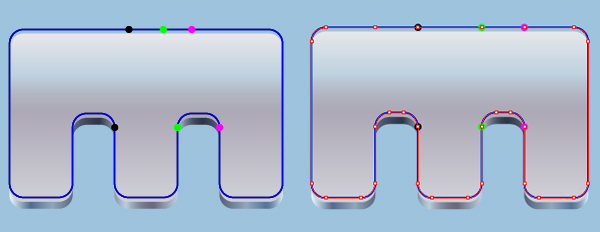
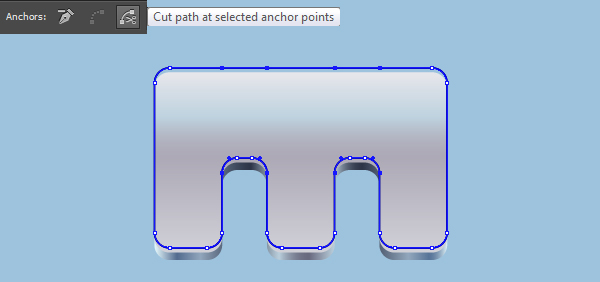
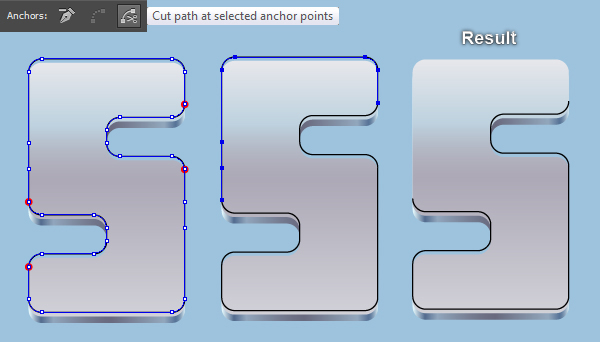
14. Focus on the letter “M”, select the black object and make a copy (Ctrl +C, Ctrl +F) of it, then replace the existing stroke color of the copy with blue. Now with the Direct Selection Tool (A) along with the Shift, select two anchor points highlighted with red. Then open the Align palette (Window > Align) and click on the Horizontal Align Left button. Likewise, focus on the third image, repeat the same process to align pairs of the anchor points highlighted with same colors. You should end up with something like in the fourth image. Now select eight anchor points you just aligned in this step and click on the “Cut path at selected anchor points” button from the Properties bar. Next select paths like you see in the next to last image and remove them. In the end your letter “M” should look like the final image shown.
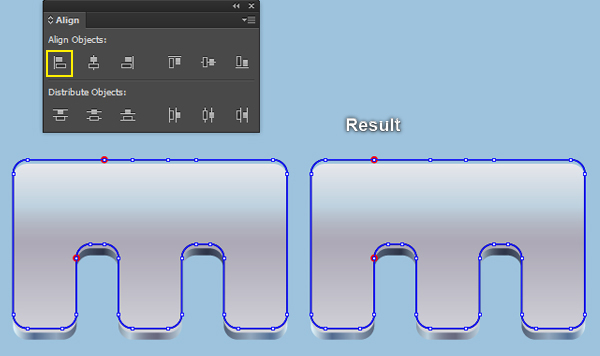
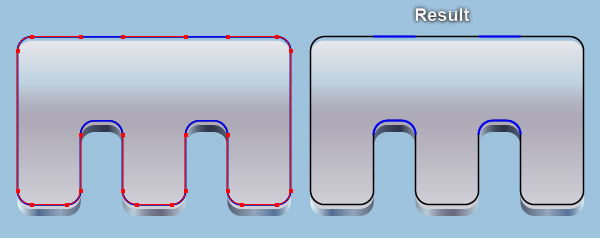
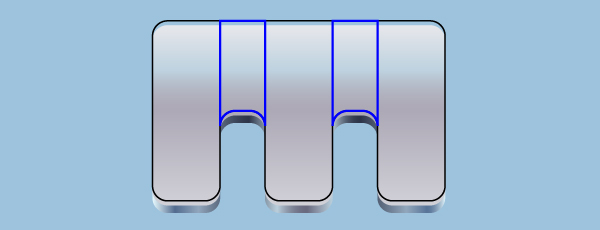
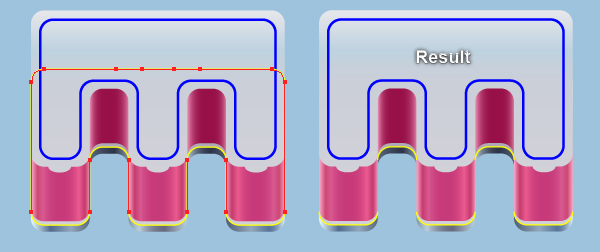
15. Select two blue paths like you see in the first image, right click on the artboard and then select the Join section from the drop-down menu. Next right click on the artboard again, then select the Join section. Likewise, repeat the same process for the two remaining blue paths. In the end your letter “M” should look like the final image shown.
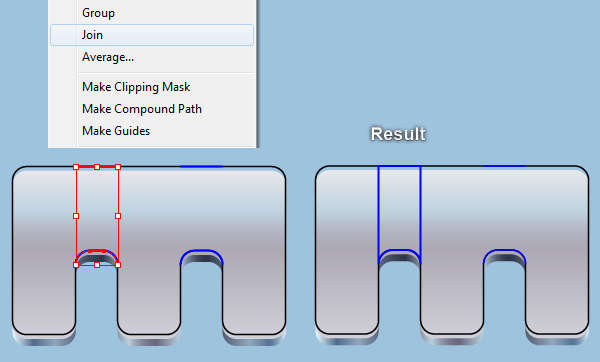
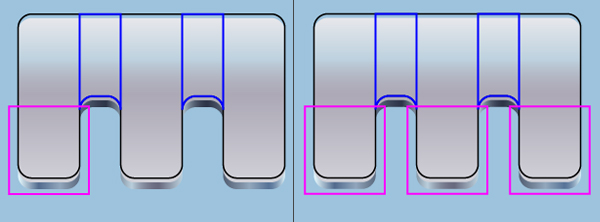
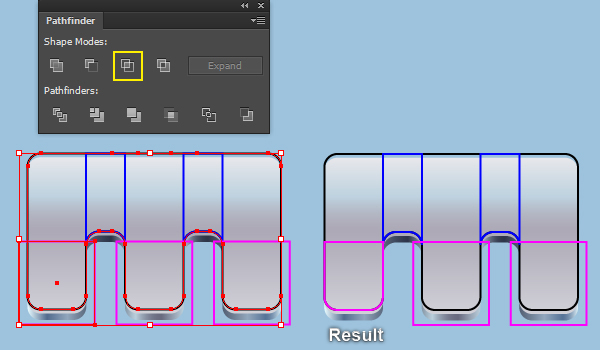
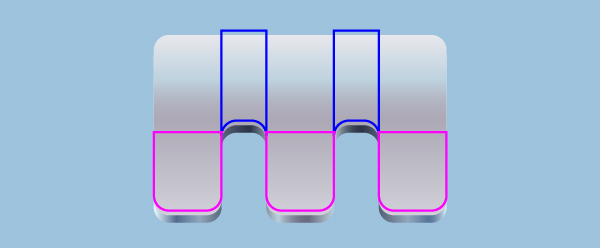
16. With the Rectangle Tool (M), create a 60 by 64px magenta rectangle. Make two copies (Ctrl +C, Ctrl +F, Ctrl +F) of the newly created rectangle, then place these rectangles to the positions as shown in the images below. Before you continue, select the black object of the letter “M” and make two copies of it. Now select the left magenta rectangle and a black object, then open the Pathfinder palette (Window > Pathfinder) and click on the Intersect button. The resulting object should look like the fourth image below. Likewise, repeat the same process for the remaining two black objects and two magenta rectangles. In the end your letter “M” should look like the final image shown.
17. We will continue with the letter “S”. With the Direct Selection Tool (A) along with the Shift, select four anchor points highlighted with red of the black object and click on the “Cut path at selected anchor points” button from the Properties bar. This make the black object becomes four paths. Select the top-left path and remove it. Now select the top-right path, right click on the artboard and select the Join section from the drop-down menu, then replace the existing stroke color of the resulting object with magenta. Likewise, repeat the same process for the top-left path to create another magenta object as shown in the last image.
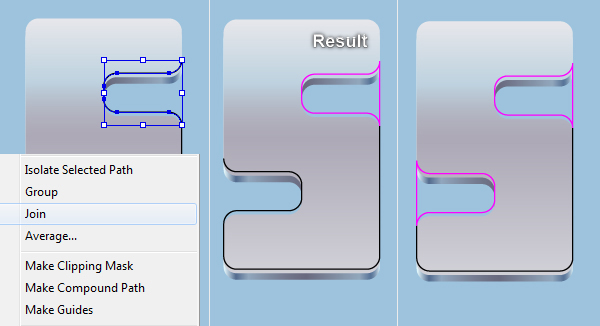
18. Focus on the first image, select two anchor points highlighted with red of the remaining black path and remove them. Next select the anchor point highlighted with blue and move it 30px up. Reselect the black path, right click on the artboard and then select the Join section from the drop-down menu.
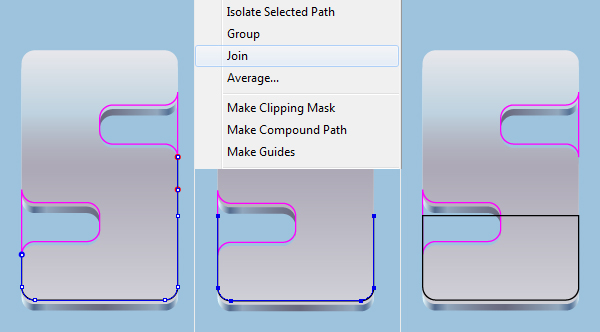
19. Next come the letter “C”. Pick the Rectangle Tool (M) and create a red rectangle, then place it to the position like you see in the first image. Now select the black and the red rectangles of the letter “C”, open the Pathfinder palette (Window > Pathfinder) and click on the Divide button, then press (Ctrl +Shift +G) to ungroup the resulting group. Finally select the red object and remove it.
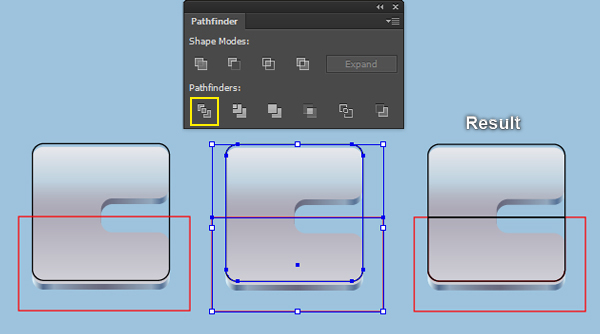

20. Before you continue, press (Ctrl +Alt +3) to show all blue and red objects hidden in the step 13, then bring these objects to bring (Ctrl +Shift +Right Square Bracket). Next select all red objects, remove their strokes and fill these objects with the linear gradient as shown in the last image.
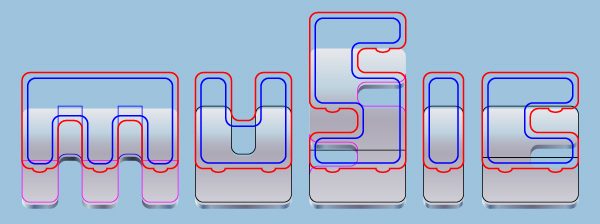
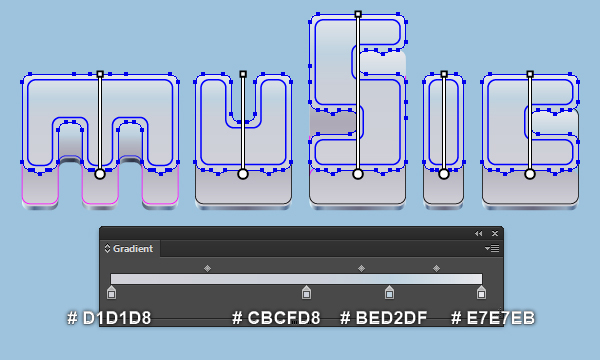
21. Focus on the letter “M” and fill the objects created in the step 15 and step 16 of this letter like you see in the images below.
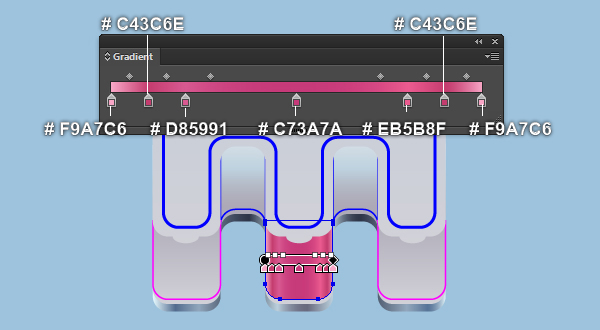
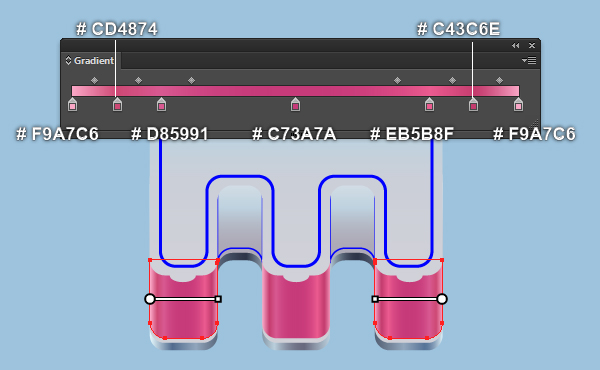
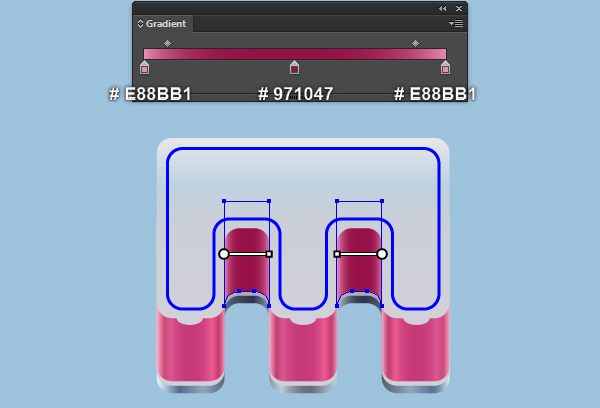
22. Select the black object of the letter “U” and remove its stroke, then fill this object with the linear gradient as shown below. Next select the black object of the letter “S” and the lower black object of the letter “C”, then pick the Eyedropper Tool (I) and click on the shape you just filled with magenta gradient colors of the letter “U”.
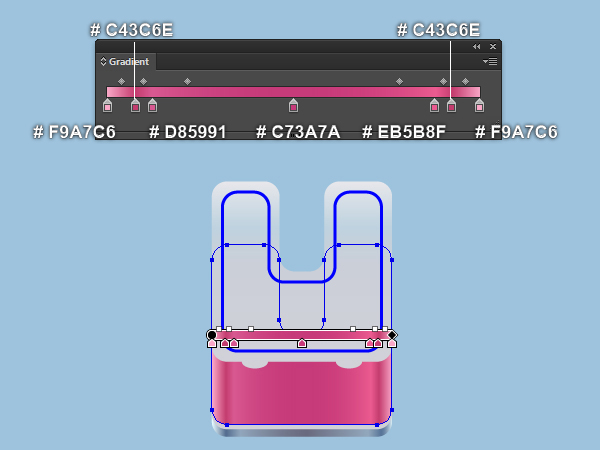
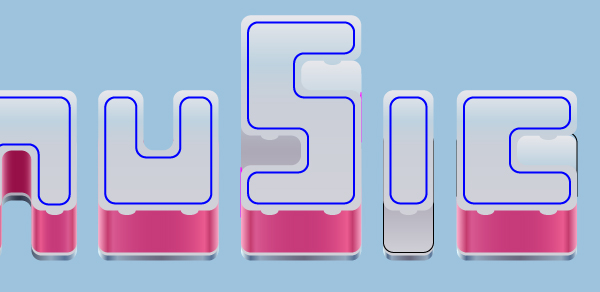
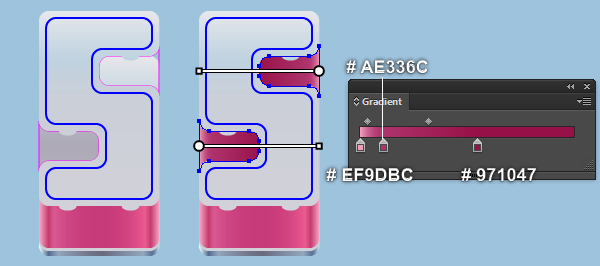
23. Select the two magenta objects of the letter “S” and move them 42px up. Keep these objects selected, remove their strokes and then fill them with the linear gradient as shown below. Next come to the letter “I”, select the black object of this letter, then remove its stroke and fill this object with the linear gradient as shown in the third image. Finally select the remaining black object of the letter “C”, move it 20px up, then remove its stroke and fill this object with the linear gradient as shown in the last image.
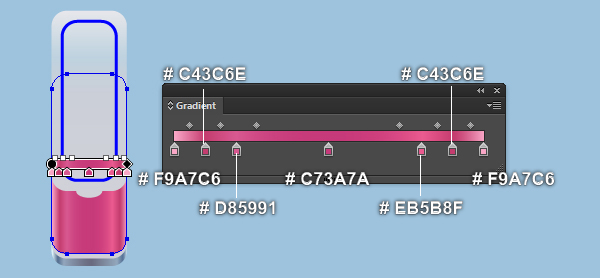
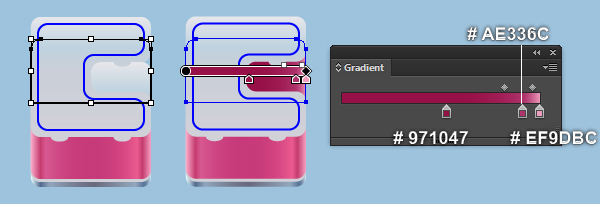
24. At this point your text should look like in the next image:
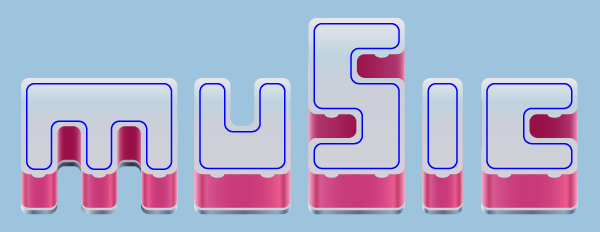
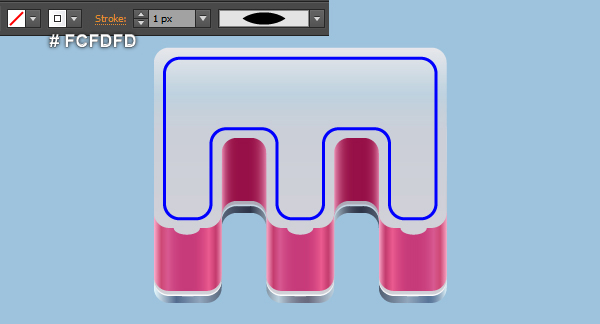
25. Focus on the letter “M”, select the white shape created in the step 10 and make a copy (Ctrl +C, Ctrl +F) of it. Add a 1px yellow stroke for the newly created shape and remove the fill color of it, then bring this object to front (Ctrl +Shift +Right Square Bracket). Now with the Direct Selection Tool (A) along with the Shift, select anchor points highlighted with red of the yellow object and click on the “Cut path at selected anchor points” button from the Properties bar. Next select the paths like you see in the second image and remove them. Finally select the remaining yellow paths, replace the existing stroke color of them with white (# FCFDFD) and then apply the Width Profile 1 for the resulting paths.
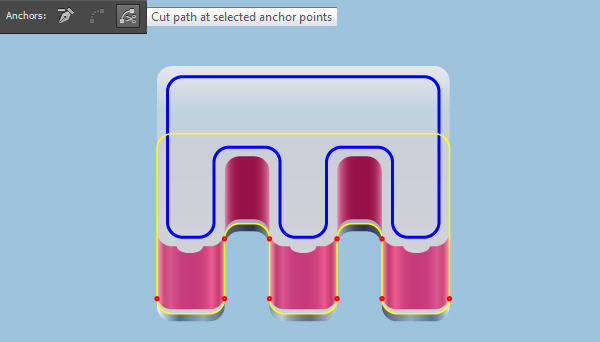
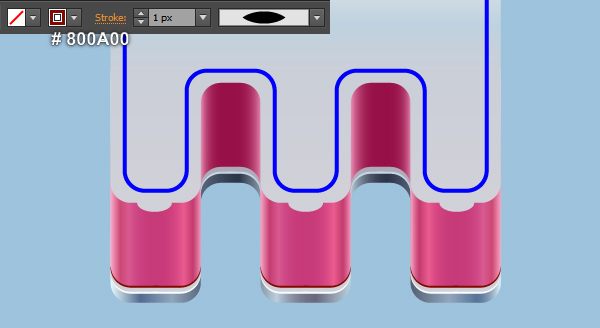
26. Select three lower magenta shapes of the letter “M”and make a copy (Ctrl +C, Ctrl +F) of them. Add a 1px black stroke for the newly created shapes and remove the fill color of them, then bring these objects to front (Ctrl +Shift +Right Square Bracket). Now with the Direct Selection Tool (A) along with the Shift, select anchor points highlighted with yellow of the black objects and click on the “Cut path at selected anchor points” button from the Properties bar. Next select three upper black paths and remove them. Finally select the remaining black paths, replace the existing stroke color of them with dark red (# 800A00) and then apply the Width Profile 1 for the resulting paths.
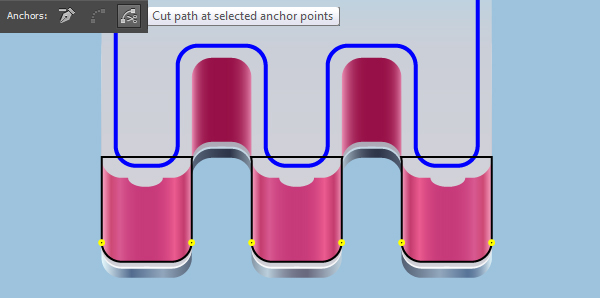
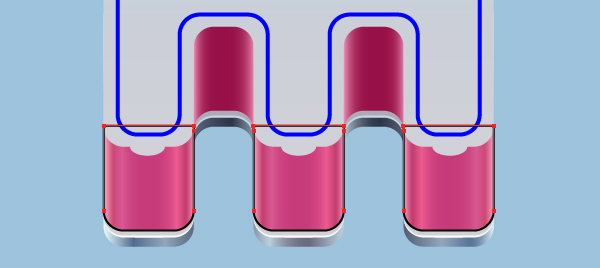
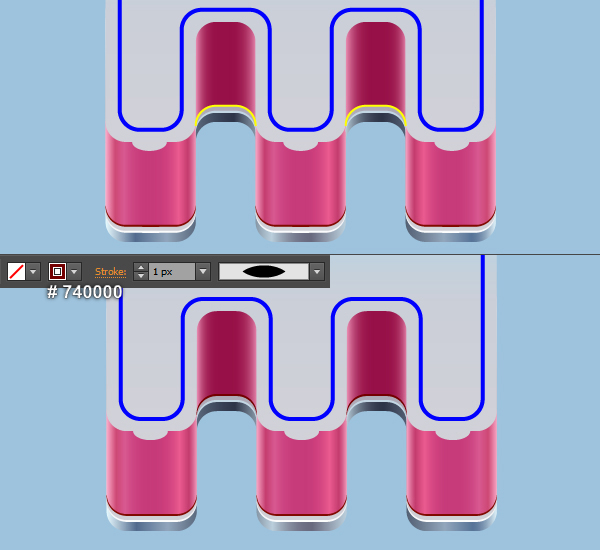
27. Repeat the same process as the step 26 to create two yellow curved paths as shown below. Reselect these two paths, replace the existing stroke color of them with dark red (# 740000) and then apply the Width Profile 1 for the resulting paths.
28. Focus on the letter “U”, select the white shape created in the step 10 and the magenta shape, make a copy (Ctrl +C, Ctrl +F) of them, then bring these copies to front (Ctrl +Shift +Right Square Bracket). Keep the copies selected, add a 1px dark red (# 800A00) stroke and remove the fill color of this object, then apply the Width Profile 1 for the resulting objects. Now with the Direct Selection Tool (A) along with the Shift, select four anchor points highlighted with yellow of the two dark red objects and click on the “Cut path at selected anchor points” button from the Properties bar. This make the two dark red objects becomes four paths. Select the two longer paths and remove them. Finally select the lower path and replace the existing stroke color of it with white (# FCFDFD).
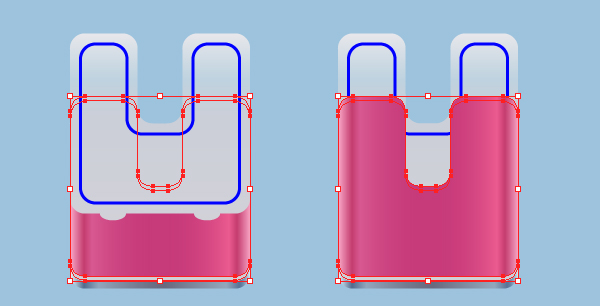
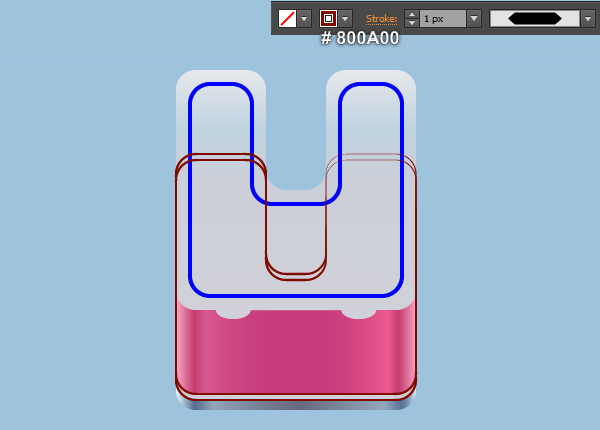
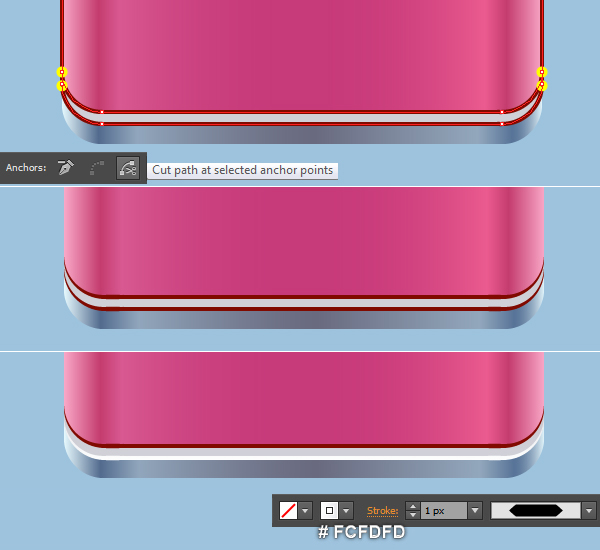
29. Likewise, repeat the same process as the previous steps for the three remaining letters.
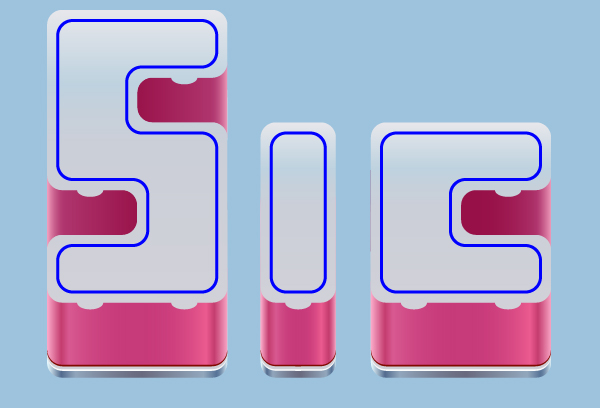
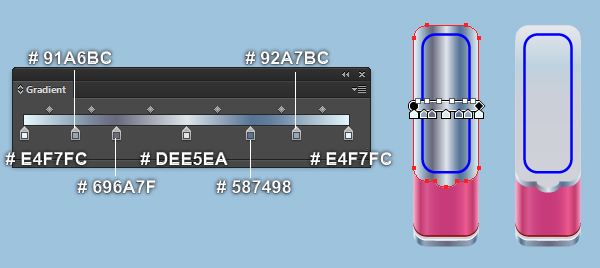
30. Focus on the letter “M”, select the white shape created in the step 20 and make a copy (Ctrl +C, Ctrl +F) of it, then replace the existing color of the copy with new linear gradient as shown below. Keep the newly created shape selected and move it 4px down, then hide it behind the white shape created in the step 20 of the letter “M”. Next come the letter “U”. Select the white shape created in the step 20 of this letter and make a copy (Ctrl +C, Ctrl +F) of it, then replace the existing color of the copy with new linear gradient as shown in the third image below. Now select the white shapes of the letters “S” and “C”, then make a copy of them. Still having these copies selected, pick the Eyedropper Tool (I) and click on the shape you just filled with grey gradient colors of the letter “U”. Next select the three new shapes of the letters “U”, “S” and “C”, then move them 4px down and hide these shapes behind the white shapes created in the step 20 of these three letters. We will continue with the letter “I”. Select the white shape created in the step 20 of this letter and make a copy of it, then replace the existing color of the copy with new linear gradient as shown in the next to last image. Keep the newly created shape selected and move it 4px down, then hide it behind the white shape created in the step 20 of the letter “I”.
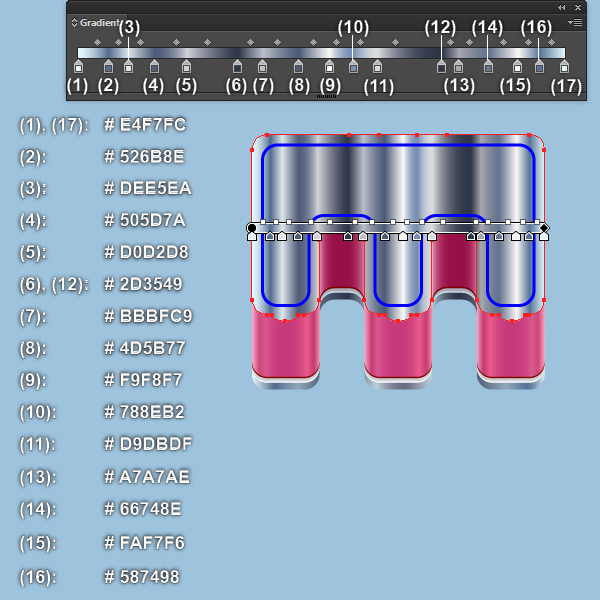
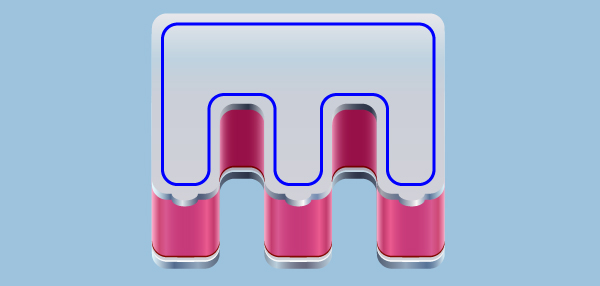
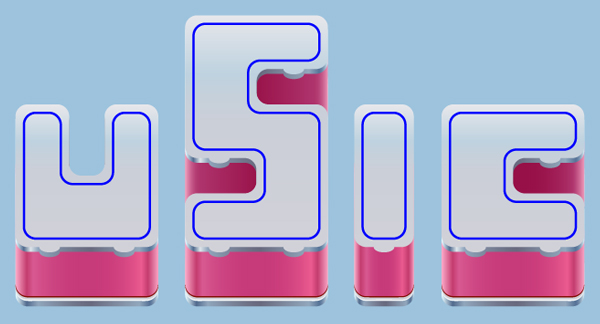
31. At this point your text should look like in the next image:

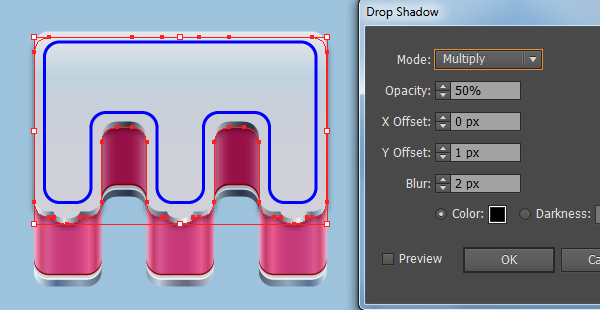
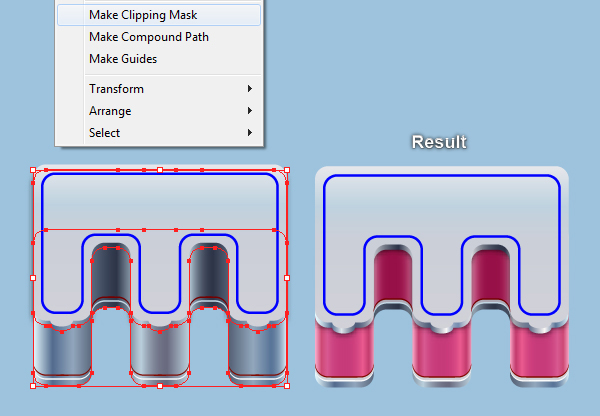
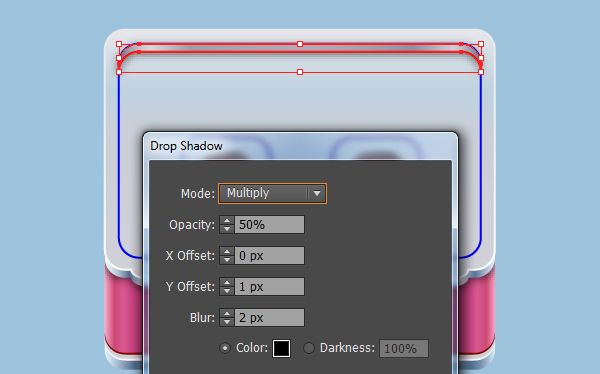
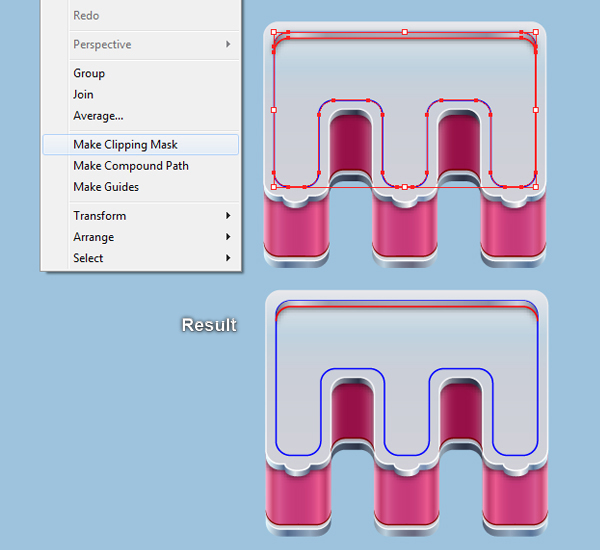
32. Select the shape created in the step 30 of the letter “M” and go to the Effect > Stylize > Drop Shadow… Follow the data like you see in the first image and click OK. Now select the shape created in the step 9 of the letter “M” and press (Ctrl +C) to copy it. Then pick the Selection Tool (V), click on the shape with shadow effect applied in this step and press (Ctrl +F) to paste the shape was copied in this step. Keep this copy selected, hold down the Shift, click on the shape with shadow effect applied in this step. Right click on the artboard and then select the Make Clipping Mask section from the drop-down menu. The clipping set should look like the third image below. Likewise, repeat the same process for the two letters “U” and “I” to apply the Drop Shadow effect as shown in the last image.

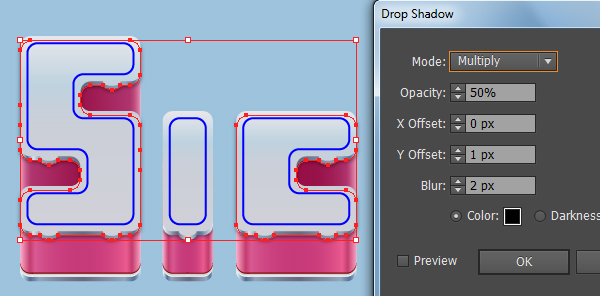
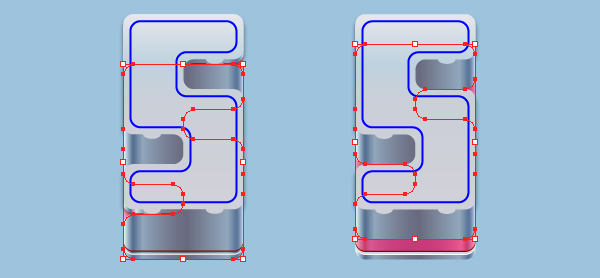
33. Select the shape created in the step 30 of the letter “M” and go to the Effect > Stylize > Drop Shadow… Follow the data like you see in the first image and click OK. Now select the shape created in the step 9 of the letter “S” and press (Ctrl +C) to copy it. Pick the Selection Tool (V), click on the shape with shadow effect applied in this step and press (Ctrl +F) to paste the shape was copied in this step, then move this copy 20px up. Keep the newly created shape selected, hold down the Shift, click on the shape with shadow effect applied in this step. Right click on the artboard and then select the Make Clipping Mask section from the drop-down menu. The clipping set should look like the fifth image below. Likewise, repeat the same process for the letter “C” to apply the Drop Shadow effect as shown in the last image.
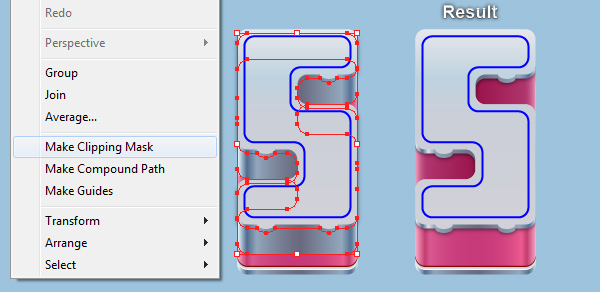
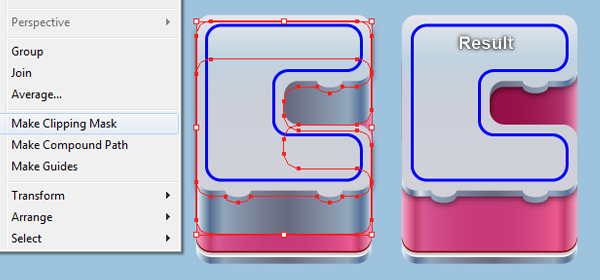
34. Focus on the letter “M”, select the blue object and make a copy (Ctrl +C, Ctrl +F) of it, then replace the exisiting stroke color of the copy with black. Keep the black object selected and make a copy of it, then move the copy 4px down. Reselect the two black objects created in this step, open the Pathfinder palette (Window > Pathfinder) and click on the Minus Front button. The resulting object should look like the fourth image below. Likewise, repeat the same process as the previous steps to create a black object for the letter “I” like you see in the last image.
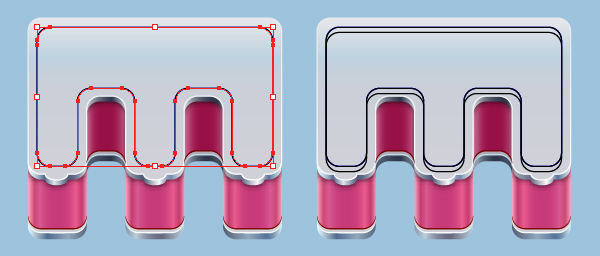
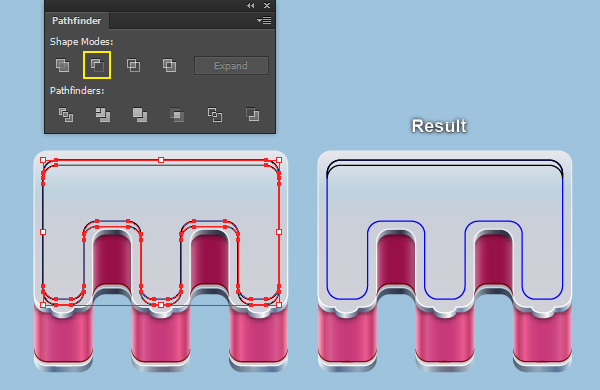

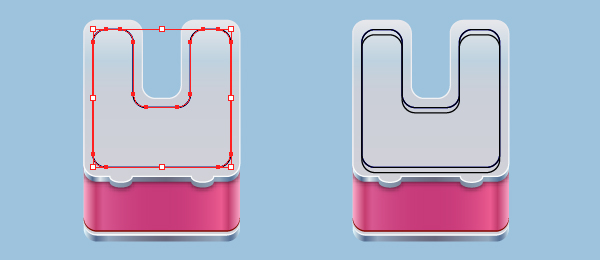
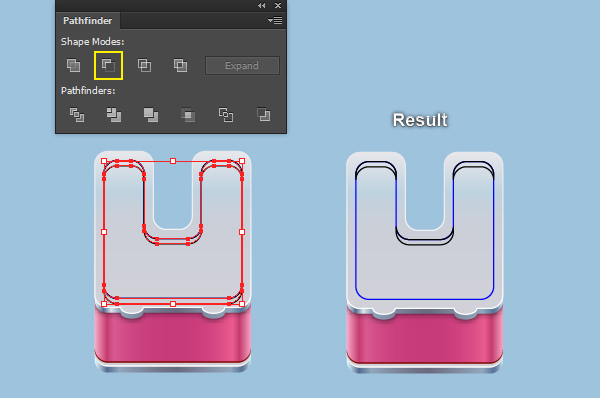
35. Focus on the letter “U”, select the blue object and make a copy (Ctrl +C, Ctrl +F) of it, then replace the exisiting stroke color of the copy with black. Keep the black object selected and make a copy of it, then move the copy 4px down. Reselect the two black objects created in this step, open the Pathfinder palette (Window > Pathfinder) and click on the Minus Front button, then press (Ctrl +Shift +G) to ungroup this resulting group. The resulting objects should look like the fourth image below. Likewise, repeat the same process as the previous steps to create black objects for the letters “S” and “C”.

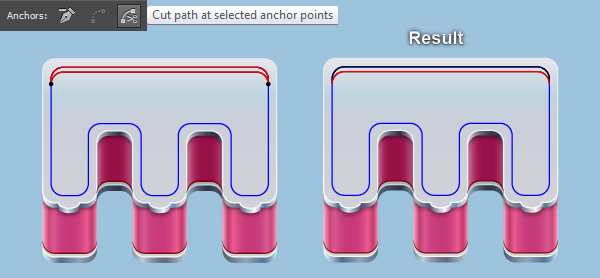
36. Select the black object of the letter “M” and make a copy (Ctrl +C, Ctrl +F) of it, then replace the exisiting stroke color of the copy with red. With the help of the Direct Selection Tool (A) along with the Shift, select two anchor points highlighted with black of the red object, then click on the “Cut path at selected anchor points” button from the Properties bar. This make the red object becomes two paths. Select the upper path and remove it. Repeat the same techniques for the remaining four letters to create more red curved paths. Also you can see them all in the final image.

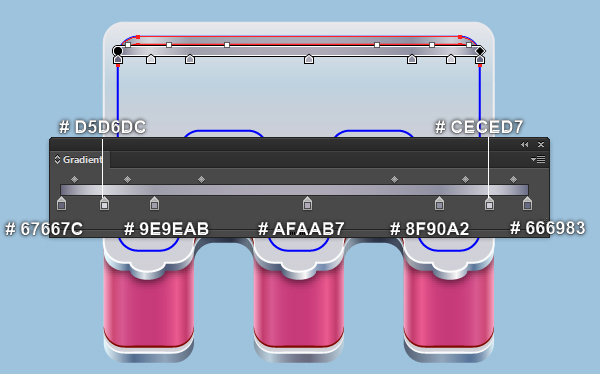
37. Select the black object of the letter “M”, remove its stroke and fill this object with the linear gradient as shown below. Keep the resulting shape selected and go to the Effect > Stylize > Drop Shadow… Follow the data like you see in the second image and click OK. Now select all black objects of the remaining four letters, then pick the Eyedropper Tool (I) and click on the shape with shadow effect applied in this step of the letter “M”.

38. Focus on the letter “M”. Select the blue object of this letter and make a copy (Ctrl +C, Ctrl +F) of it, then bring the copy to front (Ctrl +Shift +Right Square Bracket). Keep this newly created object selected, hold down the Shift and click on the shape with shadow effect applied in the step 37 of the letter “M”. Right click on the artboard and then select the Make Clipping Mask section from the drop-down menu. The clipping set should look like the second image below. Likewise, repeat the same process for the remaining four letters. You should end up with something like in the last image.

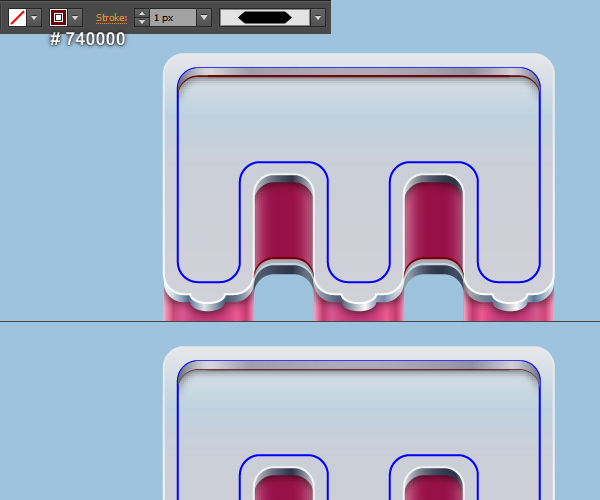
39. Select the red curved path of the letter “M”, replace the existing stroke color of it with dark red (# 740000) and apply the Width Profile 3 for the resulting path. Then hide this path behind the clipping set of the letter “M” created in the step 38. Likewise, repeat the same process for the red curved paths of the remaining four letters.

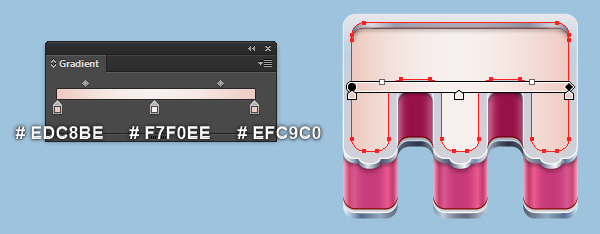
40. Focus on the letter “M”, select the blue object and remove its stroke, then fill this object with the linear gradient as shown below. Make sure that the resulting shape is still selected and go to the Effect > Stylize > Inner Glow… Follow the data like you see in the second image and click OK. Now select the blue objects of the remaining four letters, then pick the Eyedropper Tool (I) and click on the shape with Inner Glow effect applied in this step. The resulting shapes should look like the last image below.
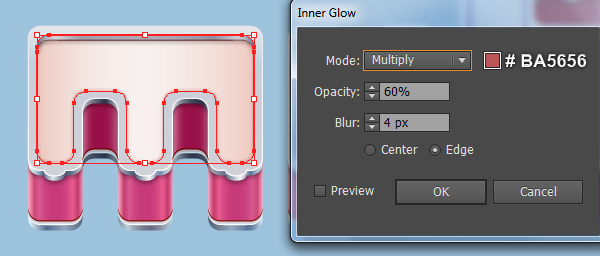

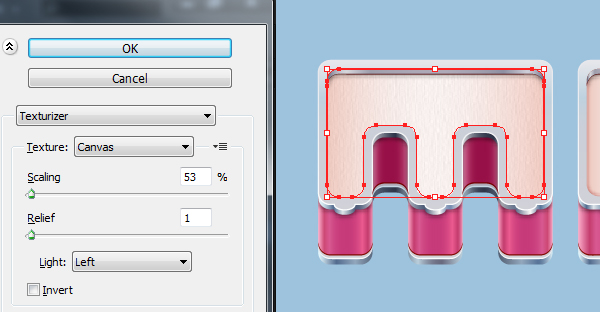
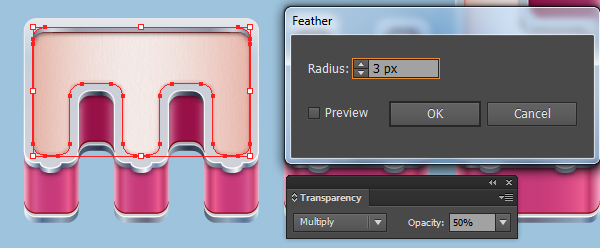
41. Select the shape with Inner Glow effect applied in the step 40 of the letter “M” and make a copy (Ctrl +C, Ctrl +F) of it. Keep this copy selected and open the Appearance palette (Window > Appearance), then remove the Inner Glow section. Make sure that the newly created shape is still selected and go to the Effect > Texture > Texturizer… Follow the data as shown below and click OK. Apply a 3px Feather effect for the resulting shape then set it to Blending Mode Multiply and reduce the Opacity to 50%. Now select the shapes with Inner Glow effect applied in the step 40 of the remaining four letters and make a copy of them. Having these copies selected, pick the Eyedropper Tool (I) and click on the shape with Texturizer effect applied in this step of the letter “M”. The resulting shapes should look like the last image below.
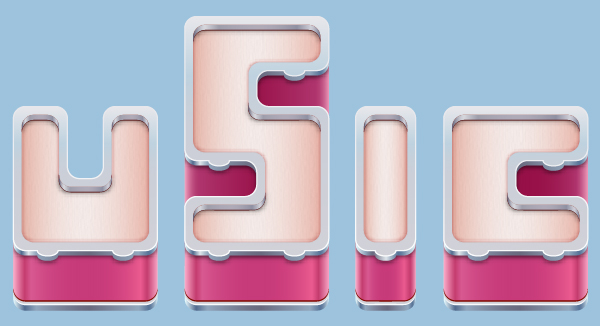
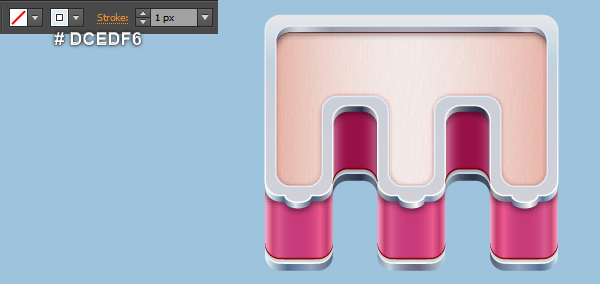
42. Select the shape with Texturizer effect applied in the step 41 of the letter “M” and make a copy (Ctrl +C, Ctrl +F) of it. Keep this copy selected and open the Appearance palette (Window > Appearance), then remove the Texturizer section. Make sure that the newly created shape is still selected, remove the fill color of it and then add a 1px white stroke (# DCEDF6). Now select the shapes with Texturizer effect applied in the step 41 of the remaining four letters and make a copy of them. Still having these copies selected, pick the Eyedropper Tool (I) and click on the white object created in this step of the letter “M”.
Create the Drum Lugs and the Tension Rods
43. Pick the Ellipse Tool (L) and create a 17 by 9px red ellipse. Make a copy (Ctrl +C, Ctrl +F) of the red ellipse and then replace the existing stroke color of the copy with black. With the Direct Selection Tool (A), select and remove the top anchor point of the black ellipse. Next select the bottom anchor point of this ellipse and move it 16px down.

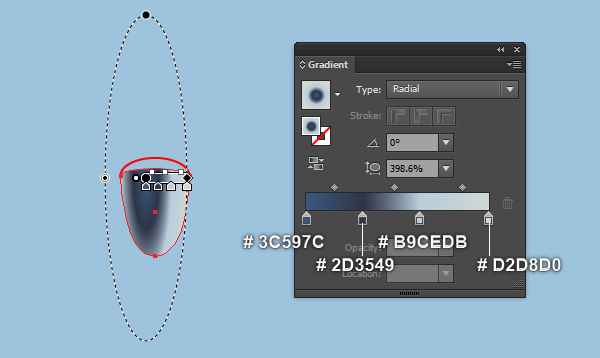
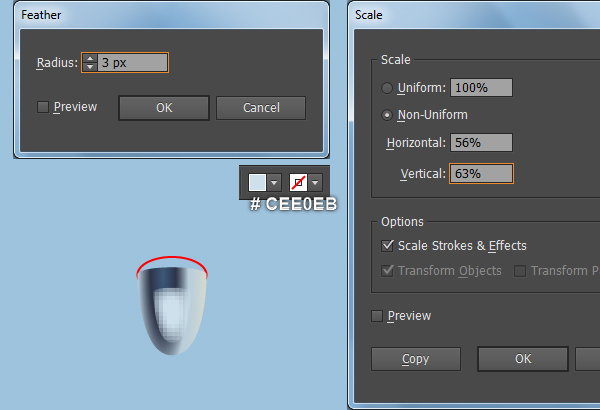
44. Select the black object created in the step 43 and remove its stroke, then fill this object with the radial gradient as shown below. Keep the resulting shape selected and go to the Object > Transform > Scale… Check the Non-Uniform, enter a 56 in the Horizontal box and 63 in the Vertical box, then click Copy. Move this copy 1px down and replace the existing color of it with light blue (# CEE0EB), then apply a 3px Feather effect for the resulting shape.
45. Select the red ellipse created in the step 43 and bring it to front (Ctrl +Shift +Right Square Bracket). Remove the stroke of this ellipse and then fill it with the linear gradient as shown below. Keep the resulting ellipse selected and make a copy of it. Add a 1px stroke (apply the linear gradient within stroke) for the newly created ellipse, then remove the fill color of it. Still having the resulting ellipse selected and go to the Object > Transform > Scale… Check the Non-Uniform, enter a 64 in the Horizontal box and 68 in the Vertical box, then click Copy. Move this copy 1px up and replace the existing color of it with black, then change the stroke weight to 0.5px.
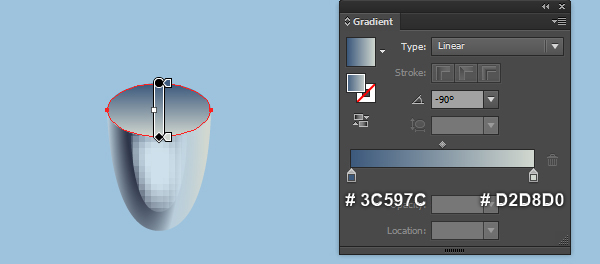
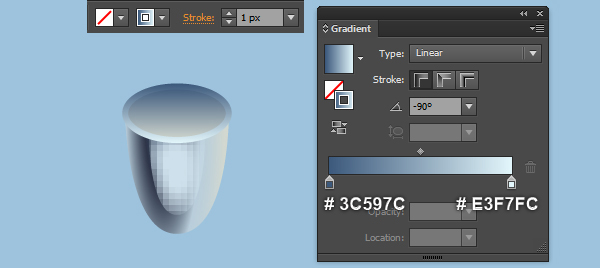
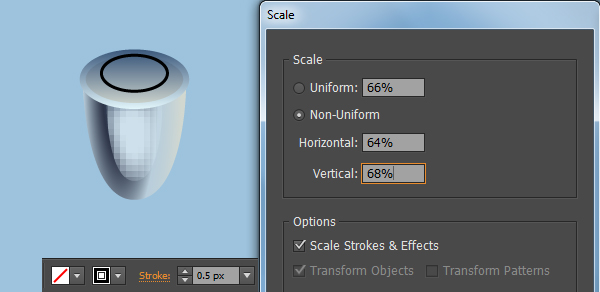
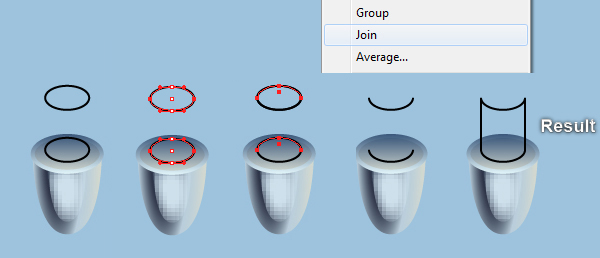
46. Select the black ellipse created in the step 45 and make a copy (Ctrl +C, Ctrl +F) of it, then move the copy 13px up. Keep the newly created ellipse selected, make a copy of it, then press (Ctrl +3) to hide the copy. Now focus on the second image, select four anchor points highlighted with red of the two black ellipses and click on the “Cut path at selected anchor points” button from the Properties bar. This make the two ellipses become four curved paths. Select the two paths like you see in the third image and remove them. Reselect the two remaining curved paths, right click on the artboard and then select the Join section from the drop-down menu. Next right click on the artboard again, then select the Join section. Still having the resulting black object selected, remove its stroke and then fill this object with the linear gradient as shown in the next to last image. Finally select and group (Ctrl +G) all objects like you see in the last image, then name this group “Lug”.
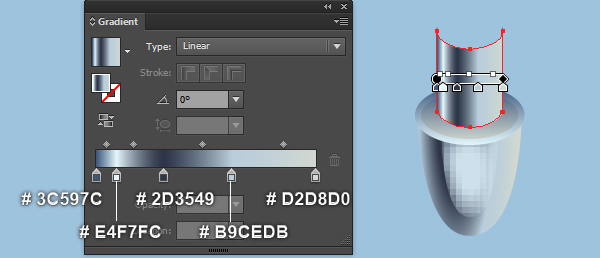
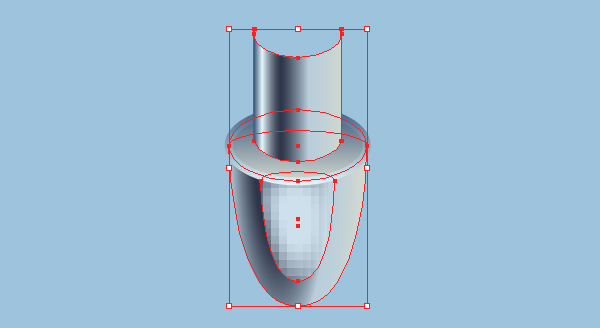
47. Before you continue, press (Ctrl +Alt +3) to show the black ellipse hidden in the step 46. Keep this ellipse selected, make a copy (Ctrl +C, Ctrl +F) of it, then move the copy 3px up and replace the existing stroke color of it with red. Reselect the black and the red ellipses, then make a copy of them and replace the existing stroke color of the copies with blue. With the help of the Direct Selection Tool (A) along with the Shift, select four anchor points highlighted with yellow and click on the “Cut path at selected anchor points” button from the Properties bar. Select two curved paths as shown in the third image and remove them. Now reselect the remaining two curved paths, right click on the artboard and then select the Join section from the drop-down menu. Next right click on the artboard again, then select the Join section. Keep the resulting object selected, then pick the Eyedropper Tool (I) and click on the shape created in the step 46. Finally select the red ellipse, bring it to front (Ctrl +Shift +Right Square Bracket), then remove its stroke and fill this ellipse with the radial gradient as shown in the last image.
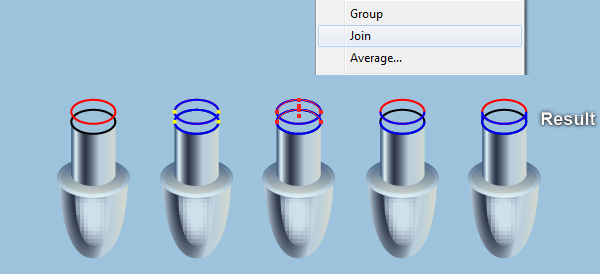
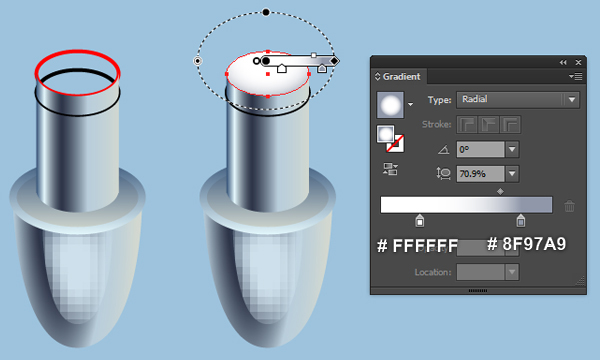
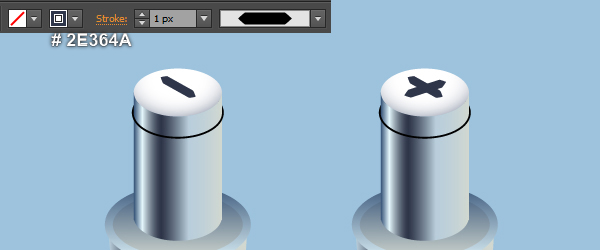
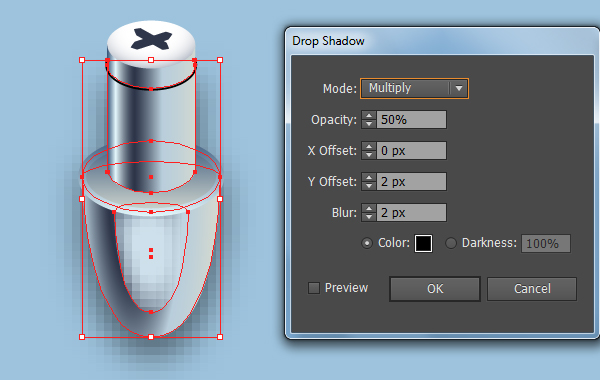
48. Using the Line Segment Tool (\) create two paths, with a 1px stroke (# 2E364A) and no fill, then apply the Width Profile 3 for these two paths. Now select and group (Ctrl + G) all objects created from beginning step 47 to this time, then name this group “Tension_Rod”. Next select the “Lug” group created in the step 46 and go to the Effect > Stylize > Drop Shadow… Follow the data like you see in the second image and click OK.
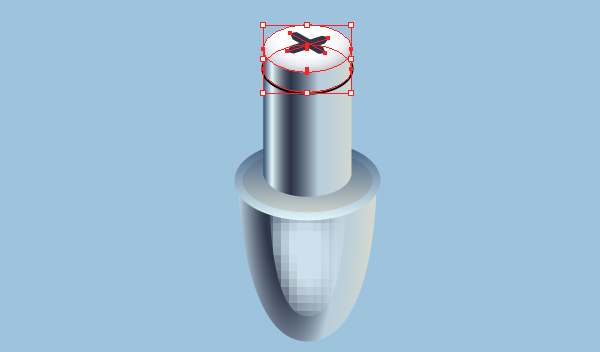
49. Select the “Lug” group created in the step 46 and the “Tension_Rod” group created in the step 48, then group (Ctrl +G) them. Make some copies of the newly created group, then focus on the letter “M” and place three newly created groups to the positions as shown below. Now select the left group created in this step and press (Ctrl +Shift +G) to ungroup this group. Next select the lower group, press (Ctrl +X) to cut it. Then pick the Selection Tool (V), click on the left magenta shape of the letter “M” and press (Ctrl +F) to paste the group was cut in this step. Repeat the same techniques for the remaining two groups created in this step. In the end they should look like the last image shown.
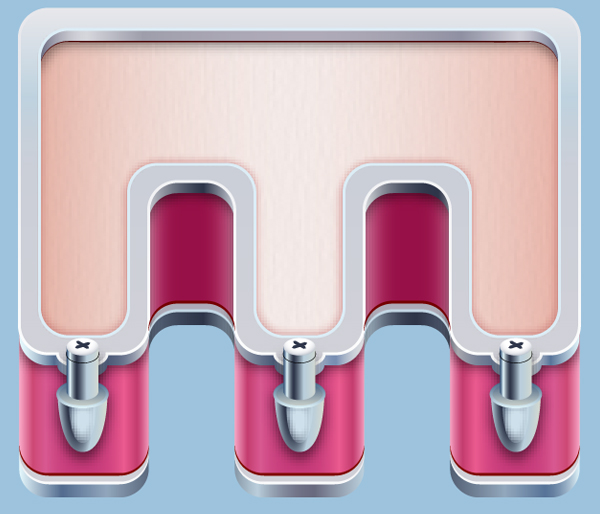
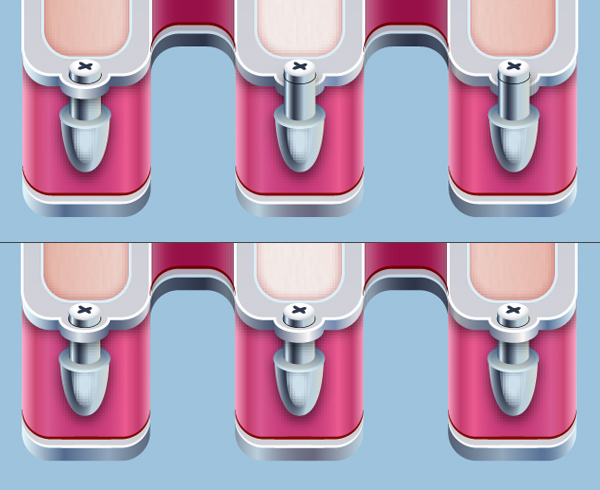
50. Likewise, repeat the same process as the previous steps for the four remaining letters.
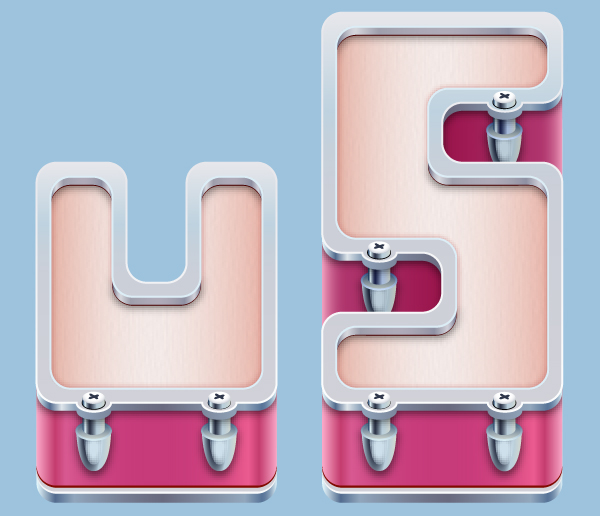
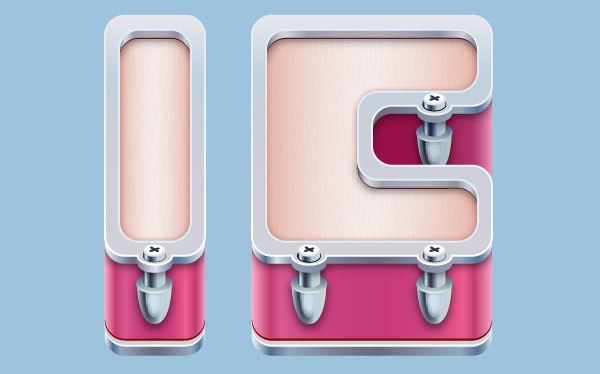
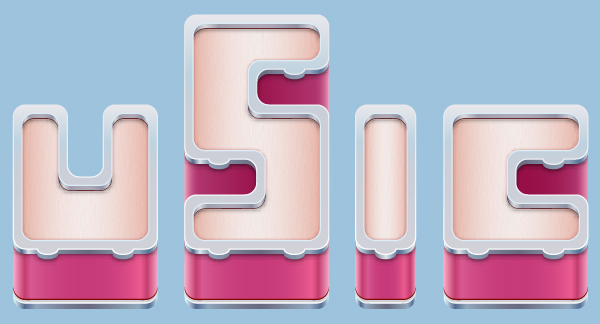
51. The drum text is ready and looks like this:
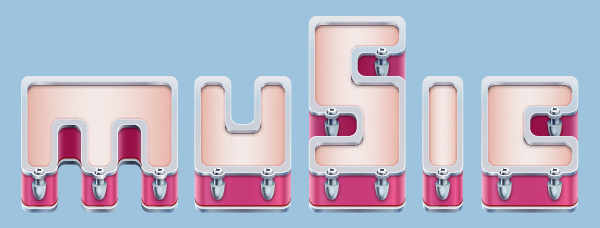
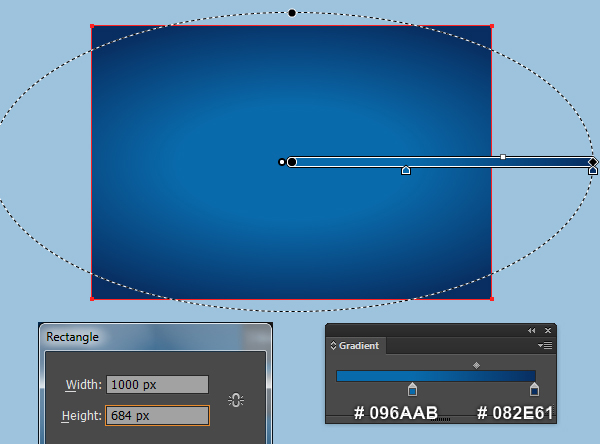
52. Pick the Rectangle Tool (M) and create a 1000 by 684px rectangle, then fill this rectangle with the radial gradient as shown below. Next place the drum text into this newly created background.

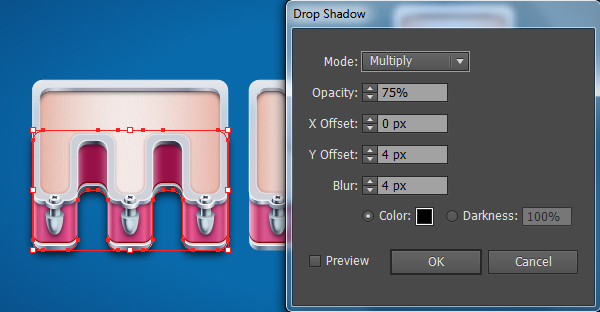
53. Select the shape created in the step 9 of the letter”M” and go to the Effect > Stylize > Drop Shadow… Follow the data as shown below and click OK. Likewise, repeat the same process for the remaining four letters to apply the Drop Shadow effect as shown in the last image.

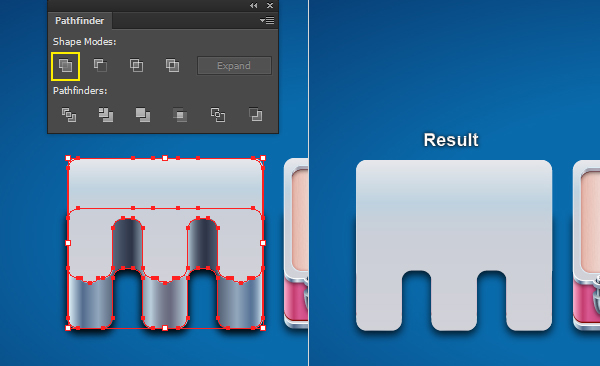
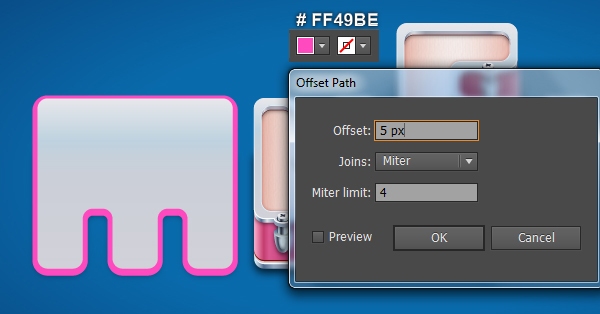
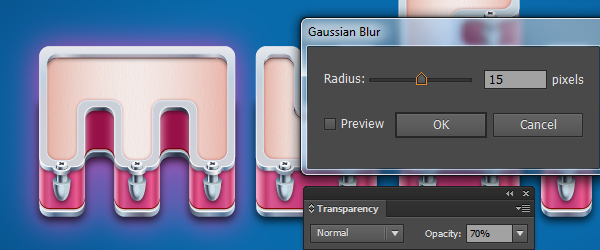
54. Focus on the letter “M”, select the white shape created in the step 20 and the shape with shadow effect applied in the step 53. Make a copy (Ctrl +C, Ctrl +F) of these two shapes and then bring the copies to front (Ctrl +Shift +Right Square Bracket). Keep the two newly created shapes selected, open the Pathfinder palette (Window > Pathfinder) and click on the Unite button. The resulting shape should look like the second image below. Still having the newly created shape selected and go to the Object > Path > Offset Path… Enter a 5px Offset and click OK, then replace the existing color of the newly created shape with magenta (# FF49BE). Reselect the white shape created in this step and remove it. Next select the magenta shape, apply a 15px Gaussian Blur effect and reduce the Opacity of the resulting shape to 70%, then hide this shape behind the letter “M”.
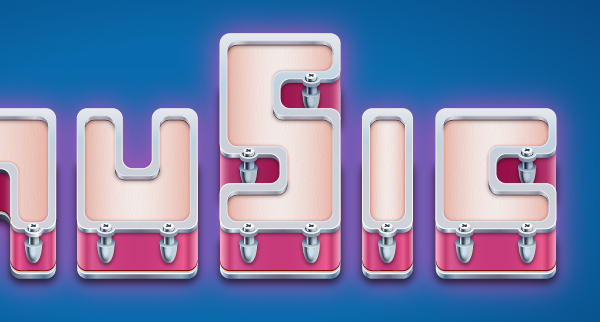
55. Likewise, repeat the same process as the previous steps for the remaining four letters. You should end up with something like this:
And We’re Done!
