In this tutorial, I’m going to show you how I create a light bulb in Adobe Illustrator. Most of the time, we’ll be using the Pen tool, so this is great practice for those struggling with drawing freehand. We’ll also use numerous techniques and effects to create this illustration. Follow the steps below and you will easily see the steps in getting the light bulb that you need.
Create a New Document
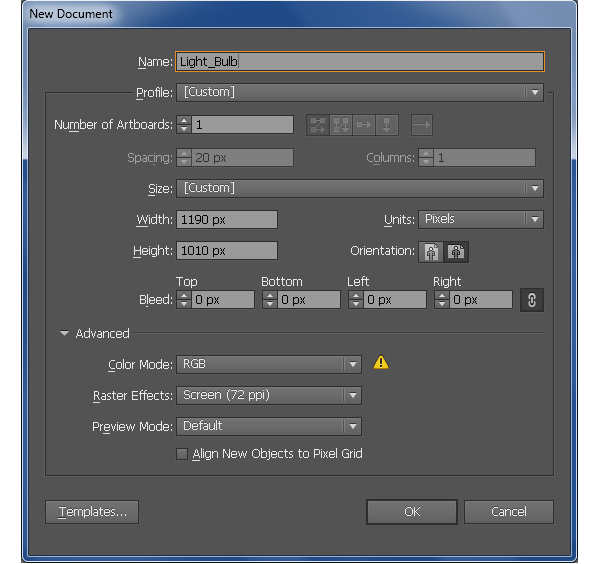
1. Launch Illustrator and then press (Ctrl + N) to create a New document. Select Pixels from the Units drop-down menu, enter 1190 in the width box and 1010 in the height box then click on the Advanced button. Select RGB, Screen (72ppi) and make sure that the Align New Objects to Pixel Grid box is unchecked before you click OK.
Create the Glass Bulb
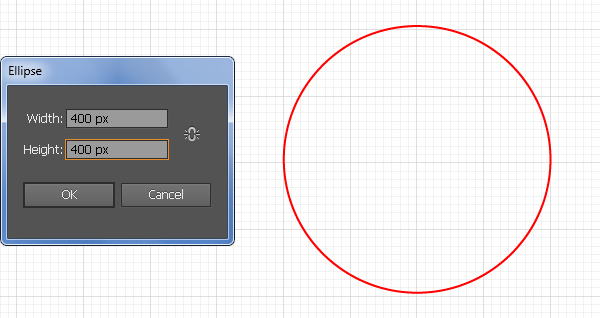
2. Pick the Ellipse Tool (L) and create a 400 by 400px ellipse. With the Direct Selection Tool (A) select the bottom anchor point of this ellipse and move it 104px down. Before you continue, show the Rulers (View > View Rulers > Show Ruler) or (Ctrl +R). Next drag a vertical guide from the Rulers (if the guide locked, go to the View > Guides > Lock Guides) or (Ctrl +Alt + ;).
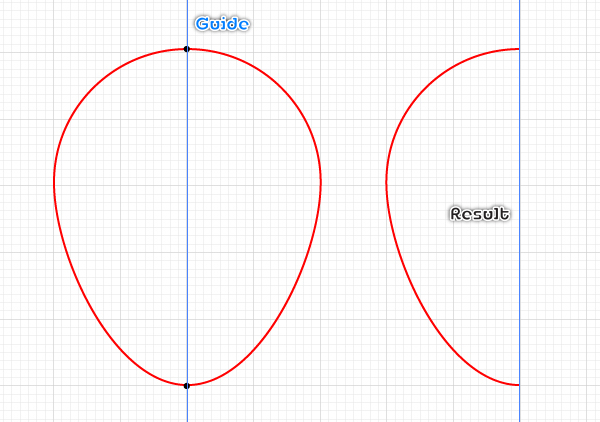
Now select the red object and the vertical guide created in this step, then open the Align palette (Window > Align) and click on the Horizontal Align Center button. With the help of the Direct Selection Tool (A) along with the Shift, select two anchor points at the top and the bottom of the red object, then click on the “Cut path at selected anchor points” button from the Properties bar. This make the red object becomes two curved paths. Select the right path and remove it.
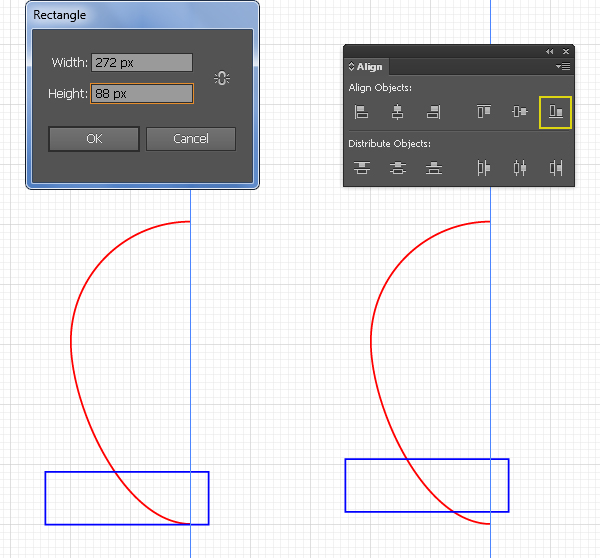
3. Pick the Rectangle Tool (M) and create a 272 by 88px rectangle, then place it to the position as shown in the first image. Make sure that the newly created rectangle is still selected, hold down the Shift and click on the red curved path created in the step 2, release the Shift and click on the red curved path again (to fixed its position).
Next open the Align palette (Window > Align) and click on the Vertical Align Bottom button. Reselect the blue rectangle and move it 21px up. Then pick the Add Anchor Point Tool (+) and click on the two points highlighted with black of the red curved path.
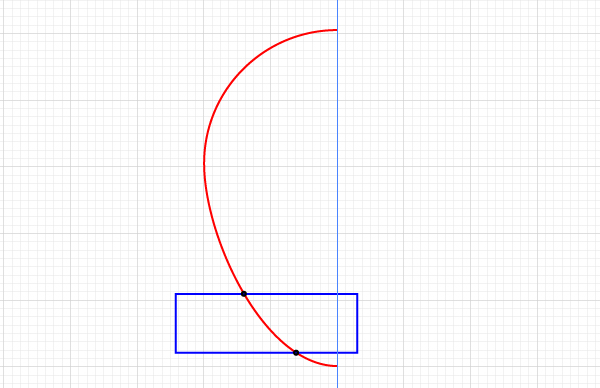
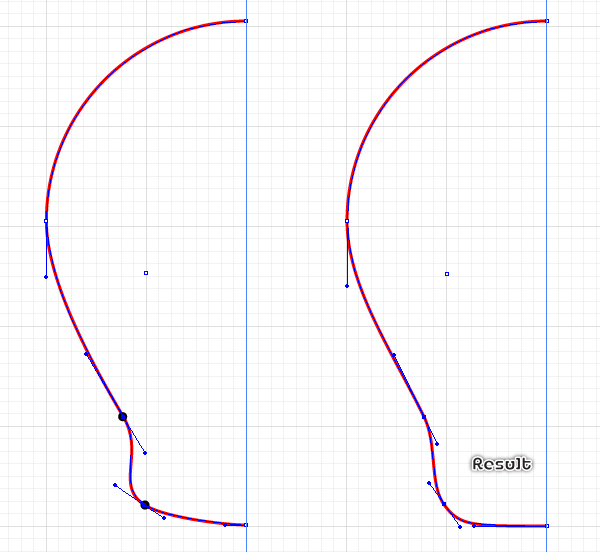
4. Before you continue, select the blue rectangle and remove it. Now select the upper anchor point highlighted with black of the red path and move it 17px to the right. Next select the lower anchor point and move it 40px to the left.
With the help of the Direct Selection Tool (A), adjust the handles of the two anchor points just moved in this step to get the result like you see in the second image.
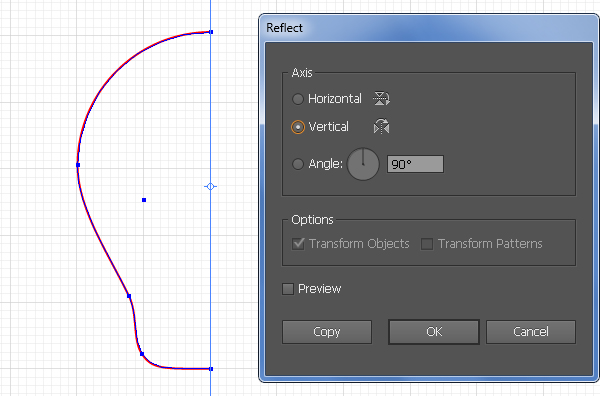
5. Select the red curved path, pick the Reflect Tool (O) and hold down the Alt, then click on the vertical guide created in the step 2. In the Reflect dialog box, check the Vertical and click Copy.
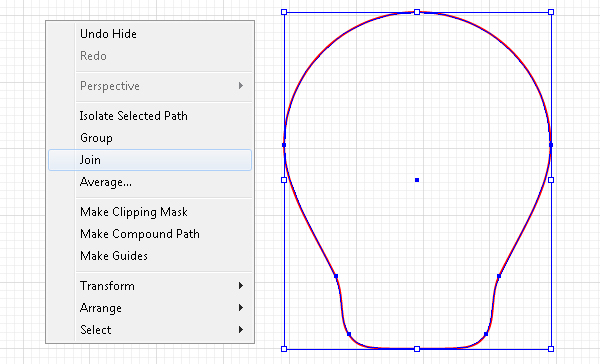
Then reselect the two red curved paths, right click on the artboard and select the Join section from the drop-down menu. Next right click on the artboard again, then select the Join section.
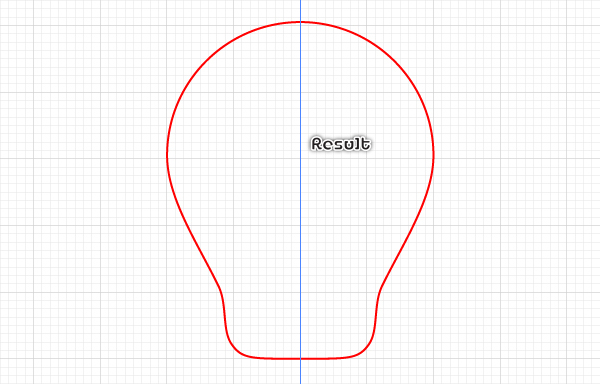
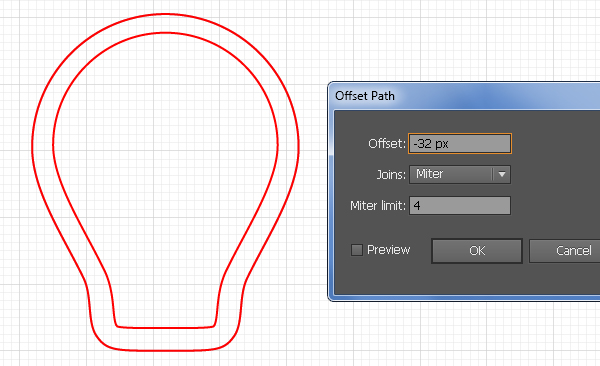
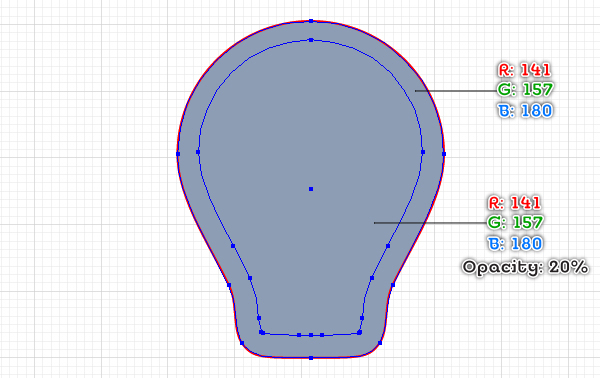
6. Select the red object created in the step 5 and make a copy (Ctrl +C, Ctrl +F) of it. Keep this copy selected and go to the Object > Path > Offset Path… Enter a -32px Offset and click OK. Make sure that the newly created object is still selected, hold down the Shift and click on a bigger red object, then fill them with R=141, G=157, B=180 (remove the stroke of them).
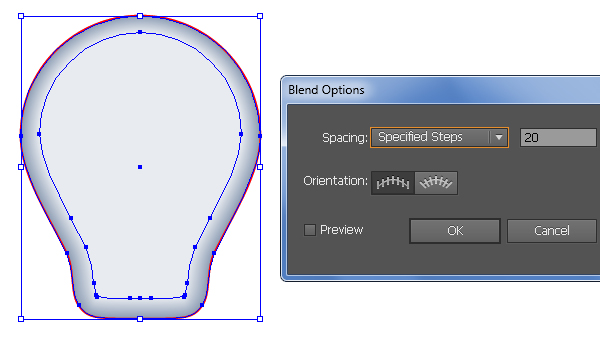
Next reselect the smaller shape and reduce its Opacity to 20%. Now select the two shapes created in this step and go to the Object > Blend > Blend Options… Follow the data as shown in the third image and click OK, then go to the Object > Blend > Make (Ctrl +Alt +B).
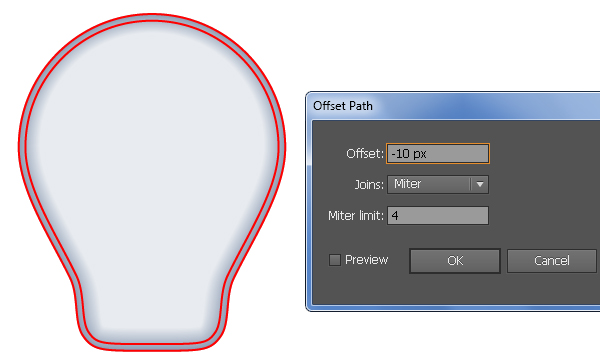
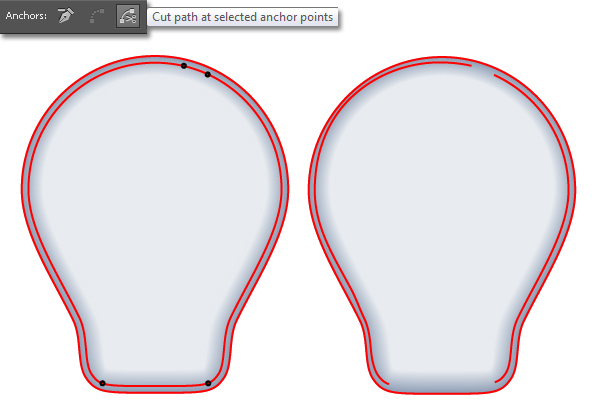
7. Select the remaining red object and go to the Object > Path > Offset Path… Enter a -10px Offset and click OK. With the Add Anchor Point Tool (+), click on the four points highlighted with black of the smaller red object. This make the smaller red object becomes four curved paths. Select the two shorter paths and remove them.
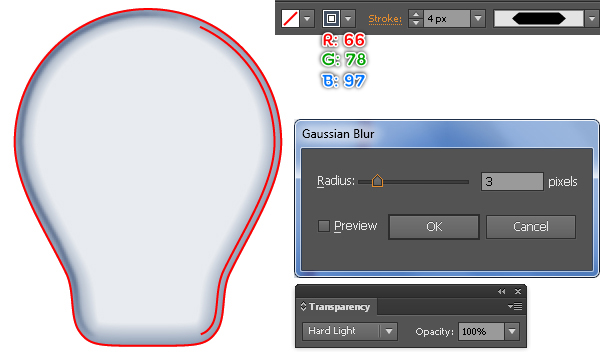
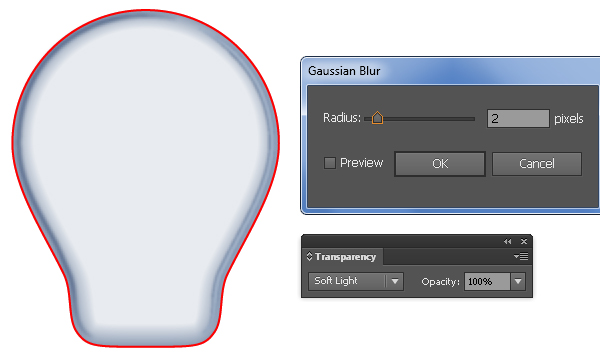
The two remaining curved paths should look like the third image below. Next select the left curved path and add a 4px stroke (R=66, G=78, B=97). Finally apply the Width Profile 3 and 3px Gaussian Blur effect for the resulting path, then change the Blending Mode of it to Hard Light.
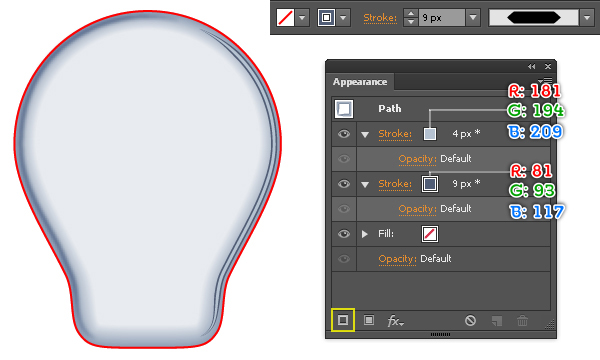
8. Select the remaining curved path and add a 9px stroke (R=81, G=93, B=117) for it, then apply the Width Profile 3 for the resulting path. Keep this path selected, open the Appearance palette (Window > Appearance), click on the Add New Stroke button (at the left-bottom corner of the Appearance palette).
This will add a second stroke for your path. Fill it with R=181, G=194, B=209 and change the stroke weight to 4px. Reselect this path and apply a 2px Gaussian Blur effect for it, then change the Blending Mode to Soft Light.
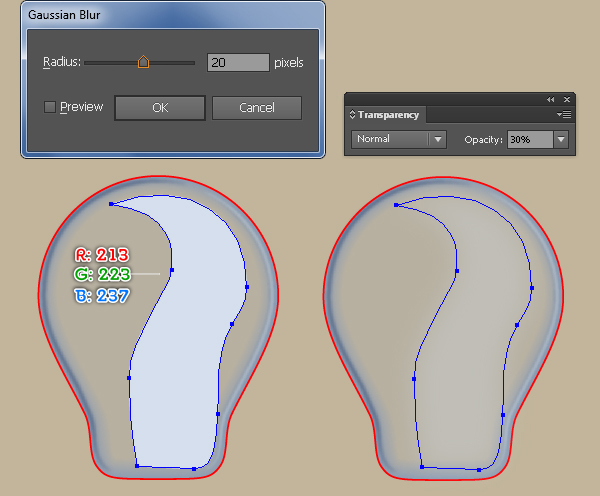
9. We are going to start making highlights on the glass bulb to give it more of a 3D look. Pick the Pen Tool (P) and create a shape (R=213, G=223, B=237) as shown below. Next apply a 20px Gaussian Blur effect for the resulting shape and then reduce its Opacity to 30%. Likewise, follow the sequence of images and draw two more shapes similar to the ones from below. Now reselect three shapes created in this step and group (Ctrl +G) them.
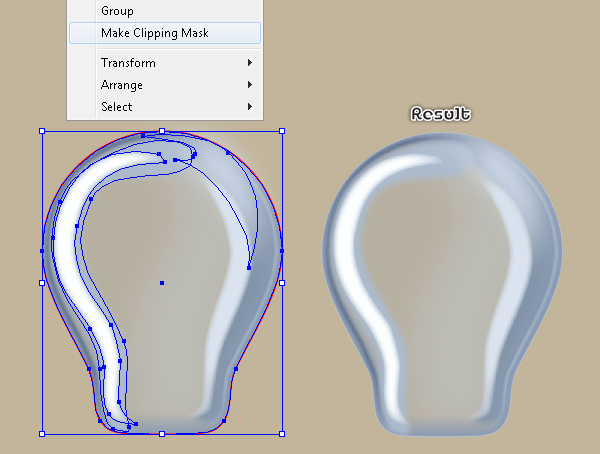
Select the red object and make a copy (Ctrl +C, Ctrl +F) of it, then bring the copy to front (Ctrl +Shift +Right Square Bracket). Keep this copy selected, hold down the Shift and click on the group created in this step, then go to the Object > Clipping Mask > Make (Ctrl +7). Finally send the clipping set to back (Ctrl +Shift +Left Square Bracket).
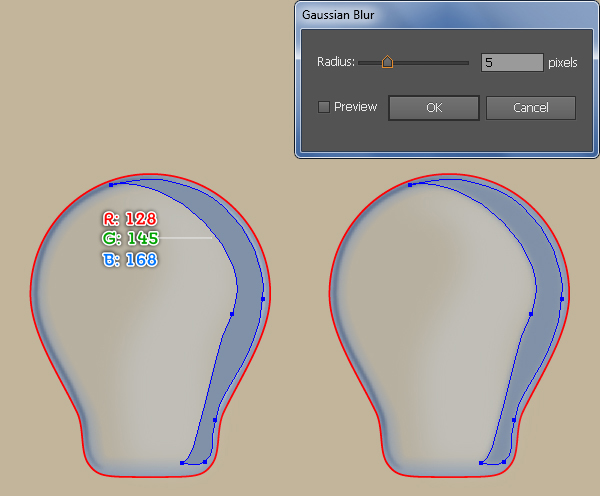
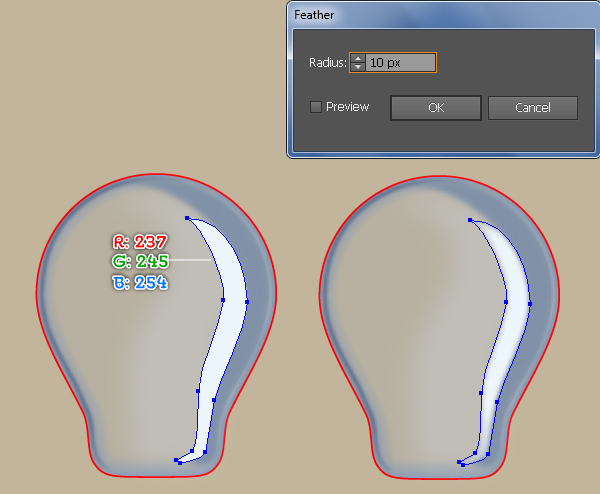
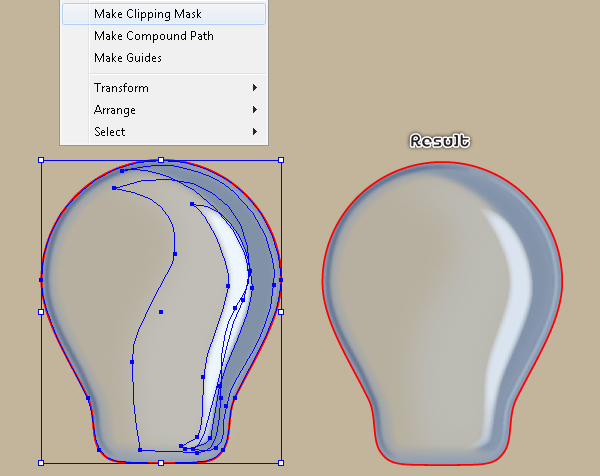
10. Follow the sequence of images and repeat the same process as the previous steps to draw three more shapes. Once your shapes are drawn, reselect and group (Ctrl +G) them. Now select the remaining red object and bring it to front (Ctrl +Shift +Right Square Bracket). Keep this red object selected, hold down the Shift and click on the newly created group, then go to the Object > Clipping Mask > Make (Ctrl +7).
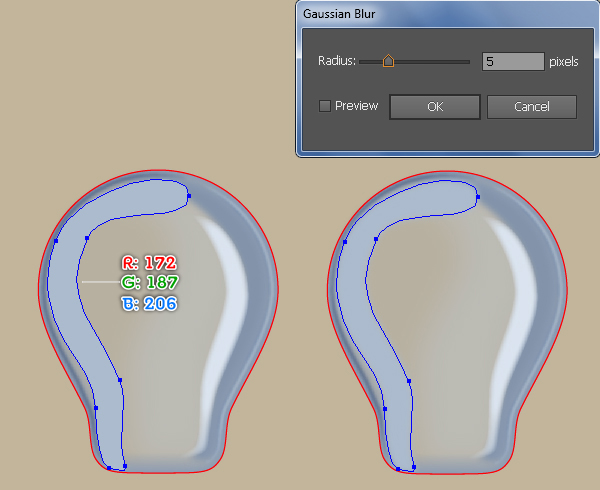
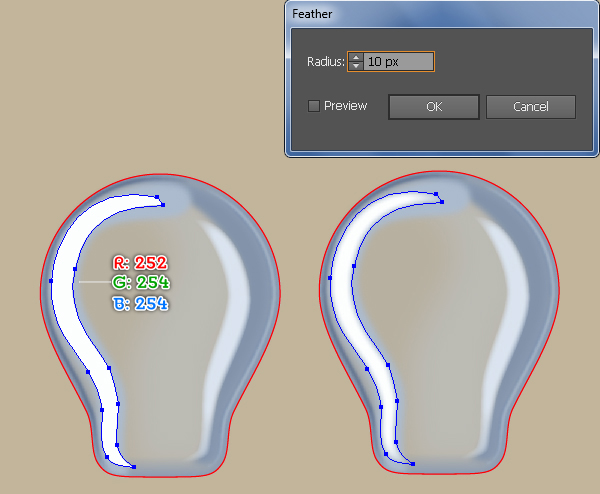
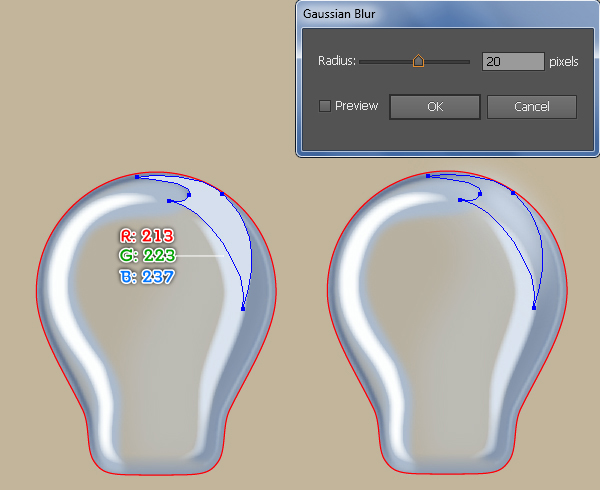
Create the Glass Mount
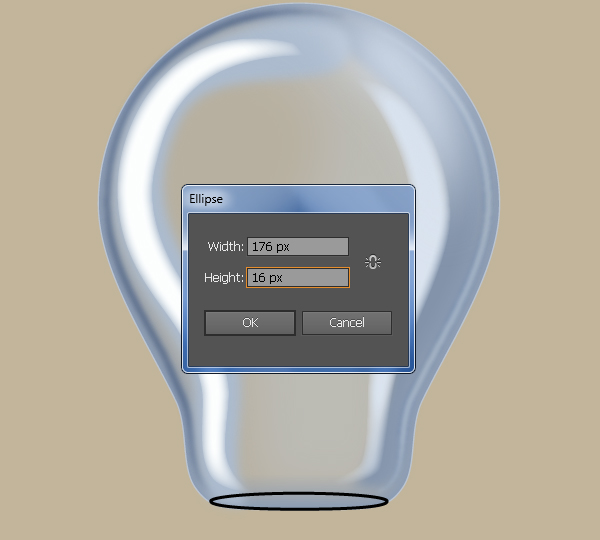
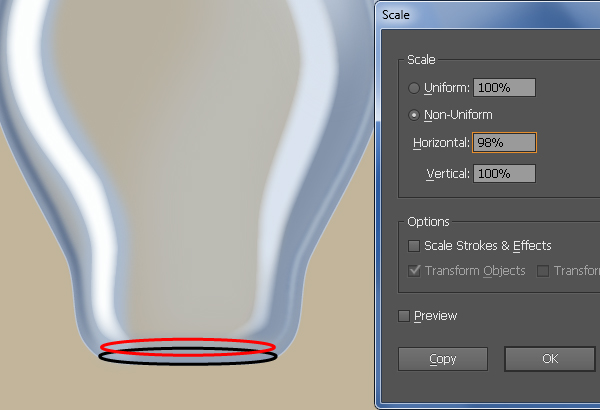
11. Pick the Ellipse Tool (L) and create a 176 by 16px ellipse, then place this ellipse to the position as shown below. Reselect the newly created ellipse and go to the Object > Transform > Scale… Check the Non-Uniform and enter a 98 in the Horizontal box, then click Copy. Replace the existing stroke color of the newly created ellipse with red and then move it 9px up.
Fill two ellipses created in this step with R=0, G=0, B=0 and remove the stroke of them. Before you continue, select the upper ellipse and make a copy (Ctrl +C, Ctrl +F) of it, then press (Ctrl +3) to hide the copy. Next reselect the two remaining ellipses and create a blend between them.
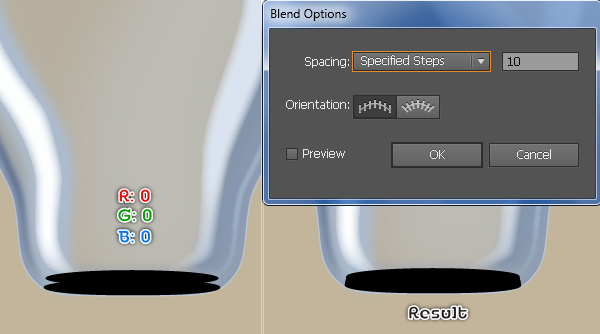
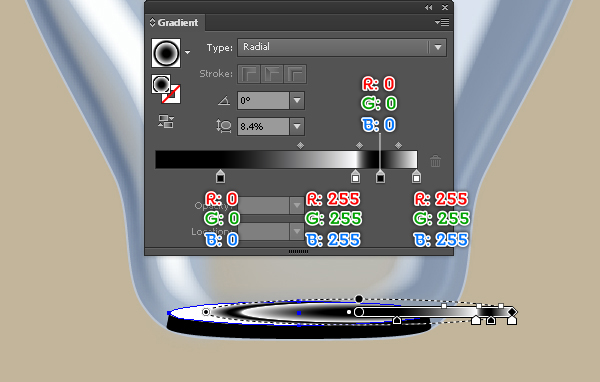
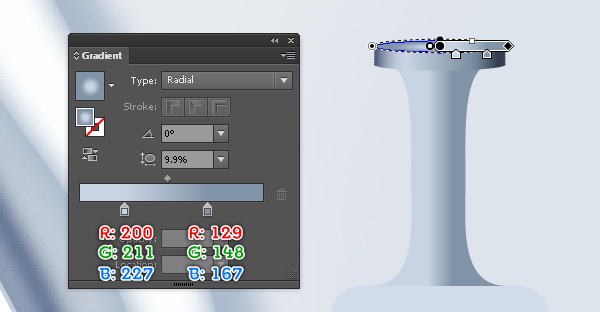
12. Press (Ctrl +Alt +3) to show the black ellipse hidden in the step 11. Next replace the existing color of it with the radial gradient as shown below.
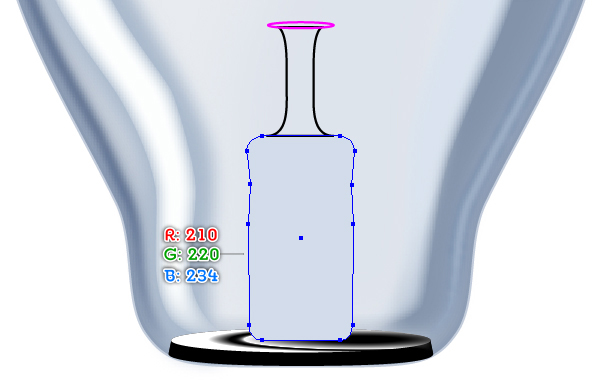
13. With the help of the Pen Tool (P), create two objects like you see in the first and the second image below. Next pick the Ellipse Tool (L) and create a 44 by 4px ellipse, then place this ellipse to the position as shown in the third image.
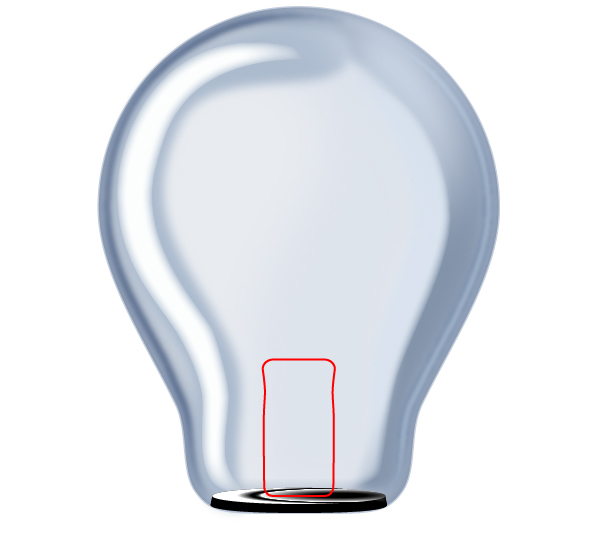
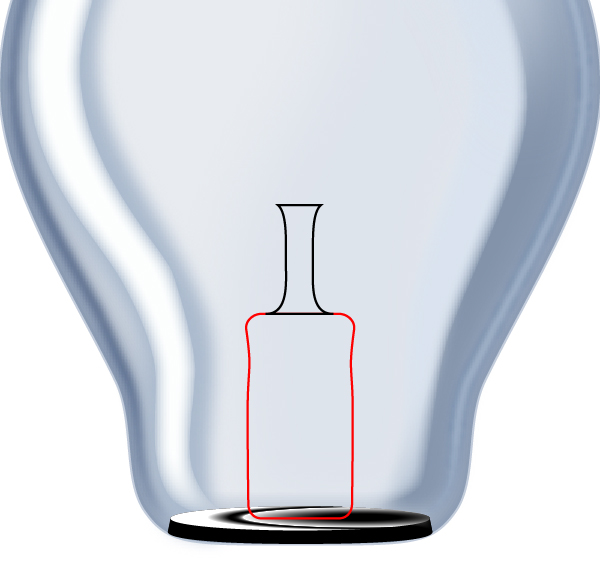
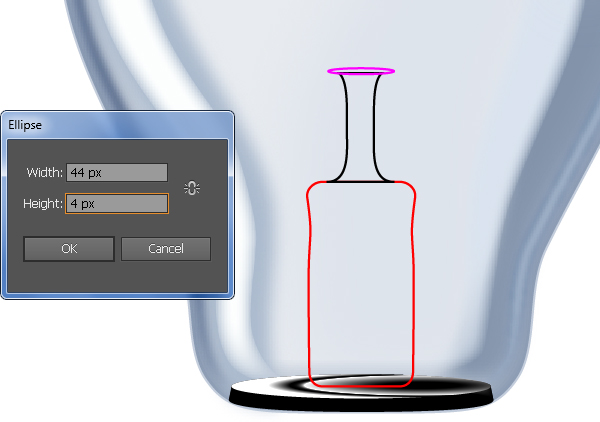
14. Fill the red object created in the step 13 with R=210, G=220, B=234. Next fill the black and the pink object with the linear gradients as shown in the second and the third image.
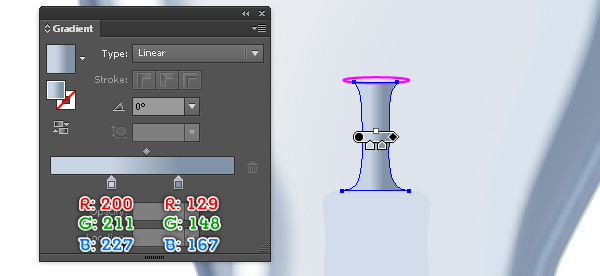
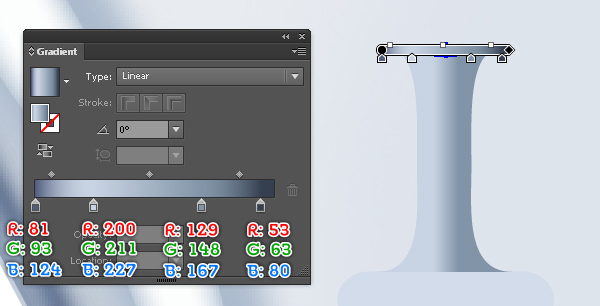
15. Select the ellipse created in the step 14 and duplicate it once (Ctrl +C, Ctrl +F), then move the copy 6px up. Before you continue, select the newly created ellipse and make a copy of it, then hide this copy. Now reselect the two remaining ellipses and create a blend between them. Next press (Ctrl +Alt +3) to show the ellipse hidden in this step and then replace the existing color of it with the radial gradient as shown in the third image.
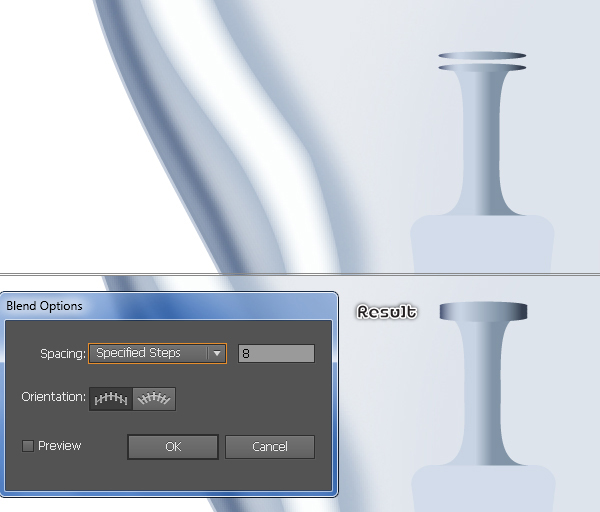
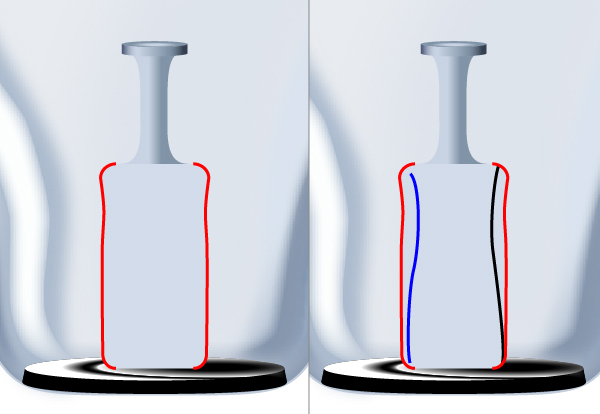
16. To add some details, first create four curved paths using the Pen Tool (P) like you see in the images below. Once your paths are drawn, reselect the two red paths and add a 5px stroke (apply the linear gradient across stroke), then apply the Width Profile 5 for the resulting paths. Next select the black path and add a 3px stroke (apply the linear gradient across stroke), then apply the Width Profile 5 for the resulting path. Finally select the remaining path and add a 4px stroke (apply the linear gradient across stroke), then apply the Width Profile 5 for the resulting path.
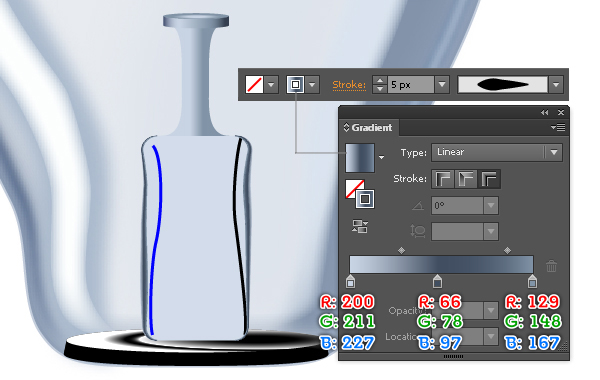
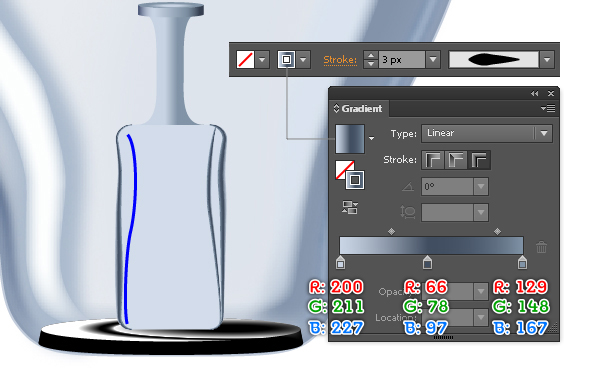
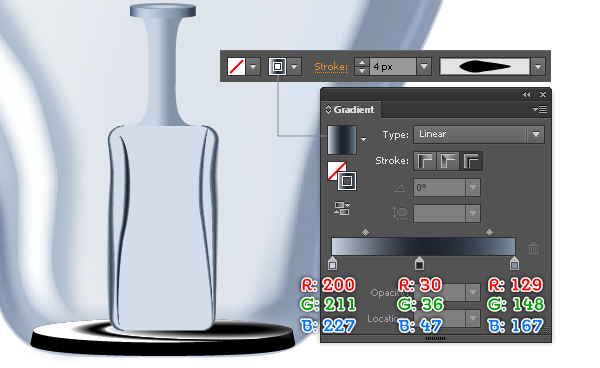
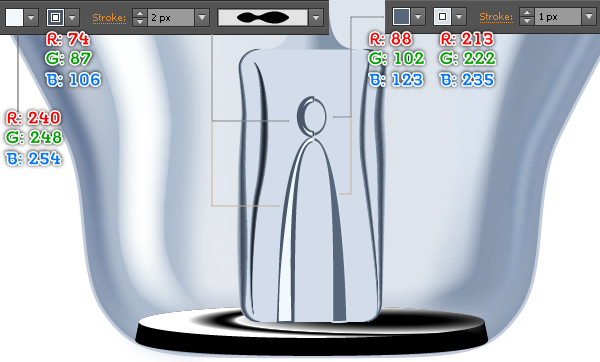
17. With the Pen Tool (P) create four objects as shown below. Once your objects are drawn, select the red and the black object, fill them with R=240, G=248, B=254 and add a 2px stroke (R=74, G=87, B=106), then apply the Width Profile 2 for the resulting shapes. Next select the blue and the pink object, fill them with R=88, G=102, B=123, then add a 1px stroke (R=213, G=222, B=235).
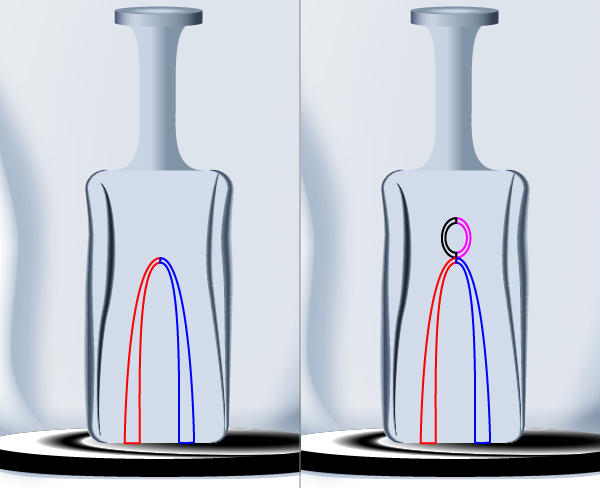
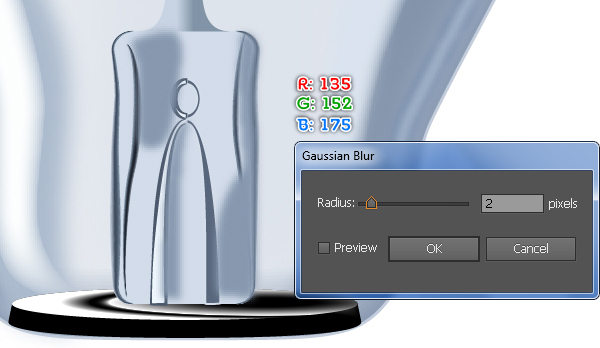
18. Pick the Pencil Tool (N) and draw three objects like you see in the first image. Next select these objects and fill them with R=135, G=152, B=175, then apply a 2px Gaussian Blur effect for the resulting shapes. Finally hide them behind the four curved paths created in the step 16.
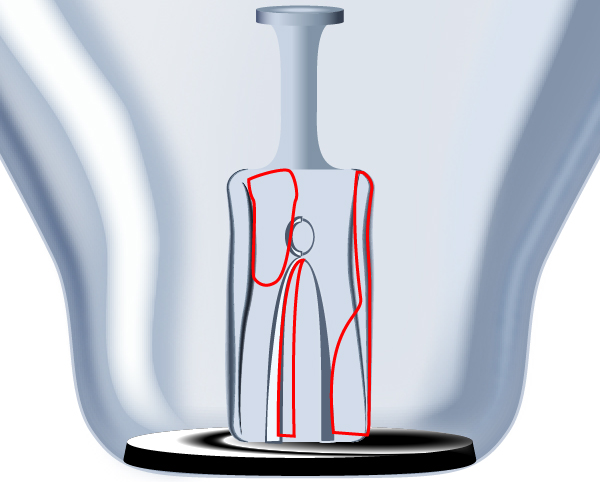
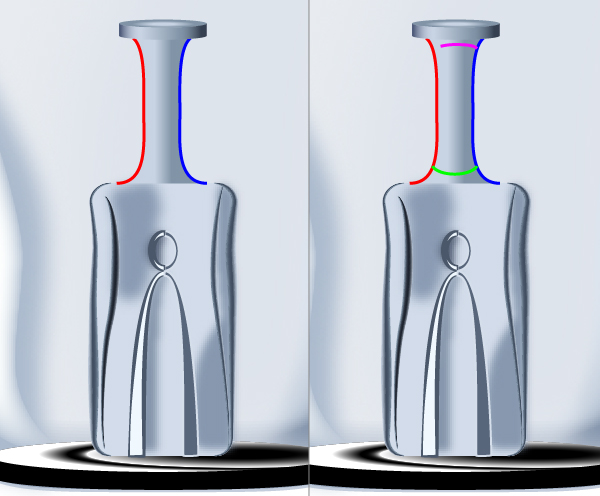
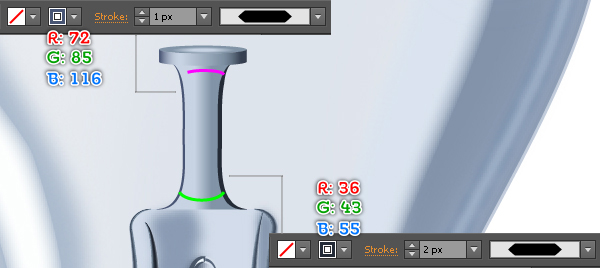
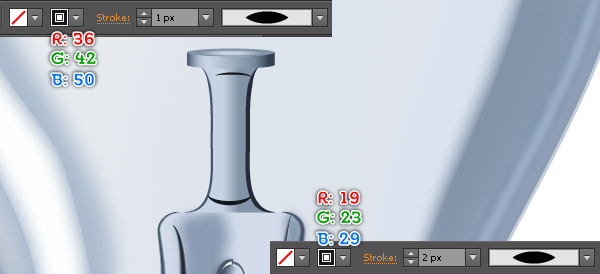
19. Pick the Pen Tool (P) and create four curved paths as shown below. Once your paths are drawn, select the red path and add a 1px stroke (R=72, G=85, B=116), then apply the Width Profile 3 for the resulting path. Next select the blue path and add a 2px stroke (R=35, G=43, B=55), then apply the Width Profile 3 for the resulting path. Now select the pink path and add a 1px stroke (R=36, G=42, B=50), then apply the Width Profile 1 for the resulting path. Finally select the remaining path and add a 2px stroke (R=19, G=23, B=29), then apply the Width Profile 1 for the resulting path.
Create the Support Wires and the Tungsten Filament
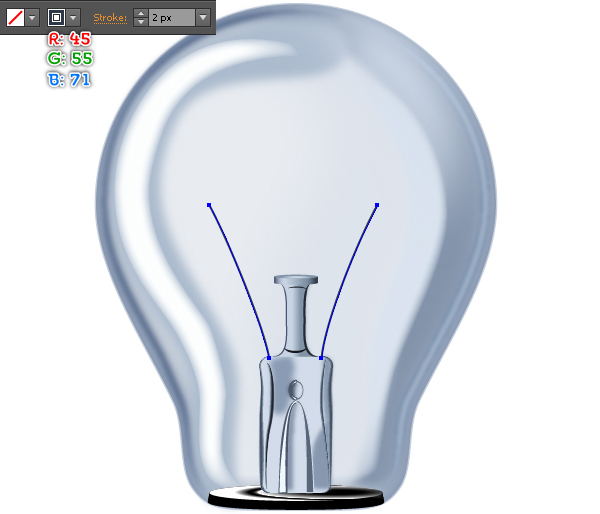
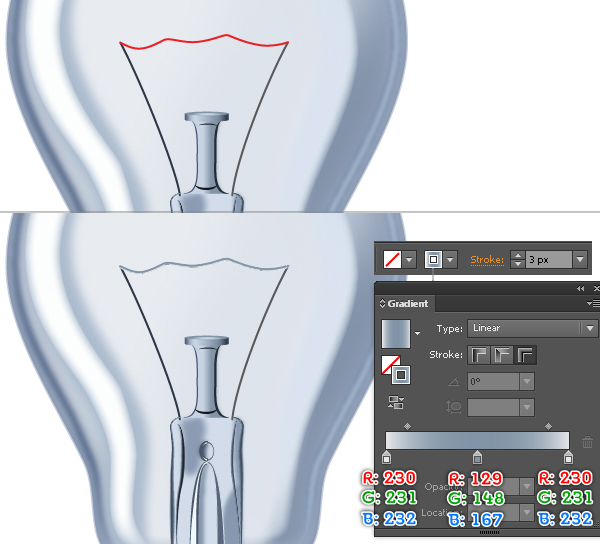
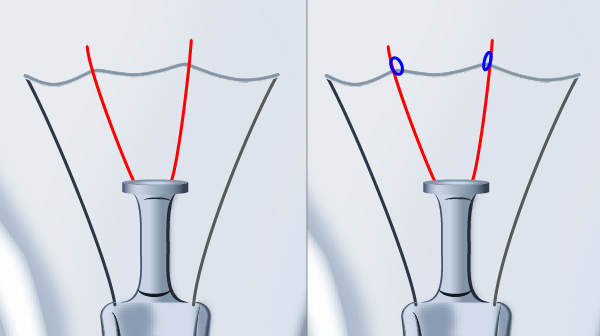
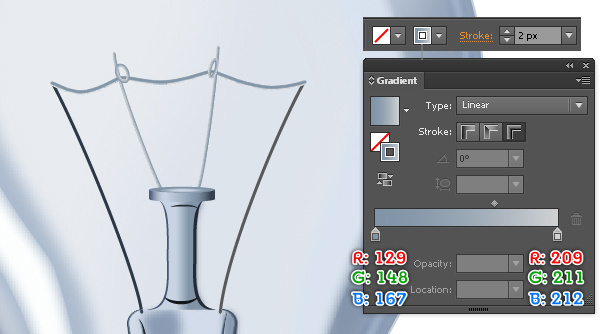
20. Draw two curved paths with the Pen Tool (P) and give them a 2px black stroke for the moment. Keep working with the Pen Tool (P) create another curved path like you see in the second image. Once your path is drawn, reselect it and add a 3px stroke (apply the linear gradient across stroke). Make sure that the Pen Tool (P) is still active, create two curved paths and two objects as shown in the fifth image. Reselect these four objects and add a 2px stroke (apply the linear gradient across stroke).
Create the Base
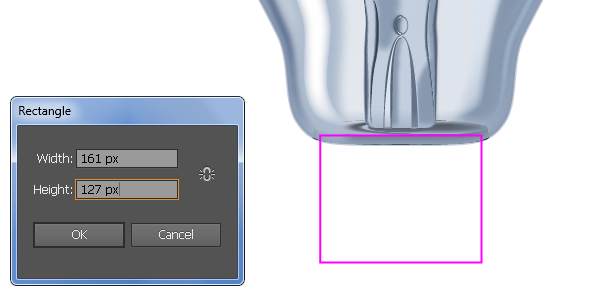
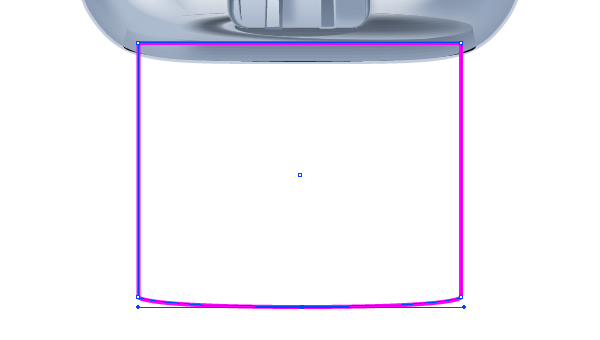
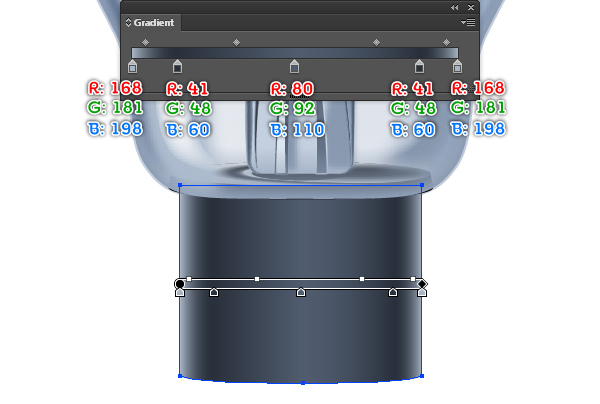
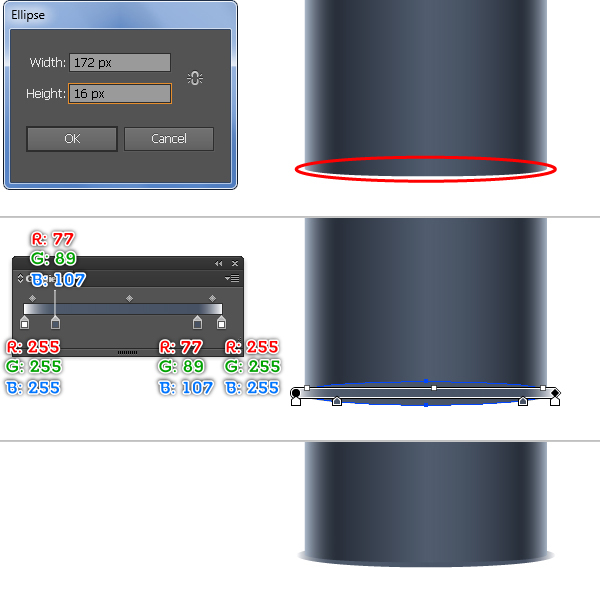
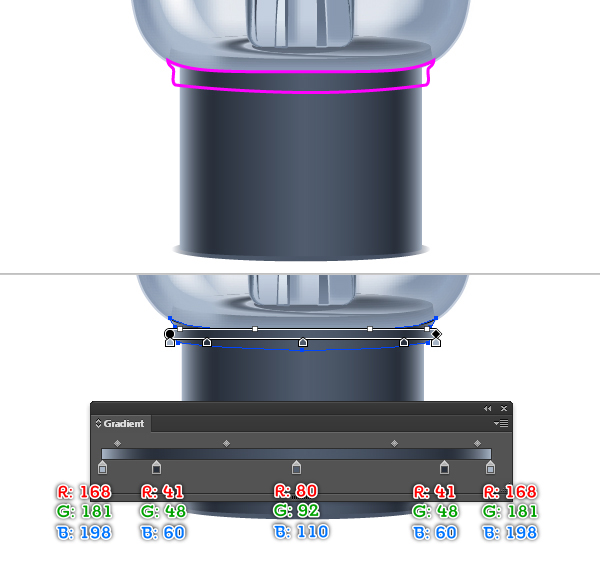
21. Pick the Rectangle Tool (M) and create a 161 by 127px rectangle, then place it to the position as shown below. Next pick the Add Anchor Point Tool (+) and click on the center of the bottom border of the rectangle to add a new anchor point. Select the newly created anchor point and move it 5px down. Then pick the Convert Anchor Point Tool (Shift +C), click on the anchor point just moved, hold mouse and drag it to the left while holding Shift. Next reselect the pink object and fill it with the linear gradient as shown in the third image. Now pick the Ellipse Tool (L) and create a 172 by 16px ellipse, then place it to the position like you see in the fourth image. Next fill this ellipse with the linear gradient as shown in the fifth image. Finally hide the resulting ellipse behind the first shape created in this step.
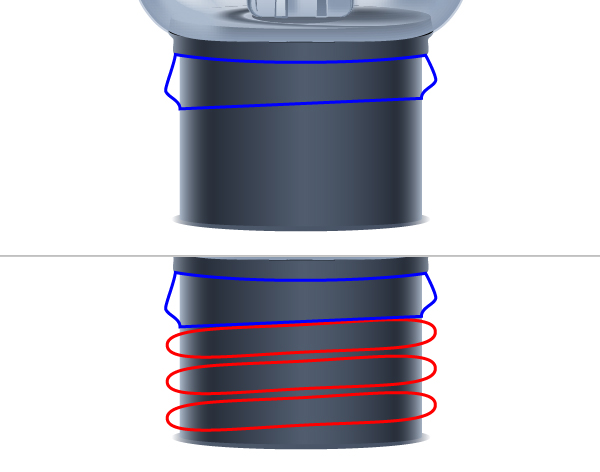
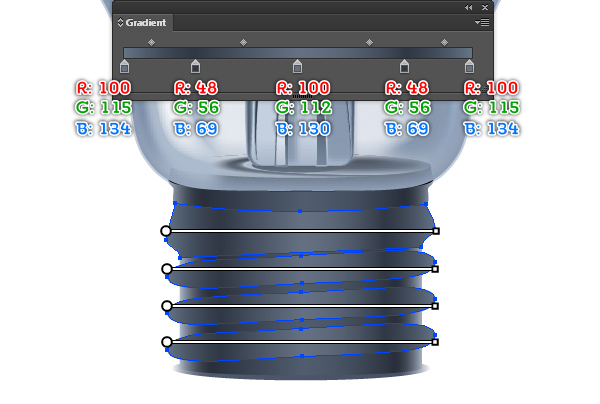
22. Pick the Pen Tool (M) and create an object as shown below. Once your object is drawn, reselect it and fill it with the linear gradient like you see in the second image. Likewise, follow the sequence of images and create four shapes similar to the ones from below.
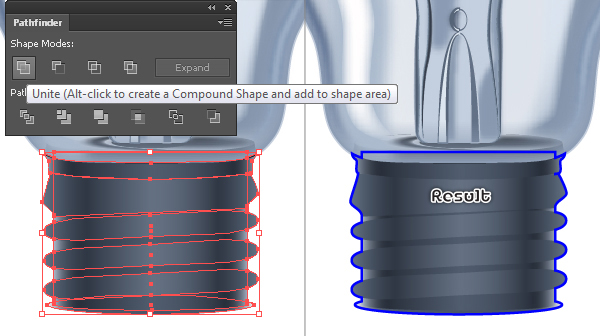
23. Before you continue, select all shapes created from beginning step 21 to this time and make a copy (Ctrl +C, Ctrl +F) of them. Keep these copies selected, open the Pathfinder palette (Window > Pathfinder) and click on the Unite button. Fill the resulting shape with none and add a 1px blue stroke, then press (Ctrl +3) to hide it. Now with the Pen Tool (P) created some red curved paths like you see in the third image. Once your paths are drawn, reselect and group (Ctrl +G) them. Make sure that the newly created group is still selected, replace the stroke color of it with R=230, G=231, B=232, then change the stroke weight to 4px. Keep the resulting group selected and apply a 2px Gaussian Blur effect for it. Now press (Ctrl +Alt +3) to show the blue object hidden in this step and then bring it to front (Ctrl +Shift +Right Square Bracket). Keep this object selected, hold down the Shift and click on the group created in this step, then go to the Object > Clipping Mask > Make (Ctrl +7).
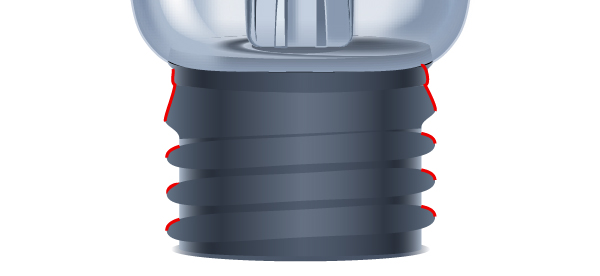
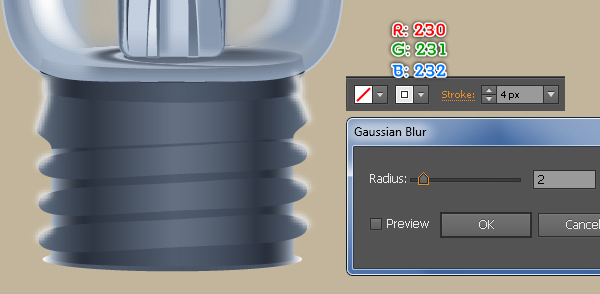
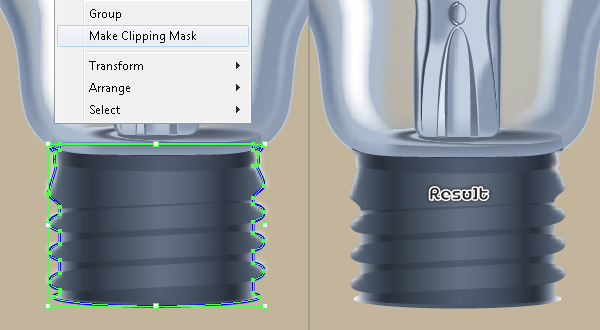
24. To add some details, first draw four curved paths using the Pen Tool (P) like in the image. Once your paths are drawn, reselect them and add a 3px stroke (apply the linear gradient within stroke). Then apply the Width Profile 3 and a 2px Gaussian Blur effect for the resulting paths.
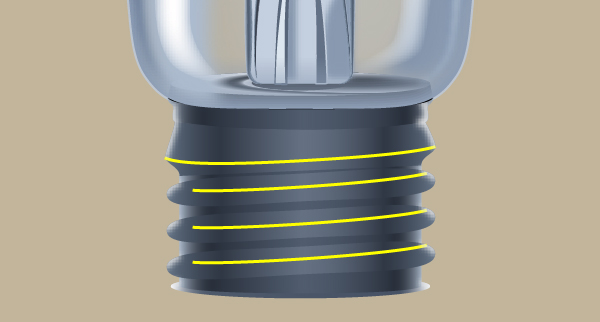
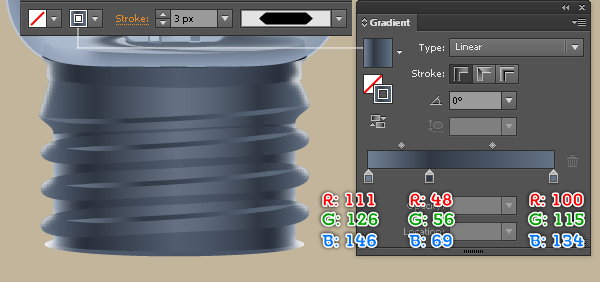
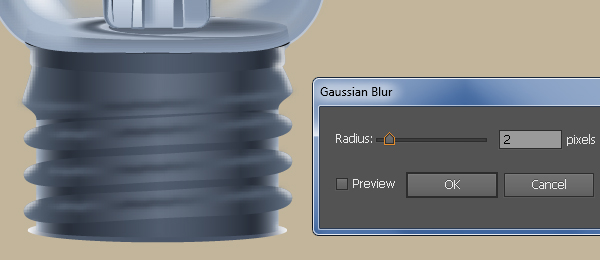
25. To give a more realistic look I’m going to be adding some highlights on the base. Pick the Pen Tool (P), follow the sequence of images and create some curved paths similar to the ones from below.
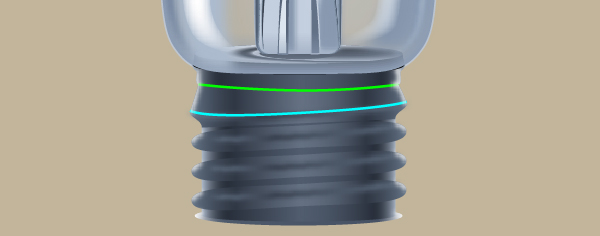
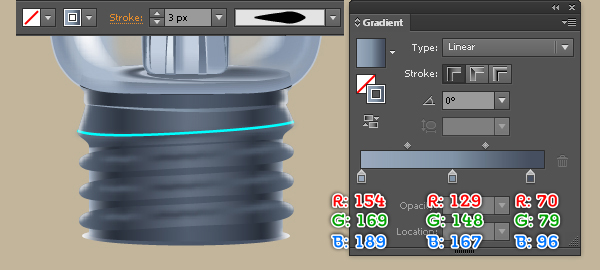
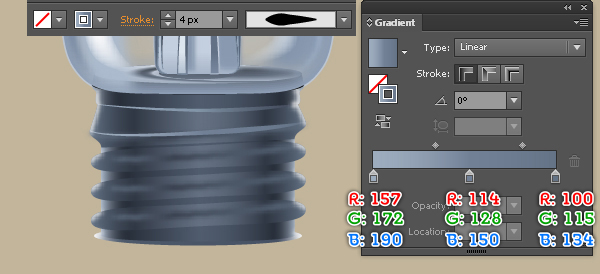
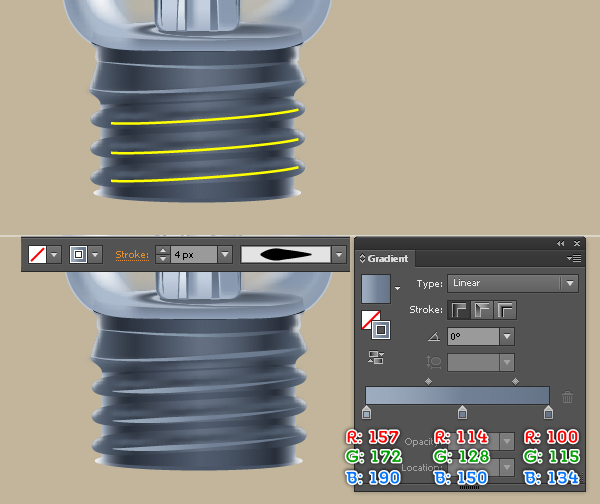
26. Keep working with the Pen Tool (P), create an object as shown below. Once your object is drawn, select it and make a copy (Ctrl +C, Ctrl +F) of it, then fill the copy with the linear gradient like you see in the second image. Next select the original object created in this step and bring it to front (Ctrl +Shift +Right Square Bracket). Focus on the third image, with the help of the Direct Selection Tool (A) along with the Shift, select four anchor points highlighted with blue and then click on the “Cut path at selected anchor points” button from the Properties bar. This make the red object becomes four curved paths. Select the lower path and remove it. Select the upper path and add a 2px stroke (apply the linear gradient within stroke), then apply the Width Profile 1 for the resulting path. Next select the two remaining paths and add a 2px stroke (R=42, G=50, B=62), then apply a 2px Gaussian Blur effect for the resulting paths. Now select the shape created in this step and make a copy of it, then bring the copy to front. Keep the newly created shape selected, hold down the Shift and click on the two paths with blur effect applied in this step, then go to the Object > Clipping Mask > Make (Ctrl +7).
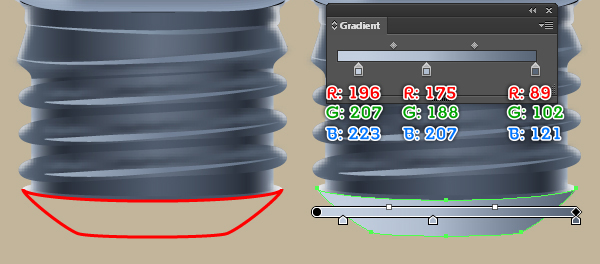
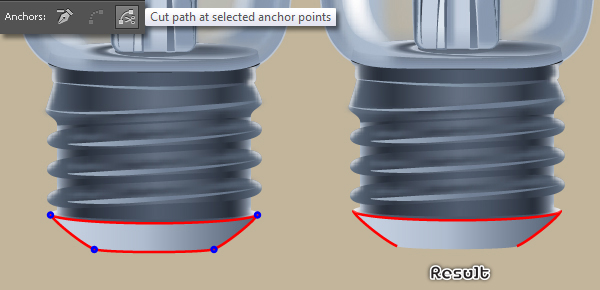
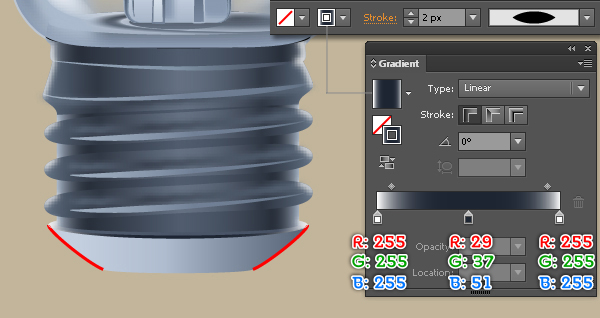
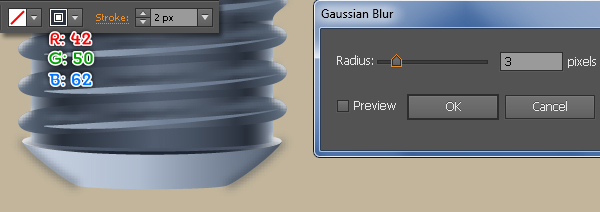
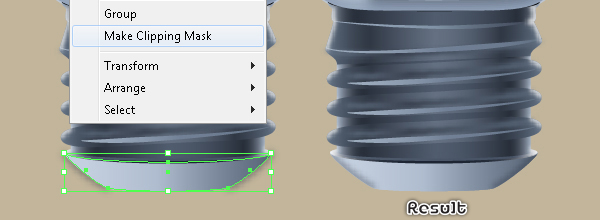
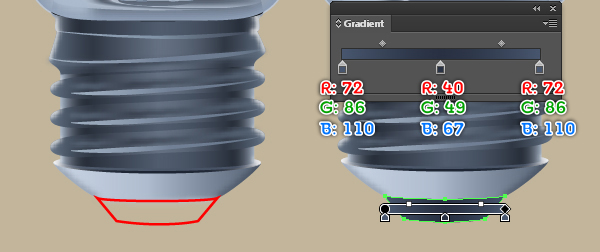
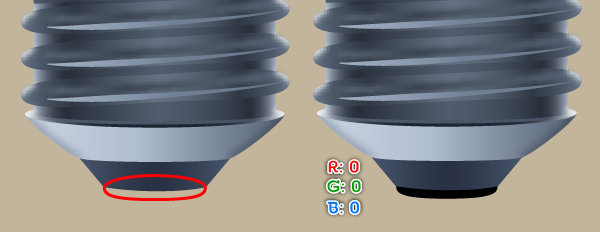
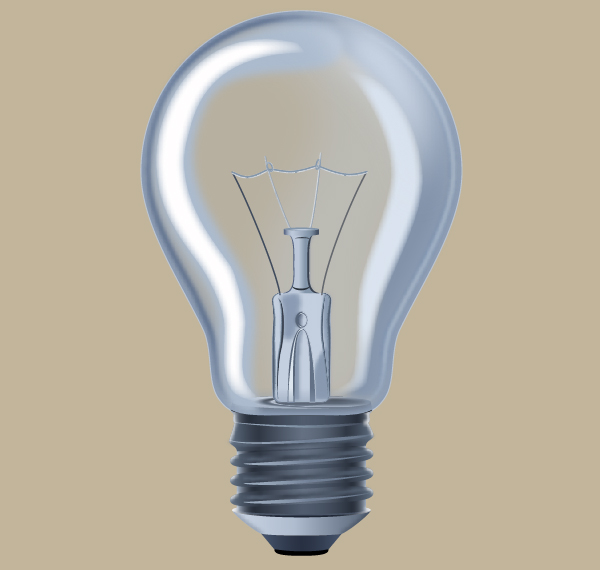
27. With the Pen Tool (P) create an object and then fill this object with the linear gradient as shown below. Make sure that the Pen Tool (P) is still active, create an object like you see in the third image. Once your object is drawn, fill it with R=0, G=0, B=0 and then send the resulting shape to back (Ctrl +Shift +Left Square Bracket). Now select and group (Ctrl + G) all objects created from beginning step 2 to this time. The light bulb is ready and looks like the final image.
Create the Background
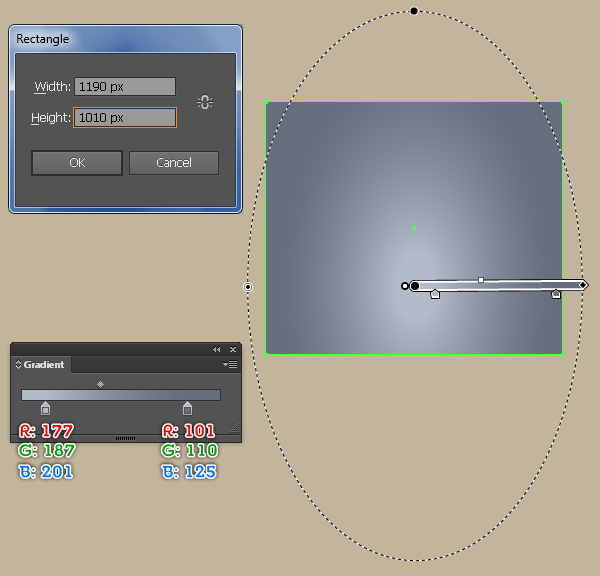
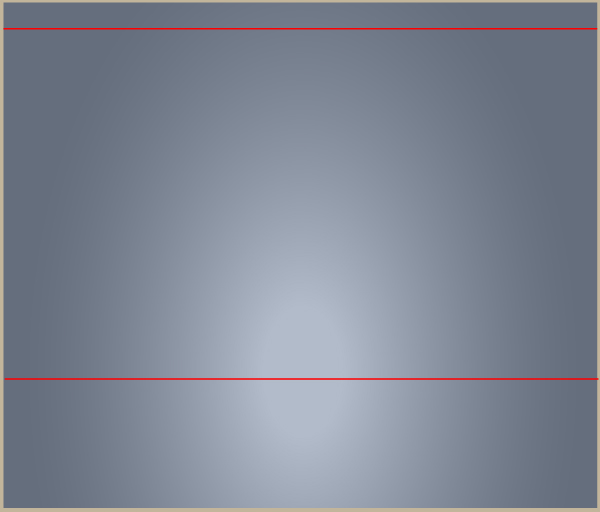
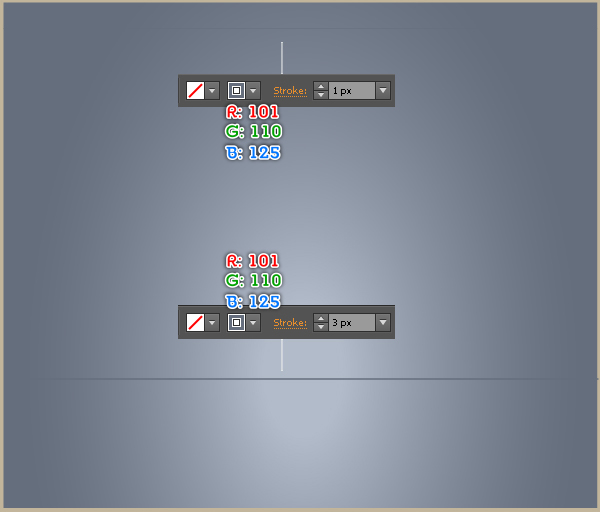
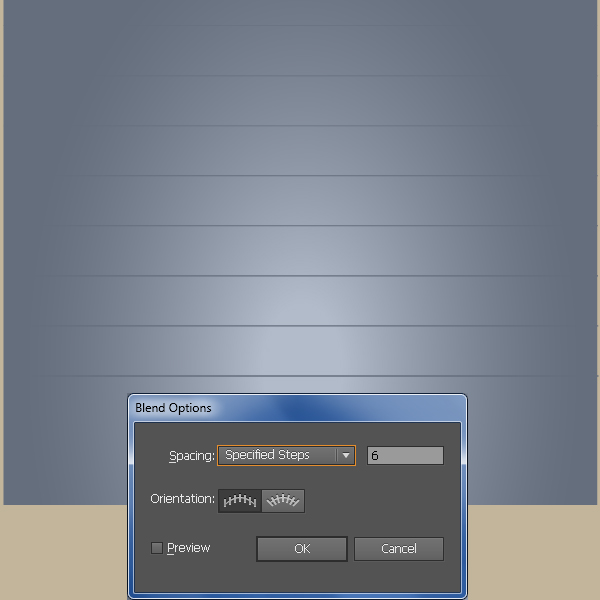
28. Pick the Rectangle Tool (M) and create a 1190 by 1010px rectangle, then fill it with the radial gradient as shown below. Next with the Line Segment Tool (\) create two horizontal lines, with a red stroke and no fill, then place these lines to the positions as shown in the second image. Select the upper line and add a 1px stroke (R=101, G=110, B=125). Then select the remaining line and add a 3px stroke (R=101, G=110, B=125). Now reselect the two newly created lines and create a blend between them. Finally place the light bulb group into the newly created background.

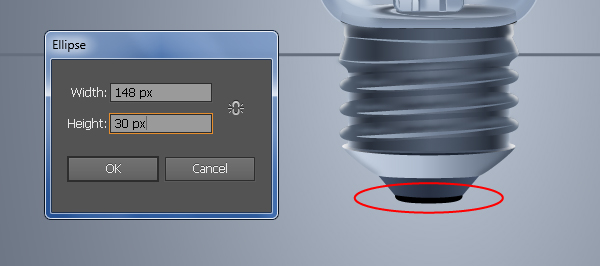
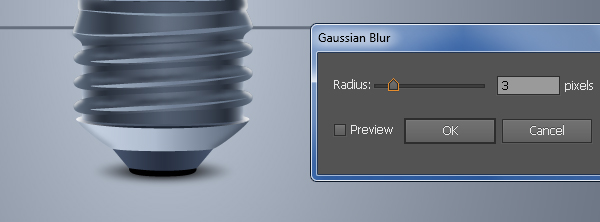
29. Pick the Ellipse Tool (L) and create a 148 by 30px ellipse, then place it to the position as shown below. Fill the newly created ellipse with the radial gradient like you see in the second image. Next apply a 3px Gaussian Blur effect for the resulting ellipse and then hide it behind the light bulb.
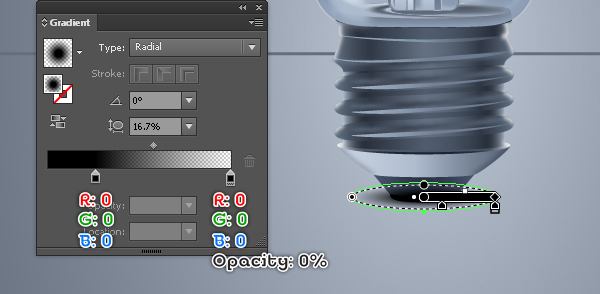
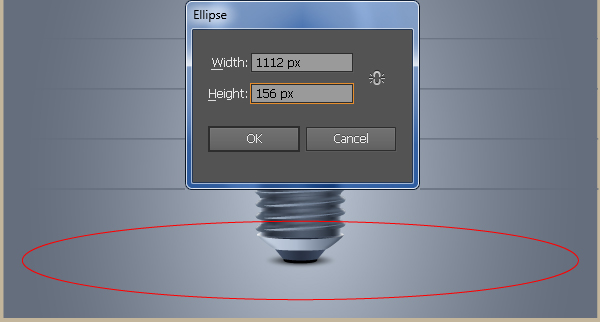
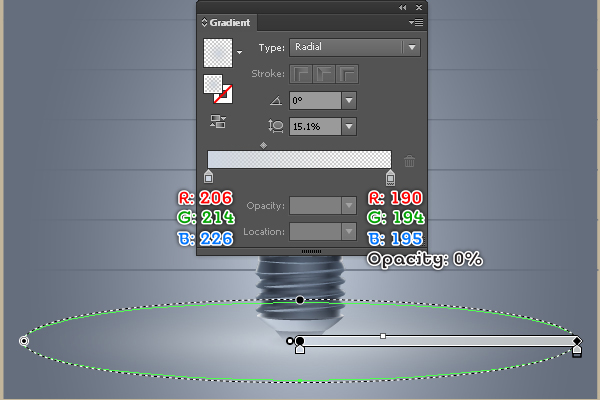
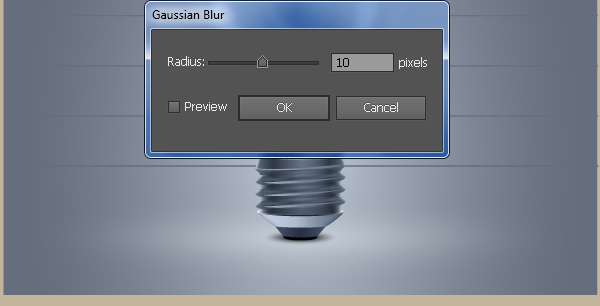
30. Continue create a 1112 by 156px ellipse using the Ellipse Tool (L) and then place it to the position as shown below. Fill the newly created ellipse with the radial gradient like you see in the second image. Next apply a 10px Gaussian Blur effect for the resulting ellipse and then hide it behind the ellipse created in the step 29. We are done with the light bulb for the moment.
And We’re Done!


