This is a step by step tutorial on how to prepare a vector artwork and submit it to microstock sites.
About a half a year ago we wrote about the popularity of vectors in Microstock Industry:
In the microstock world, photographs seem to have reached the saturation point with intense competition and tens of thousands of very talented photographers that have contributed to the supply overtaking demand, always a very bad sign for prices and profits to the producer.
But with the continuing rise of vector illustrations to the top of the bestseller lists at all the major microstock agencies, and with the easy availability of some fantastic tools like Adobe Illustrator, CorelDraw and Inkscape, the freeware alternative, there is a great opportunity for talented designers and illustrators to jump on the bandwagon and make some serious money. Read the whole article
Today we will create a simple but attractive vector artwork for sale on Microstock sites like Depositphotos, Fotolia, Shutterstock, Istockphoto, Dreamstime, etc. You will learn to use basic tools of Adobe Illustrator, use scripts to facilitate the preparing process and use Adobe Bridge.
Let’s get started by creating a new file. Set the width to 1024px and the height to 768px. Set the color mode to CMYK and the resolution to Screen (72ppi).
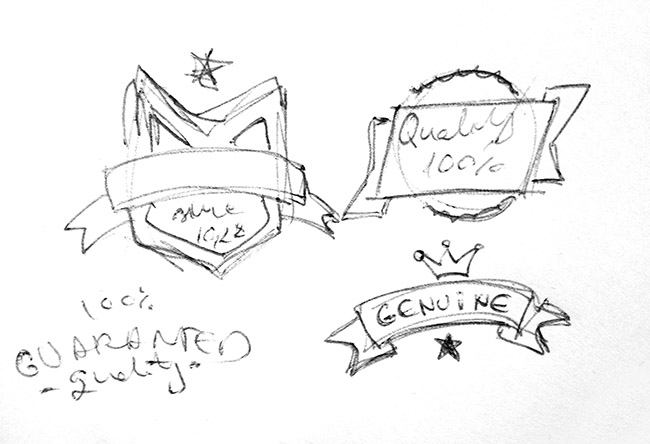
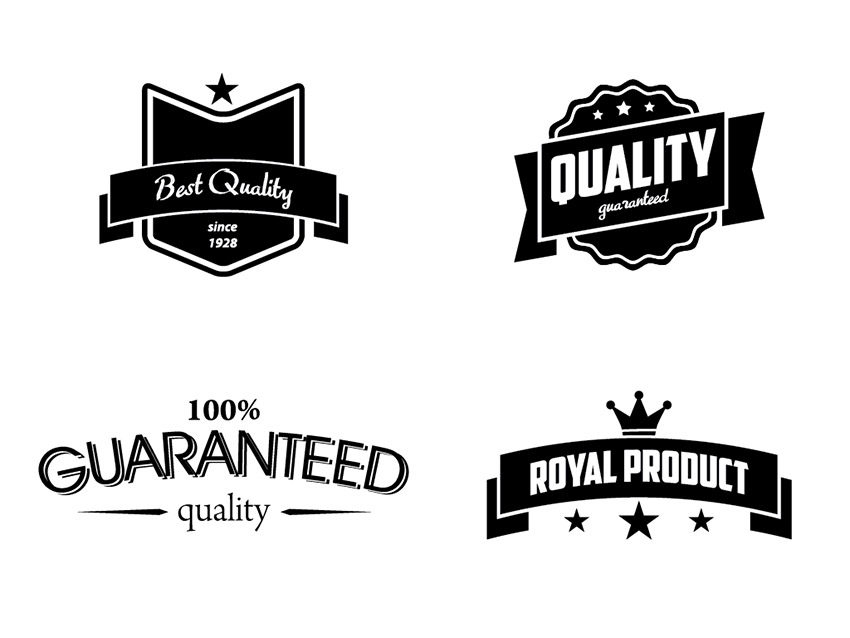
I made a sketch previously so I have an idea of what I will create. I will create a set of retro styled badges.
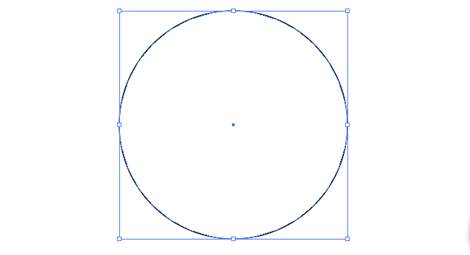
1. Create a circle, width 260px, height 260px.
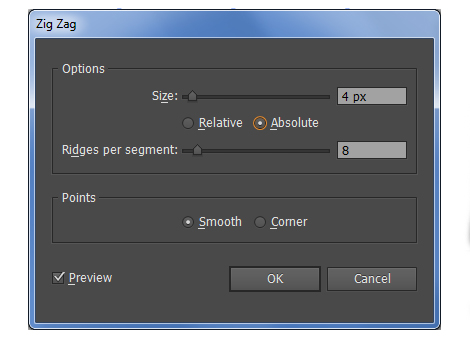
2. Go to Effect -> Distort & Transform -> Zig Zag… and set the options as you see on the image bellow. Go to Object -> Expand Appearance.
3. Fill the object with black color.

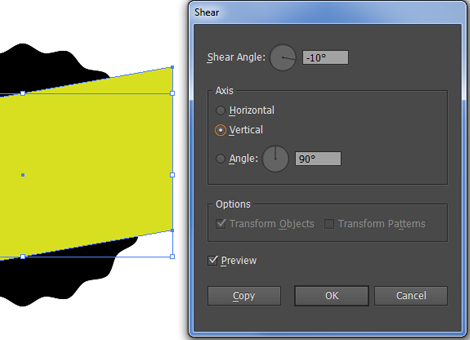
4. Create a Rectangle. Place it above the previous object and align them to center. Select the rectangle, go to Object-> Transform -> Shear and set the values as you see on the image.

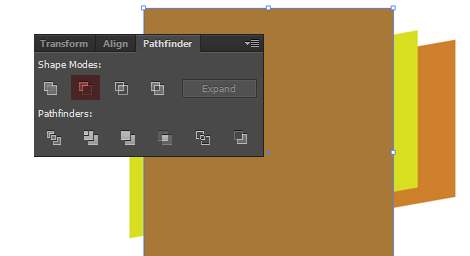
5. Duplicate the object (Ctrl + C and Ctrl + F) and move it down and to the right. Create a new rectangle. With the help of this we will cut the part we don’t need from the second rectangle. Select the two objects, then go to Window -> Pathfinder panel and select Minus Front.
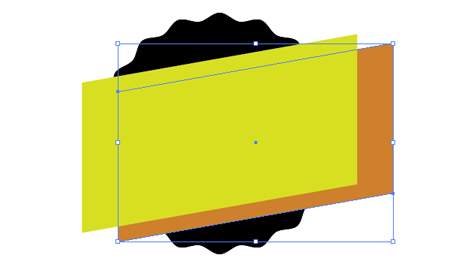
6. Repeat step 5 but now move the duplicated object down and to the left.

7. With the use of the Pen Tool place a point on the margin of the two little rectangles and move that point inside.

8. Select the two little objects, and send them below the big one. Go to Object -> Arrange -> Send to Back.

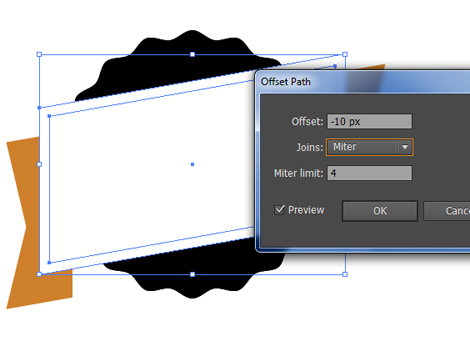
9. Select the green object, fill it with white, then go to Object -> Path -> Offset Path and set the Offset to -10px. Press OK.
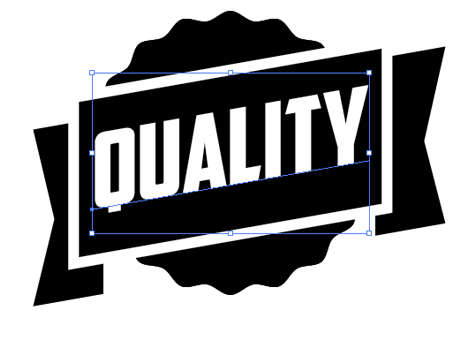
10. Fill the resulted object and the two little ones with black. Press T (Text Tool) and write “Quality”. Select a nice font. I’ve used the American Captain (http://www.dafont.com/american-captain.font). Go to Object -> Transform -> Shear and use the same settings you’ve used the first time (-10°, Vertical). The main target are the microstock sites and since we can’t use editable text so we will convert to outlines. Go to Type -> Create Outlines.
11. Ok, you’re done! You can now add other effects or a small text (Quality guaranteed, 100% Quality, Genuine product).

12. After you’re done group the objects together.
13. If you want to have a great set of retro style badges, you need to create a couple of new badges using the same techniques.
Preparing your files
14. Prepare your work to submit for review. First of all, you need to read all the requirements of the microstock sites. Most of the rules are the same so here is a list for you:
– Submissions must be wholly owned by the submitter
– Submissions must NOT contain any copyrighted material
– Do not embed your own watermark
– Do inspect all vectors before uploading them for leftovers, open paths or bitmaps
– Don’t send snapshots
– Images must be at least 4 Megapixels (some sites asking for 15Mp so it is preferable to prepare your artwork with 15 Megapixels)
– Export your artwork to EPS10 + JPG
– Be careful to close all paths if possible, this might be a reason for rejection
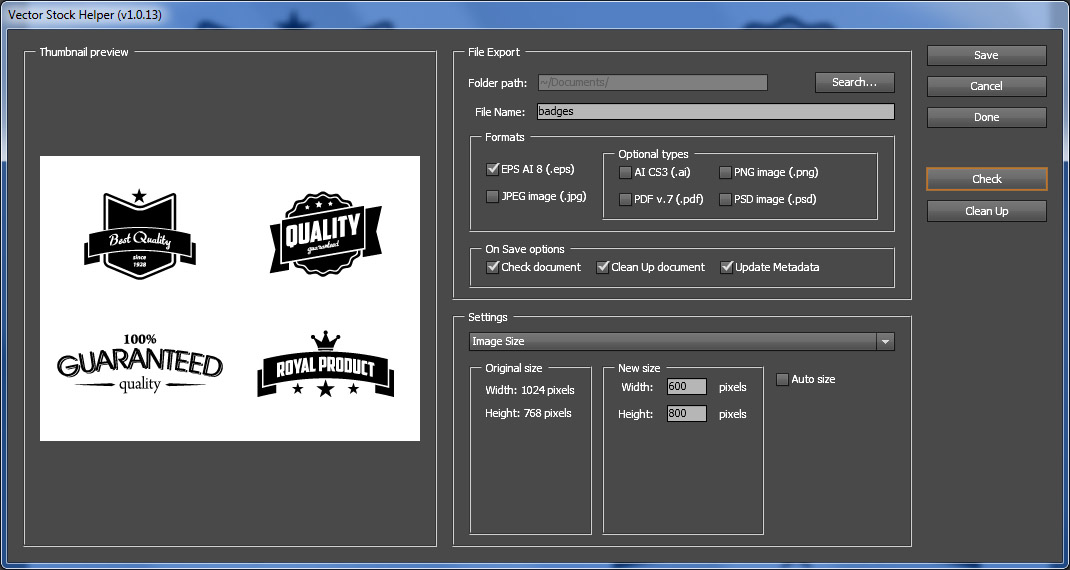
15. Now let’s test wether this file is ready to be uploaded for review. You can use a great Illustrator script to do all the dirty work. It is called Vector Stock Helper. On this site you can read the installation instructions and learn how to use the script. After you download it, place the script into a folder and run from inside the Illustrator. Go to File -> Script -> Other Script browse for the script and run.
16. To close all the opened paths, use this script: Close All Paths / Close Selected Paths( you can find it here: Vectips.com)
17. Now that your artwork is ready for submission you need to export an EPS10 file and a JPG. This can be done manually (Save as EPS10 and export a JPG) or you can use another great script found on www.oksancia.com. I made some modifications to suit my needs:
– changed the destination folder to save the image where i want
– increased the exported JPG size to 4500px so now i can have 15Mp images
You can find other useful Illustrator scripts here.
Keywording
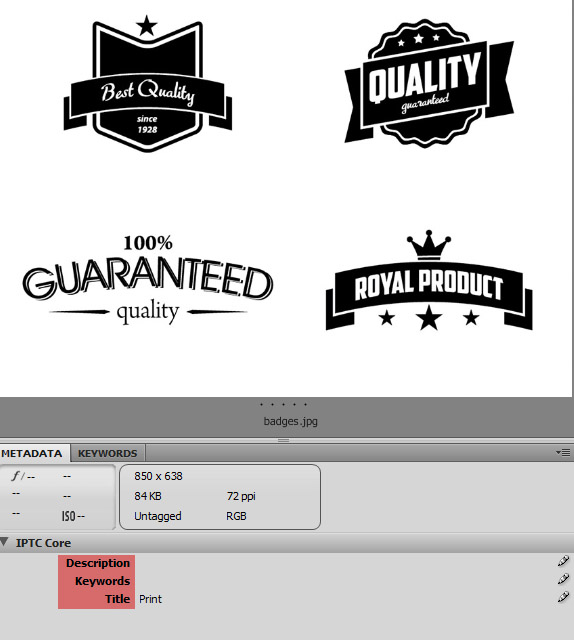
18. The last thing to do is to insert the keywords. Open Adobe Bridge go to Edit -> Preferences, select Metadata / IPTC Core check Description, Keywords, Title, uncheck any other options. Click OK.
Uploading
After you inserted all the keywords, description and title, you can upload it to your favorite microstock site for review. This can be done manually …. or you can use a batch file (PC) to upload it through FTP.
Create a file with .BAT extension and copy this text. This script can be used to upload it to Canstockphoto, Fotolia, and Depositphotos. These sites require that vectors are in a ZIP archive, along with a JPEG preview.
@echo off

echo user username> ftpcmd.dat
echo password>> ftpcmd.dat
echo bin>> ftpcmd.dat
echo put %1>> ftpcmd.dat
echo quit>> ftpcmd.dat
ftp -n -s:ftpcmd.dat ftp.canstockphoto.com

echo user Fotolia ID> ftpcmd.dat
echo Your login followed by your password (ie: if your login is "login" and your password is "password", your ftp password will be "loginpassword")>> ftpcmd.dat
echo bin>> ftpcmd.dat
echo put %1>> ftpcmd.dat
echo quit>> ftpcmd.dat
ftp -n -s:ftpcmd.dat ftp.fotolia.com

echo user username> ftpcmd.dat
echo password>> ftpcmd.dat
echo bin>> ftpcmd.dat
echo put %1>> ftpcmd.dat
echo quit>> ftpcmd.dat
ftp -n -s:ftpcmd.dat ftp.depositphotos.com

del ftpcmd.dat
In Total Commander (PC) select the batch file, click Ctrl + Enter, then select the .zip file you want to upload and press again Ctrl + Enter. Press Enter again. The script will upload your files.
Be aware that this file can be read easily with a text editor so don’t use this batch on public computers!
After you upload your files, the system will read the title, description and keywords attached to them and you will have to select the proper categories for your files and submit for review.
Getting Paid
On most microstock sites you can get paid trough checks or online (PayPal / Skrill (Moneybookers) ). You have to register, add a bank account and send money to that account.
You’re done!
I hope you liked this little presentation and perhaps you will incorporate some of the techniques i presented into your workflow.
If you want to learn more about microstock sites you can read on www.microstockdiaries.com.
If you have further (effective, simple) techniques you use, please share with us!
Check out the Practical tips for selling resources for design by Jesse Snyder!
Update
After a couple of days we have the result of our work, the vector files are available for sale on microstock sites 🙂