After releasing the new iOS 7 by Apple, app designers and developers needed to adjust their visual language to match the new design of iOS7.

Here on Vectorgraphit we will share a weekly a new tutorial on how to create one of the new iOS 7 flat icons in Adobe Illustrator. Remember, these tutorials are featuring some Adobe Illustrator technics, some changes may apply. If you want to create iOS 7 icons, you can read more about the Interface Guidelines here.
In the following weeks you will learn to create the following iOS7 icons:
| #01 – Photos icon #02 – Videos icon #03 – Safari icon #04 – Weather icon |
#05 – Calculator icon #06 – Compass icon #07 – Phone icon #08 – FaceTime icon |
Today you learn to create the iOS browser, Safari icon. You will learn to use the basic tools and line styles. The first 3 steps are similar to the first few steps in the other tutorials so if you’re already familiar with it, you can skip them.
To start, download the grid we created. The file is an EPS file so you can use it in other vector editing software too. You don’t need to use this grid but we want to create icons like the originals, so this is the easiest way to do it.
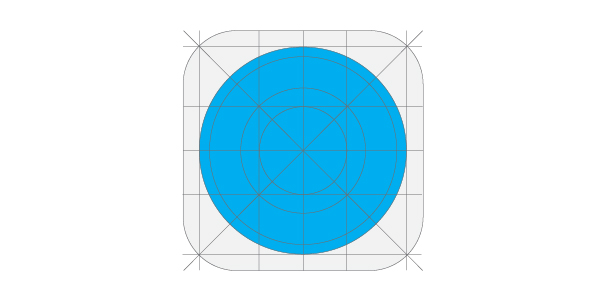
1. Now that you have the grid, insert it to a new layer and lock the layer. Make sure that the layer with the grid is on top of the other layers (see image in step 2).
2. Create a square with the Rectangle Tool (M) while holding the Shift key. Set its size to 120px (width and height). Place the square bellow the grid.
![]()
3. Go to Effect -> Stylize -> Round Corners and set the Radius to 27°. Fill it in with white and set its outline to gray.
![]()
4. Create a Circle with the Ellipse Tool (L) while pressing the Shift Key. Place it over the rectangle and resize to fit into the grid as you see in the image below (104px). Fill it with blue. You will change its color later.
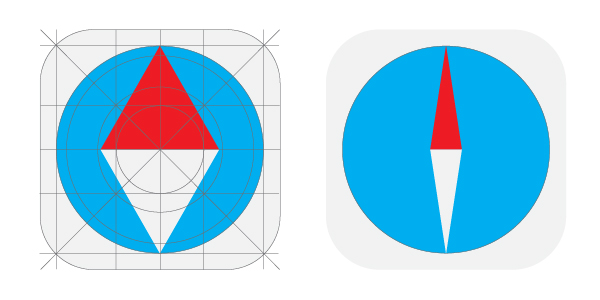
5. Start using the Polygon Tool. While pressing the Left Mouse Button, press the Down Key on keyboard to decrease the angles ant get a triangle. Now still pressing the Left Mouse Button press the Shift key to align the triangle horizontally. Place it over the circle, modify its size if needed. Duplicate the triangle (Ctrl + C, Ctrl + F). Go to Object -> Transform -> Reflect. Set the Axis to Horizontal and press OK. Now move the second triangle below the other one with the Down Key. Fill them in with a color (red + white). Select both triangles and change their width to 16px.
6. Go to Object -> Transform -> Rotate and set the Angle to -45° ( … or while pressing the Shift key, rotate with the mouse). Create a rectangle and align it to the circle. Duplicate it and move the second rectangle to the bottom of the circle. Select both rectangles, press Ctrl + G to group them.
![]()
7. Go to Effect -> Distrort&Transform -> Transform. Set the Angle to 10° and the Copies to 17, press OK.
![]()
8. Duplicate the group (Ctrl + C, Ctrl + F). Isolate the second group, doubleclick with the mouse. Now modify the length of the rectangles ( both of them! ).
![]()
9. Exit isolation mode by clicking on the upper right arrow on top bar of the layers menu. Go to Object -> Transform -> Rotate and set the Angle to 5°. Select the two triangles and bring them to the front (Ctrl + Shift + ] ).
![]()
10. Fill the circle with a gradient. use these color codes: #1846F3 (R=24 G=70 B=243) and #00E3FF (R=0 G=227 B=255).
![]()
+1. As a bonus I show you how to create a dashed line. Use this technique when you don’t need to have an exact number of lines. Set the Stroke width to 7pt and check the Dashed Line option. Set 1pt and 6pt for the dash and gap. The result will be similar to the one you created above.
![]()