Follow this tutorial and learn how to draw a cute flamingo character with sunglasses in Adobe Illustrator. Learn how to add details on a character and how to create two custom Blend Art Brushes that will help you to add shading and highlights on the flamingo. Also, these brushes will be very useful in other projects as well. Let’s begin!
Final Image
Tutorial Details
- Program: Adobe Illustrator CS6 – CC 2017
- Difficulty: Intermediate
- Estimated Completion Time: 1 hour
Create a New Document
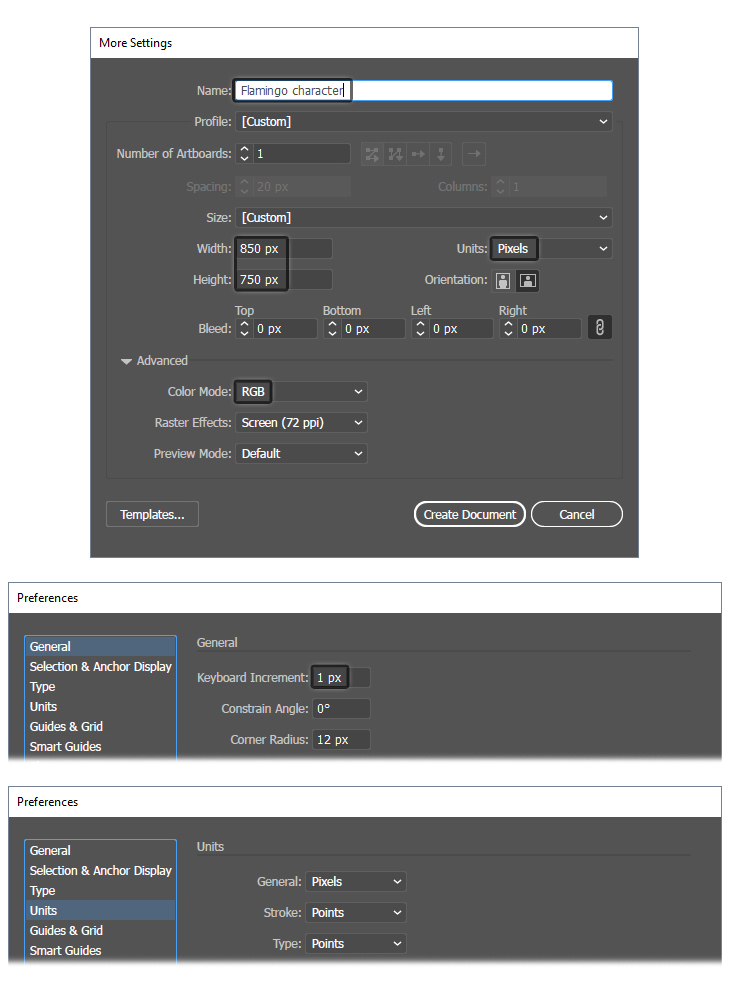
1. Launch Illustrator and open a blank document. Type a name for your file and set up the dimensions then select Pixels as Units and RGB as Color Mode. Next, go to Edit > Preferences > General and set the Keyboard Increment to 1 px and while there, also go to Units and make sure that they are set as in the following image. I usually work with these settings and they will help you throughout the drawing process.
Draw the Basic Body of the Flamingo
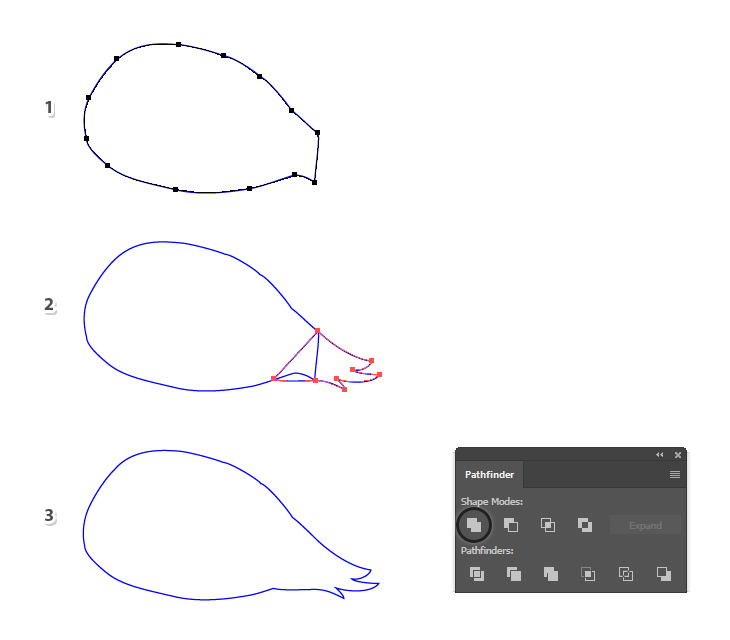
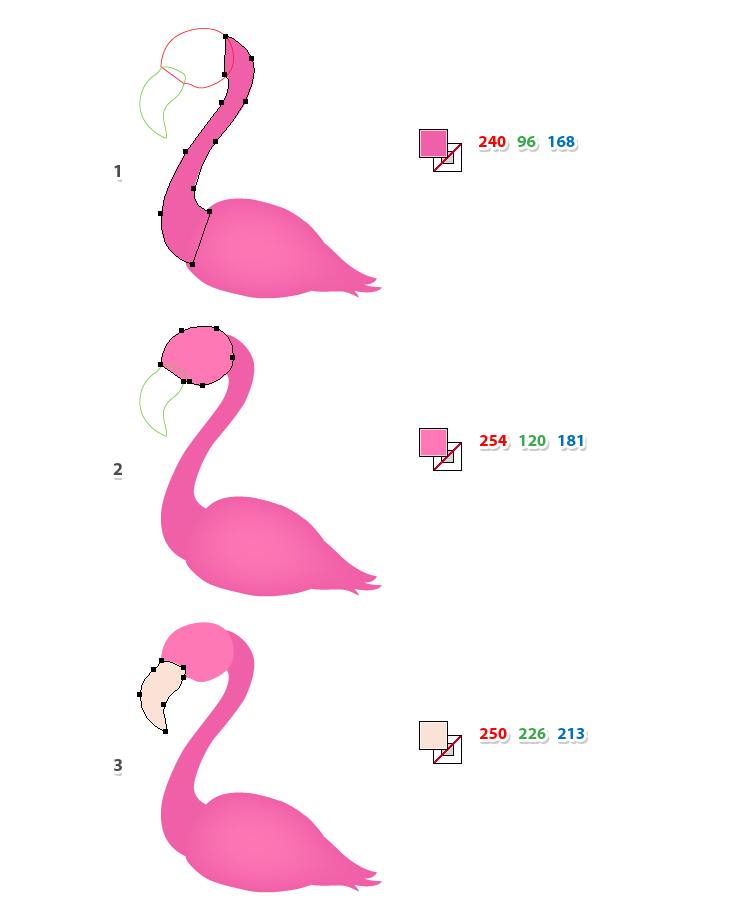
2. Start by drawing a shape like in the image below (1) using the Pen Tool (P) and then continue with the shape of the tail (2). Now, select both shapes and press Unite in the Pathfinder panel to merge them into a single shape (3).
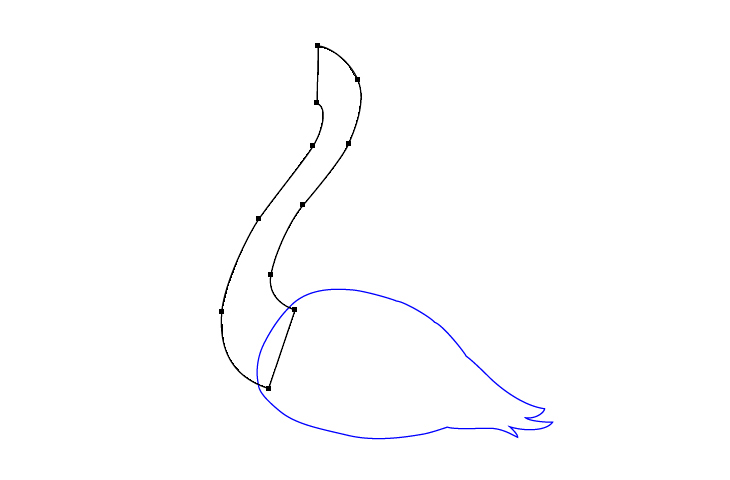
3. The next shape to draw is the neck of the flamingo. Use again the Pen Tool (P).
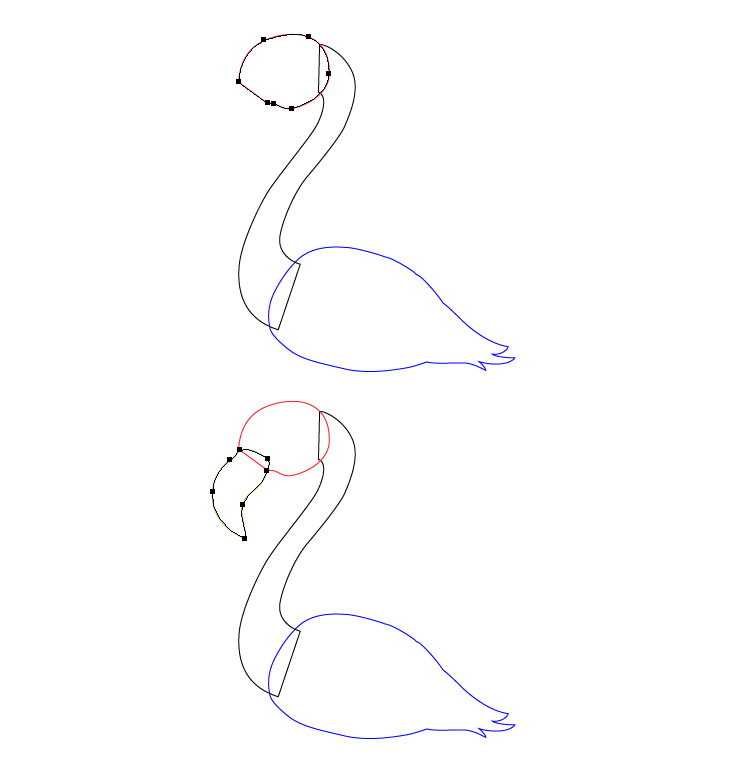
4. Continue with the shape of the head and the beak as shown in the image below.
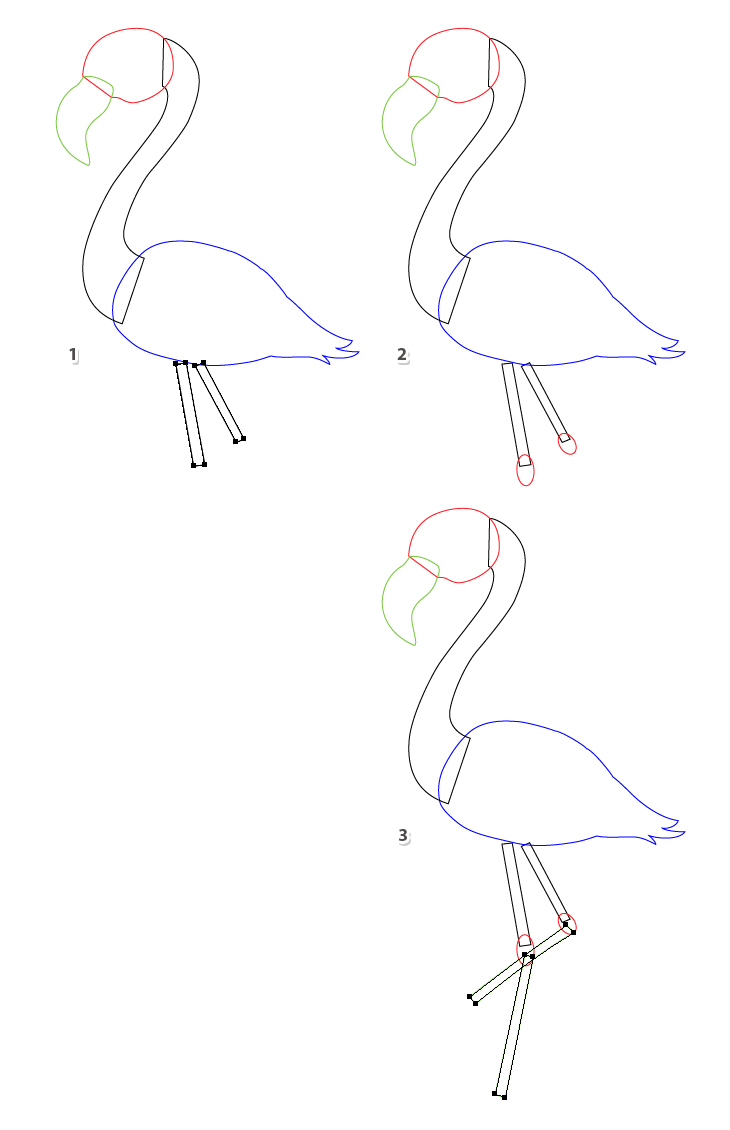
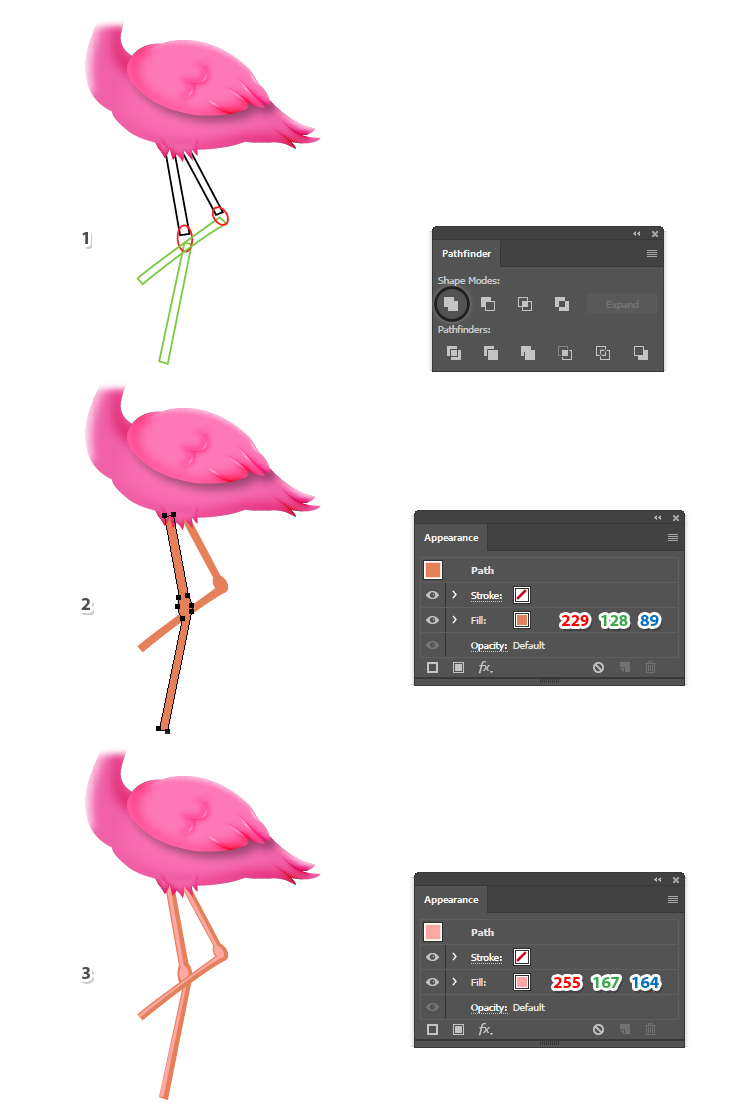
5. The legs are made of thin rectangles and an ellipse between them as the knee.
Color the Body of the Flamingo
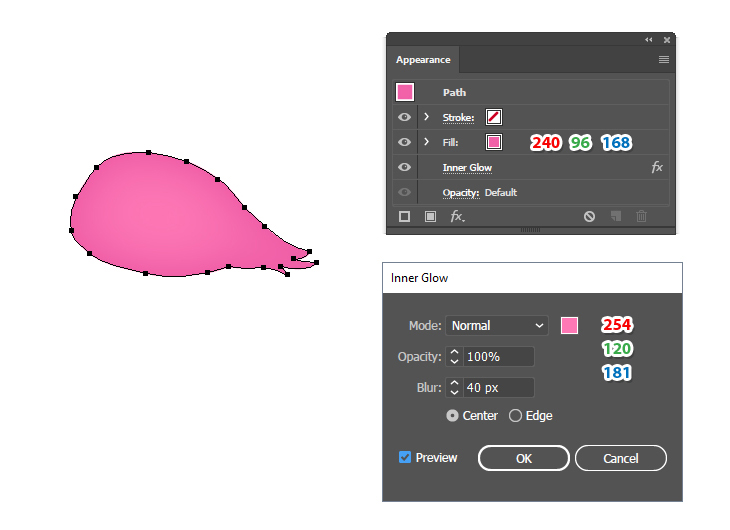
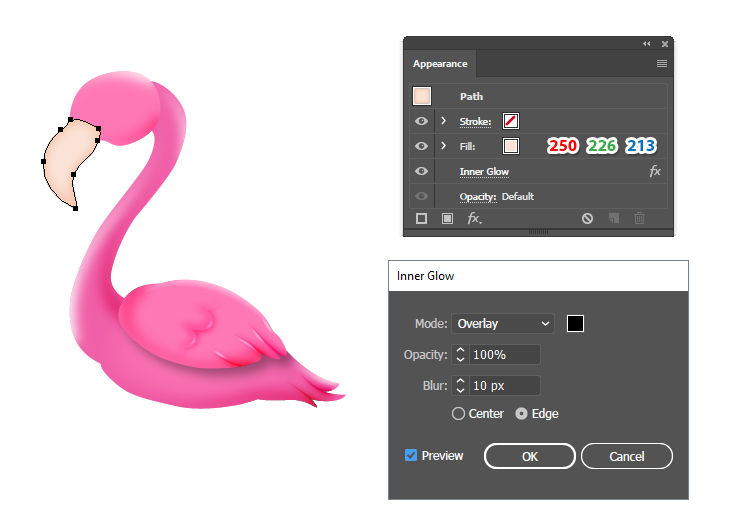
6. Let’s color some of these shapes. Select the shape of the body and give it a bright pink fill color. Next, go to Effect > Stylize > Inner Glow and apply the settings shown.
7. Fill the neck, head and beak shapes with the colors indicated.
Create Custom Blend Art Brushes
8. Let’s create two custom Blend Art Brushes that will be very useful in other projects as well. Grab the Ellipse Tool (L) and draw a 100 x 3 px ellipse (1); then select only the left and right points using the Direct Selection Tool (A) and press the Convert selected anchor points to corner option in the Control panel or use the Convert Anchor Point Tool (Shift-C) (2).
While the ellipse stays selected, go to Object > Path > Offset Path and apply an Offset of -1.3 px to obtain a smaller ellipse in the center. Fill both shapes with black but set the Opacity of the bigger one to 0% (3). Now, select both shapes and go to Object > Blend > Blend Options. Choose 12 Specified Steps and then go back to Object > Blend > Make (Alt-Control-B) (4).

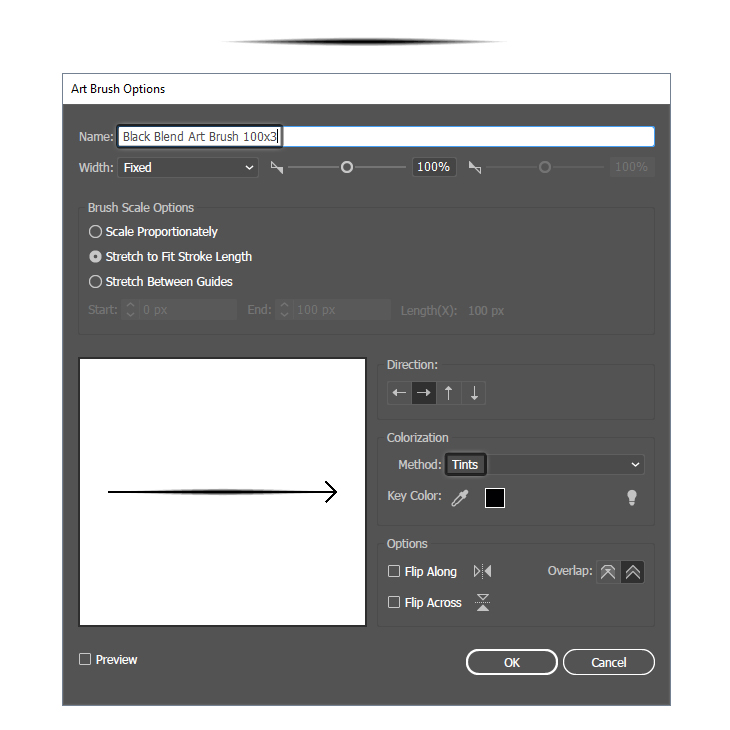
9. Drag the blend-group obtained at the previous step into the Brushes panel to save it. Type Black Blend Art Brush as the name of the brush and change the Colorization Method to Tints. Leave the rest of the settings as they are and hit OK.
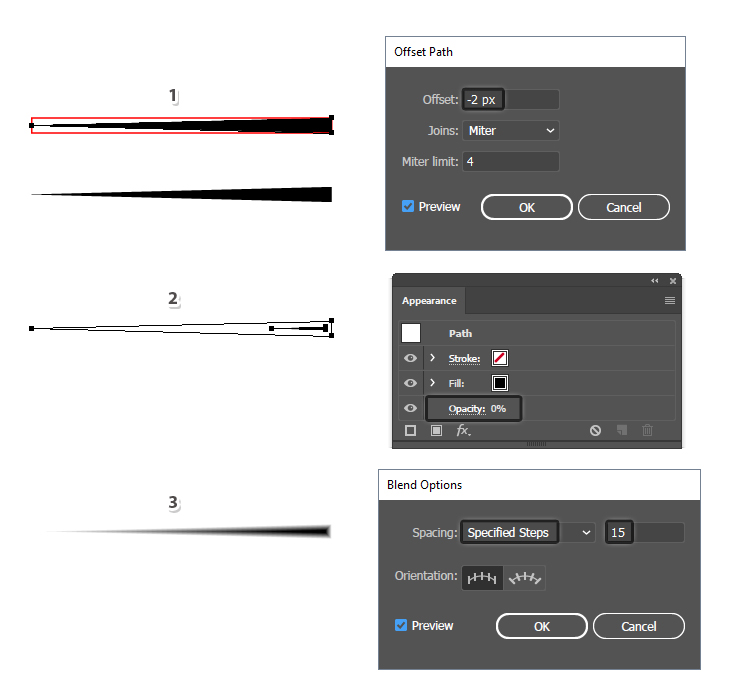
10. Let’s create the second brush. Use the Rectangle Tool (M) to draw a rectangle on your artboard having the dimensions 100 x 5 px. Use this rectangle as a guide to draw an elongated triangle as shown in the image below (1).
While the triangle stays selected, go to Object > Path > Offset Path and apply an Offset of -2 px to obtain a smaller triangle inside. Fill both shapes with black but set the Opacity of the bigger one to 0% (2). Now, select both shapes and go to Object > Blend > Blend Options. Choose 15 Specified Steps and then go back to Object > Blend > Make (Alt-Control-B) (3).
11. Drag the blend-group obtained at the previous step into the Brushes panel to save it. Type Tapered Blend Art Brush as the name of the brush and change the Colorization Method to Tints. Hit OK.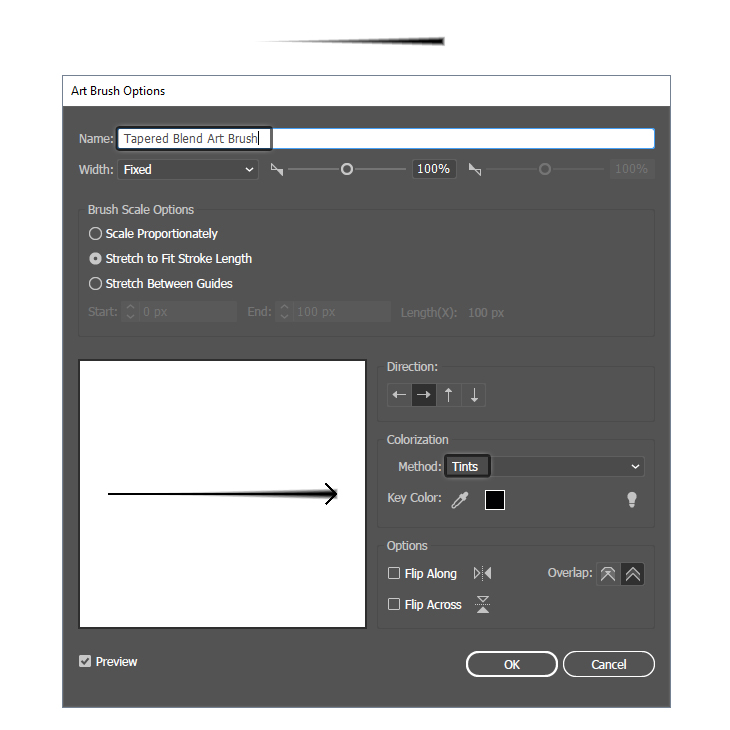
Add Shading and Highlights on the Flamingo
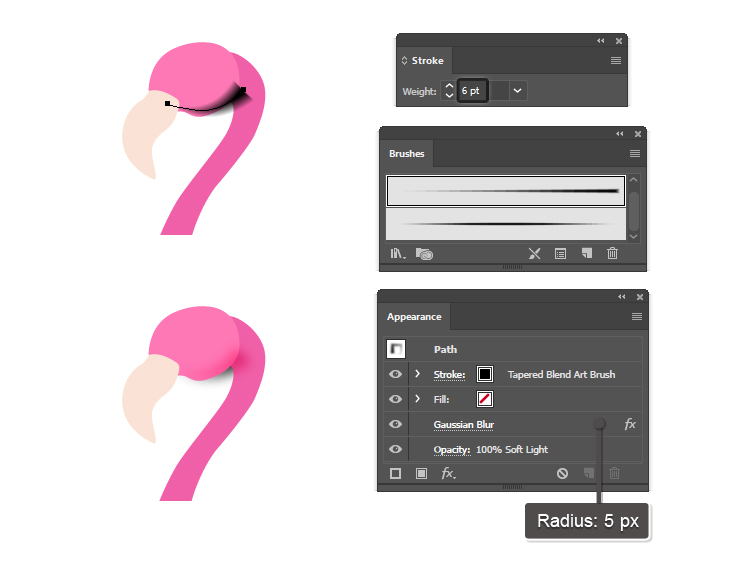
12. Let’s use these new custom brushes to add shading and highlight on the flamingo. Focus on the head and draw a path following the bottom side using the Pen Tool (P). Give it a 6 pt Stroke and use the Tapered Blend Art Brush. Next, go to Effect > Blur > Gaussian Blur and apply a Radius of 5 px; then set the Blending Mode to Soft Light.
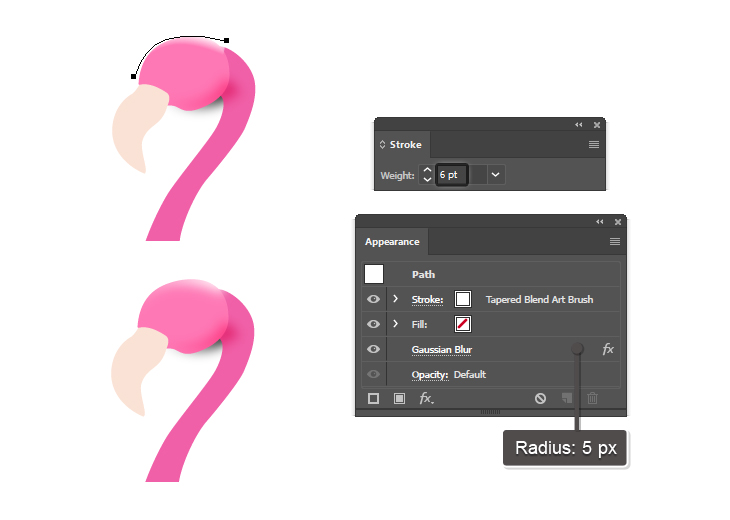
13. To create a highlight, draw a path following the top side of the head. Give it a 6 pt Stroke and use the Tapered Blend Art Brush again. This time, use white as the stroke color instead of black and since the Colorization Method was set to Tints earlier, the brush will change color as well. Apply a 5 px Gaussian Blur and the highlight is ready.
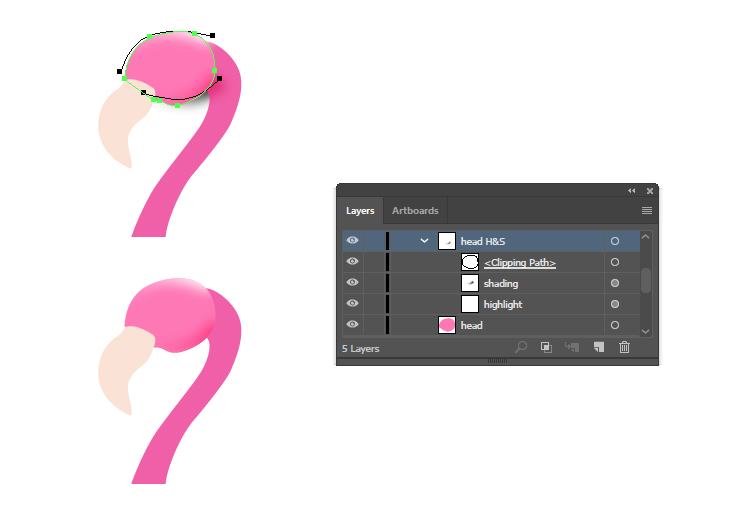
14. Let’s clean up the edges with a mask. Select the shape of the head and then Copy and Paste in Place (Shift-Control-V) to make a copy of it in front of everything (the green path). Set this copy to stroke-none and fill-none. Now, select the highlight and shading paths along with the copy of the head and go to Object > Clipping Mask > Make (Control-7). Name the resulting group “Head Highlight & Shading”.
15. Now, focus on the neck and draw a path following its right side and apply the same settings shown earlier to add shading (1).
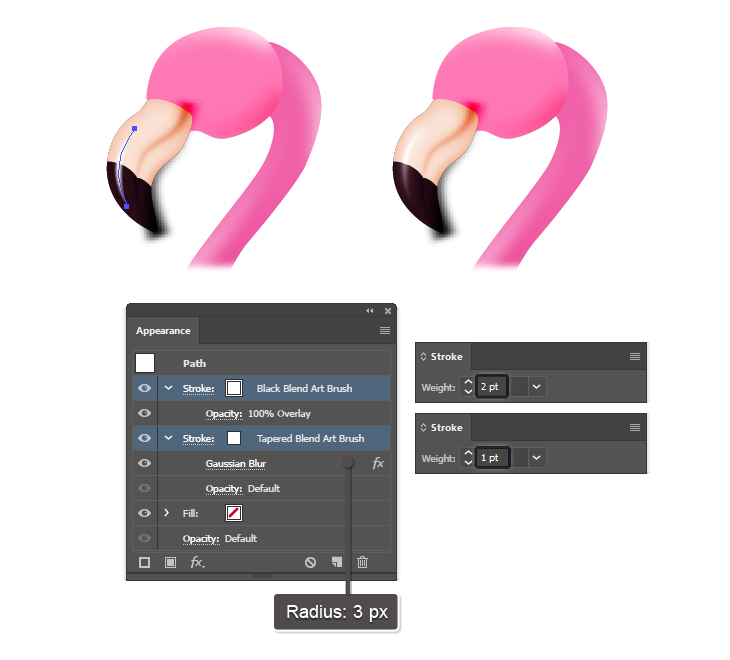
Draw other two paths following the left side of the neck and at the top as the highlight paths and apply the same settings shown earlier for the head (2).
Make a copy of the neck in front of everything and set it to stroke-none and fill-none. Select the three paths along with the copy of the neck and go to Object > Clipping Mask > Make (Control-7) and this will clean up the edges. Name the resulting group “Neck Highlight & Shading” (3).

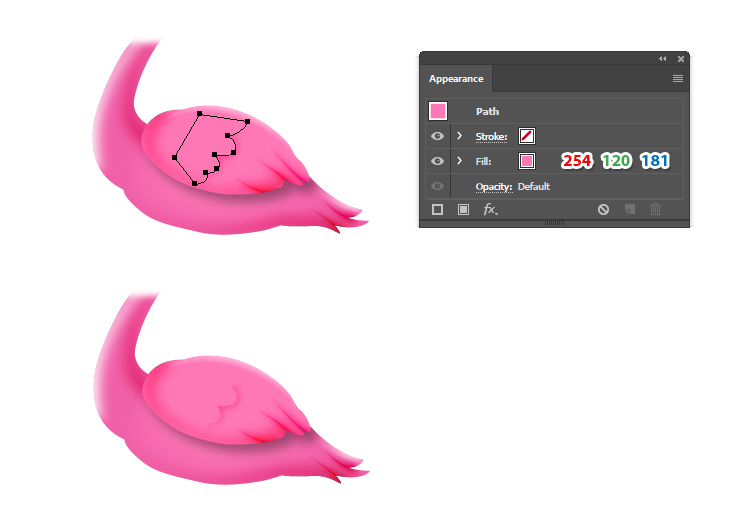
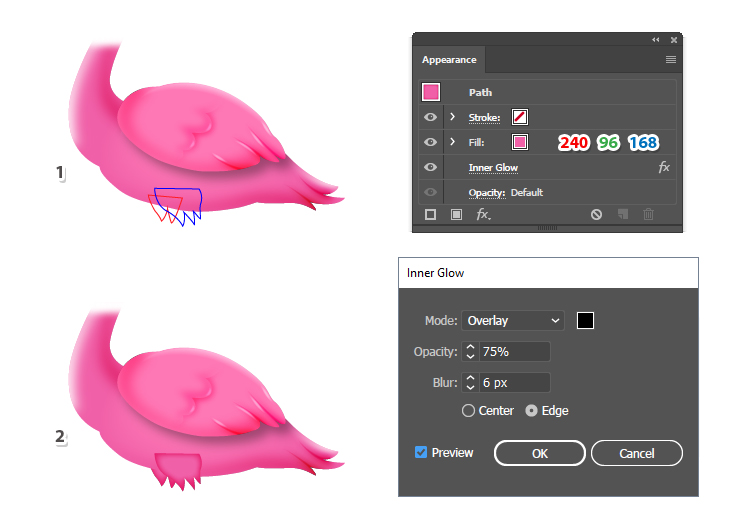
16. The same thing goes for the body of the flamingo. Draw a shading path at the bottom and a highlight path at the top of the tail and apply the same settings shown for the head (1). After you are done, make a copy of the body and use it to create the mask like you did before (2).
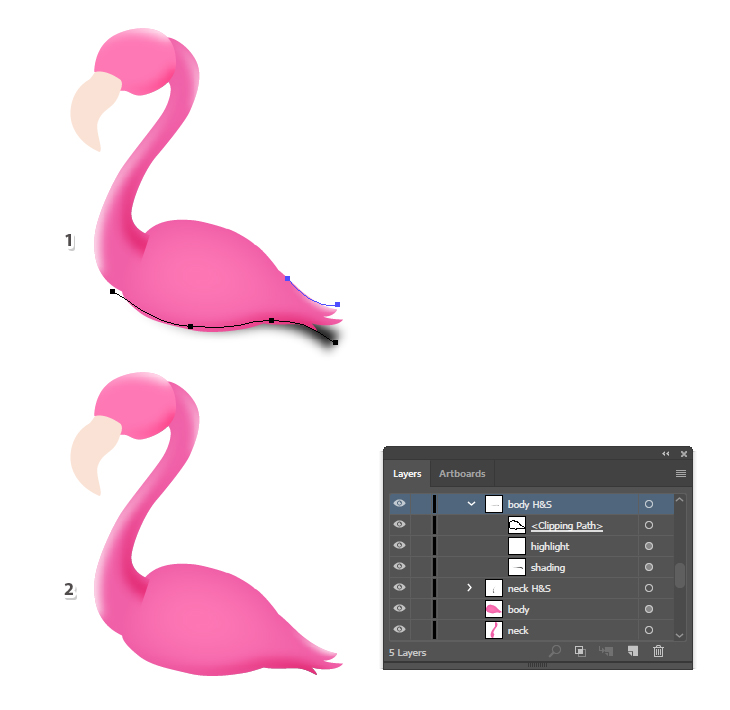
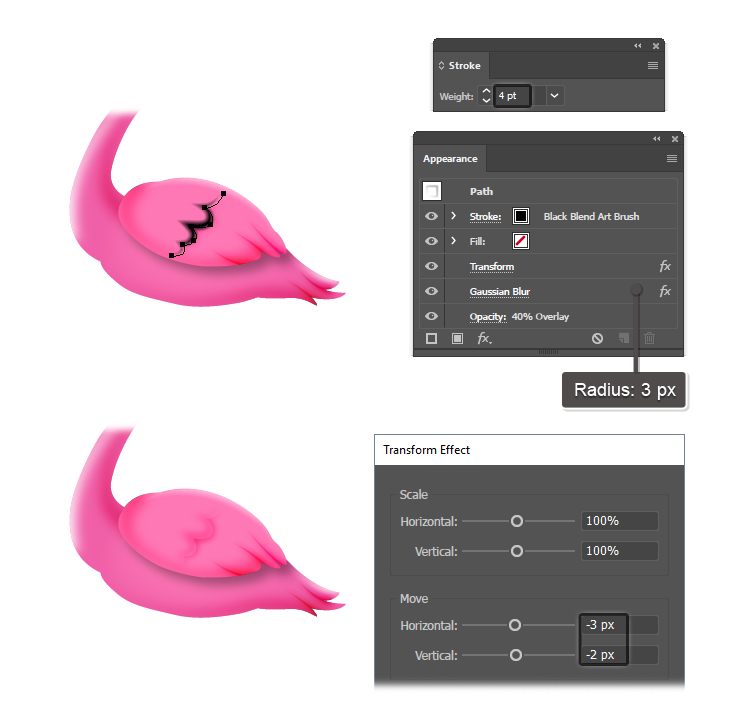
17. Focus on the tail and let’s add some shading there. Draw with the Pen Tool (P) two paths as shown below (1) and give them a 3 pt black Stroke using the Tapered Blend Art Brush. While this Stroke attribute stays selected in the Appearance panel, go to Effect > Blur > Gaussian Blur and apply a Radius of 3 px.
Add a New Stroke at the top of the Appearance panel and this time, select a 1 pt black Stroke and the Tapered Blend Art Brush (2). Set the Blending Mode to Overlay. Drag these two “tail shading” paths under the mask that you have created previously for the body and you can see the final result in the image below (3).

Draw the Wing of the Flamingo
18. It’s time to draw the wing. You can use an ellipse and then distort the right side to look like feathers. Select light pink as the fill color; then go to Effect > Stylize > Drop Shadow and apply the settings shown.

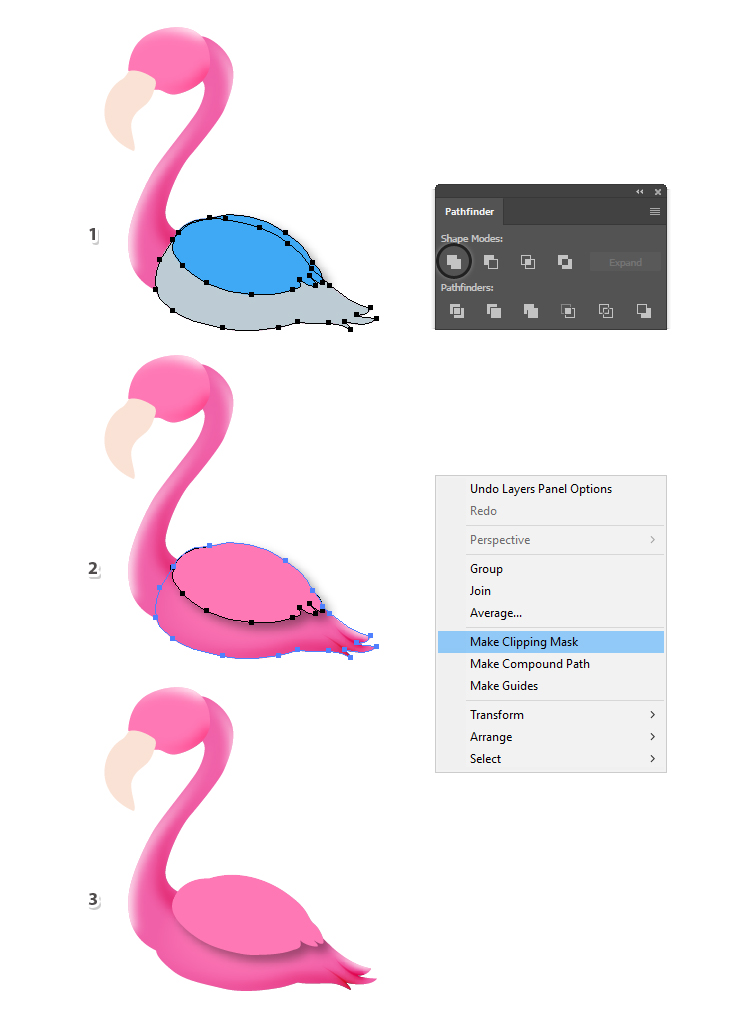
19. Select the body and the wing shapes and then Copy and Paste in Place (Shift-Control-V) to make copies of them in front of everything (1). While these copies stay selected, press Unite in the Pathfinder panel to merge them into a new shape. Set it to stroke-none and fill-none.
Now, select the wing along with this new shape and go to Object > Clipping Mask > Make (Control-7) (2). This will mask the shadow that goes above the wing and you can see the final result in the image below (3).
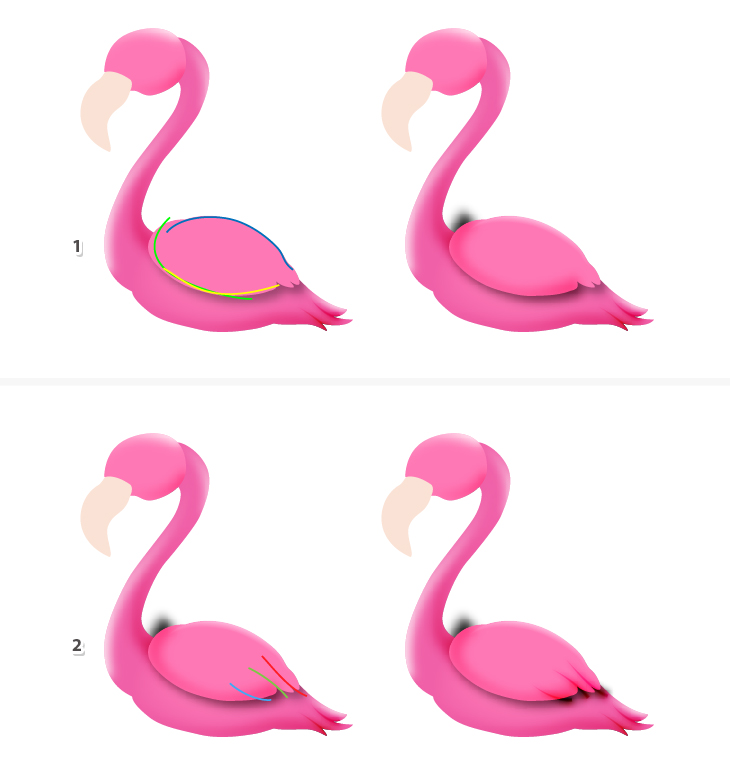
20. As you did before, you can now create shading and highlight on the wing. The highlight path follows the top of the wing (the blue path) and the two shading paths are at the bottom of the wing (the green and yellow paths). Use the same settings as for the body or the neck. (1).
Next, focus on the tip of the wing and add some shading to create the appearance of feathers as you did for the tail. Draw the three paths and use the same settings shown for the tail (2).
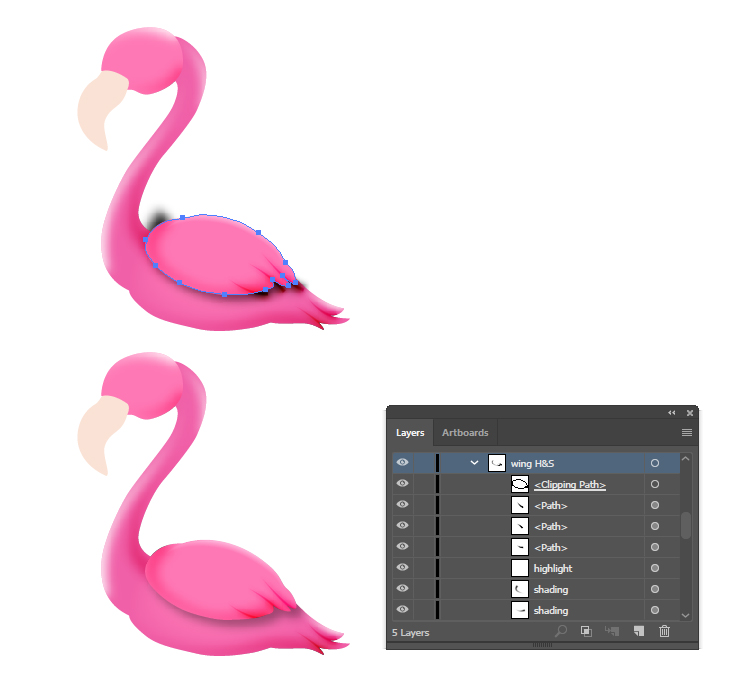
21. Make a copy of the wing in front of everything and set it to stroke-none and fill-none. Now, select all the shading and highlight paths that you have made in the previous step and go to Object > Clipping Mask > Make (Control-7). This will clean up the edges of the wing.
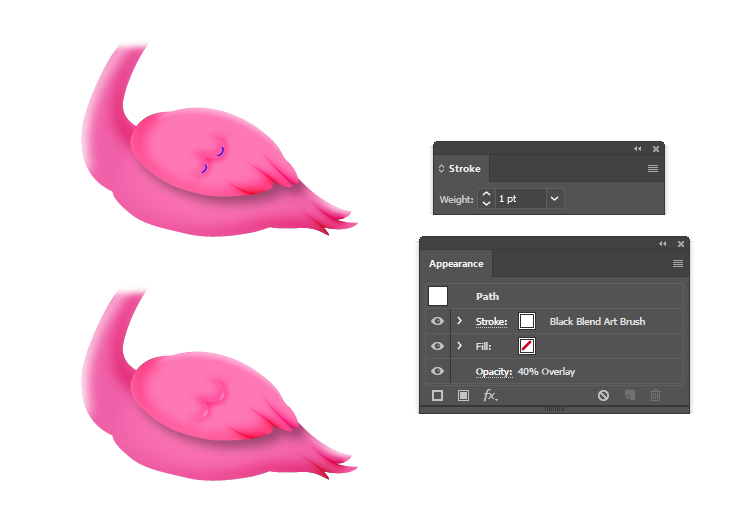
22. Use the Pen Tool (P) to draw a wavy path on the wing. Give it a 2 pt black Stroke and use the Black Blend Art Brush. Next, go to Effect > Blur > Gaussian Blur and apply a Radius of 3 px; then set the Blending Mode to Overlay and reduce the Opacity to 55%.

23. Copy and Paste in Front (Control-F) the wavy path and use the Pen Tool (P) to close the end points to obtain a new shape. Remove any existing appearances and just select a pink fill color.
24. Select the same wavy path again and then Copy and Paste in Place (Shift-Control-V) to make a copy of it in front of the other shapes. Give it a 4 pt Stroke and use the Black Blend Art brush; then go to Effect > Distort & Transform > Transform and apply the settings shown to move the brush. Next, apply a 3 px Gaussian Blur and then set to Blending Mode Overlay and 40% Opacity.
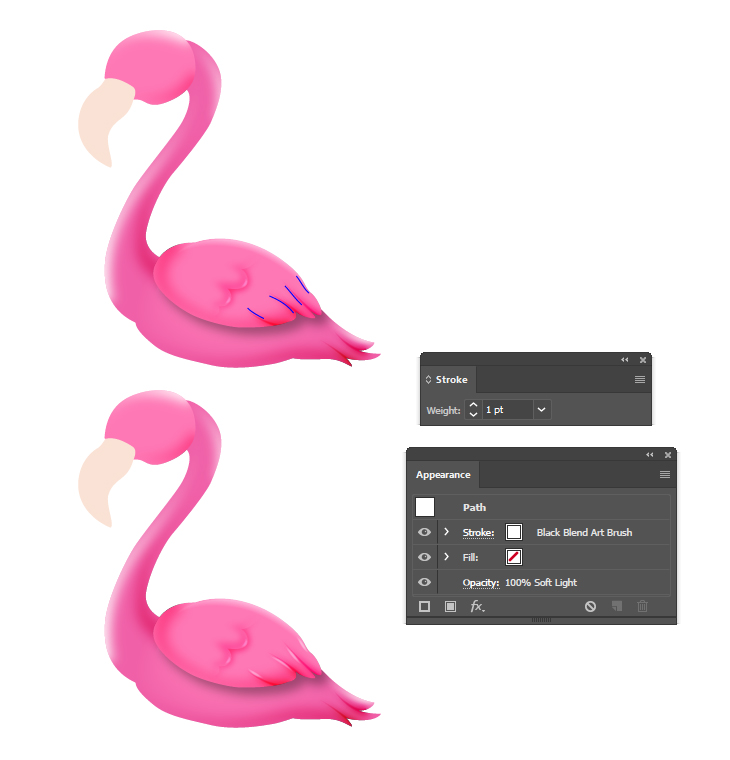
25. To add some shine on the wing, first draw two short paths following the waves that you have previously created. Give them a 1 pt white Stroke and use the Black Blend Art Brush. Set the Blending Mode to Overlay and reduce the Opacity to 40%.
26. To add some shine on the tip of the wing, use the Pen Tool (P) to draw four paths like below. Give them a 1 pt white Stroke and use the Black Blend Art Brush again. This time, set the Blending Mode to Soft Light for all of them.
Draw the Beak of the Flamingo
27. We are moving on to the beak. Besides the existing color, go to Effect > Stylize > Inner Glow and apply the settings shown.
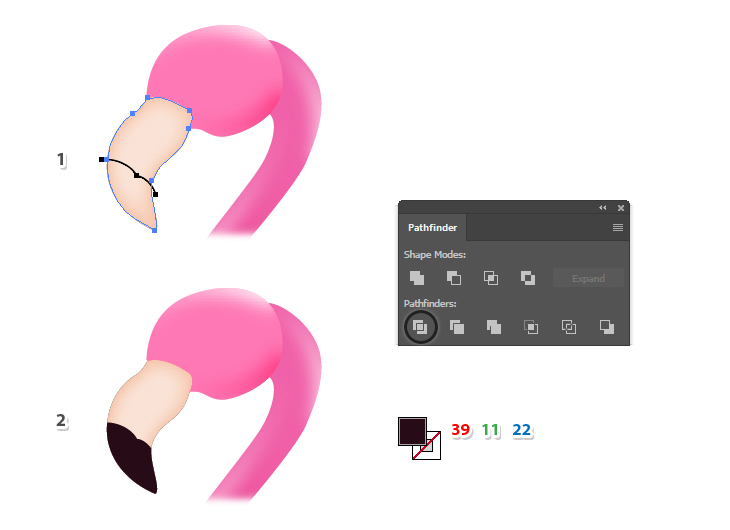
28. Use the Pen Tool (P) to draw a path over the beak like in the following image (1). Now, select the shape of the beak and then Copy and Paste in Front (Control-F). While this copy stays selected, also select the path and press Divide in the Pathfinder panel followed by Ungroup (Shift-Control-G). From the two resulting shapes, keep only the tip and fill it with a dark plum color (2).
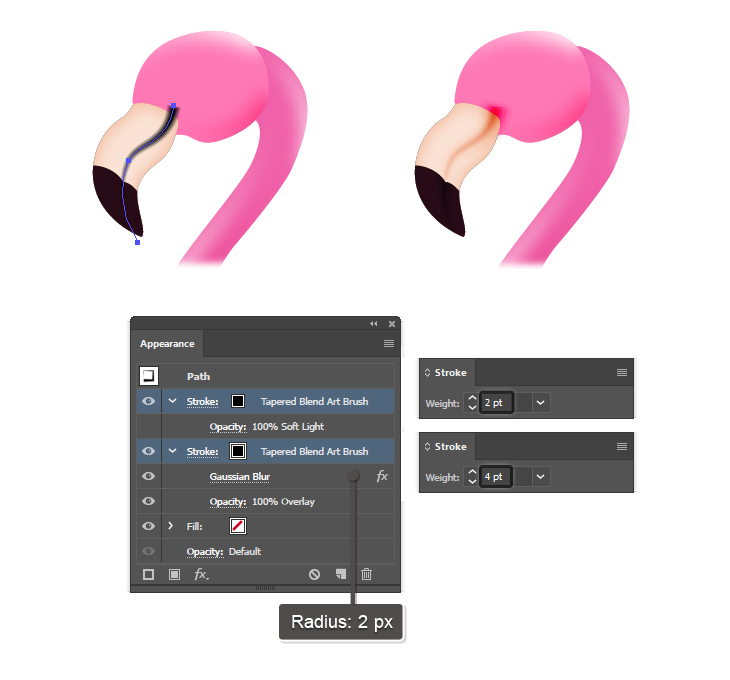
29. Use the Pen Tool (P) again to draw a path through the middle of the beak. Give it a 4 pt black Stroke and use the Tapered Blend Art Brush. While this Stroke attribute stays selected in the Appearance panel, apply a 2 px Gaussian Blur and then set the Blending Mode to Overlay.
Keep the path selected and add a New Stroke at the top of the Appearance panel. Select a 2 pt black Stroke and the Tapered Blend Art Brush and then change the Blending Mode to Soft Light.
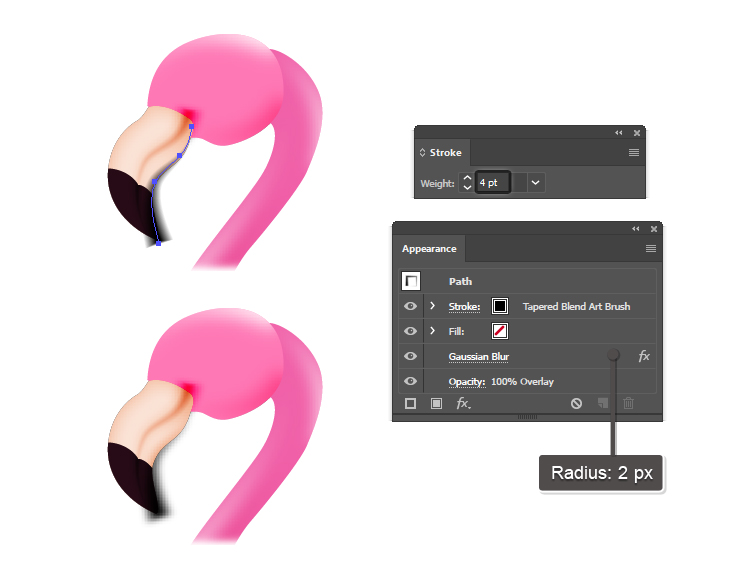
30. Draw a new path following the right side of the beak. Select a 4 pt black Stroke and the Tapered Blend Art Brush; then apply a 2 px Gaussian Blur and change the Blending Mode to Overlay. We will create a mask to clean up the edges later.
31. Let’s add some shine. Draw a curved path on the beak and give it a 1 pt white Stroke using the Tapered Blend Art Brush; then apply a 3 px Gaussian Blur.
Add a New Stroke at the top of the Appearance panel and this time, select a 2 pt white Stroke and the Black Blend Art Brush. Set this Stroke attribute to Blending Mode Overlay.
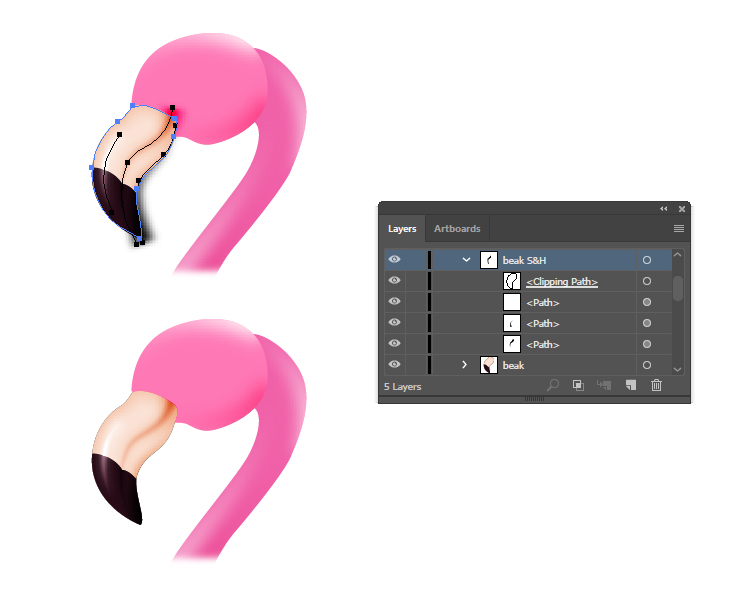
32. Let’s create a mask to clean up around the edges. Select the shape of the beak and then Copy and Paste in Place (Shift-Control-V) to make a copy of it in front of everything. Set this copy to stroke-none and fill-none. Now, select the last three stroked paths along with the copy of the beak and go to Object > Clipping Mask > Make (Control-7).
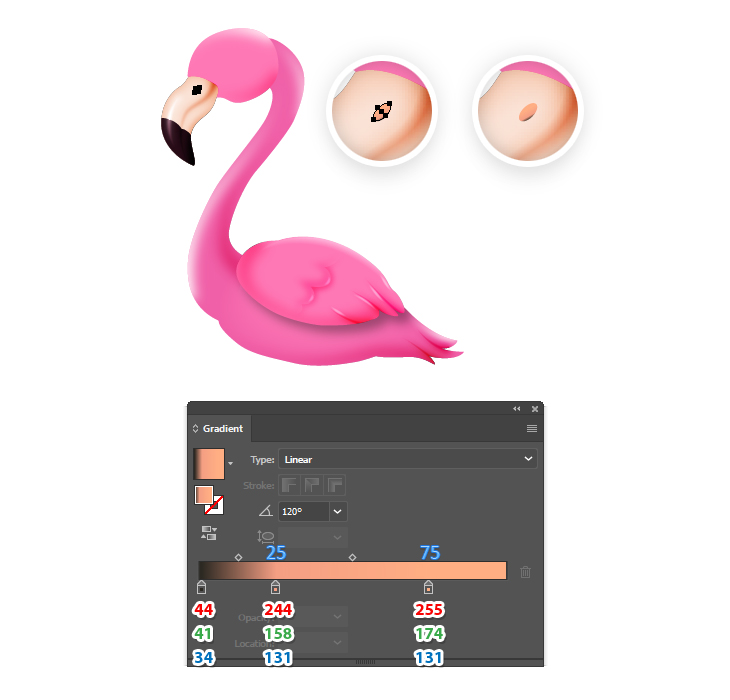
33. Draw a small ellipse at the top of the beak filled with the linear gradient shown as the nostril.
Draw the Sunglasses of the Flamingo
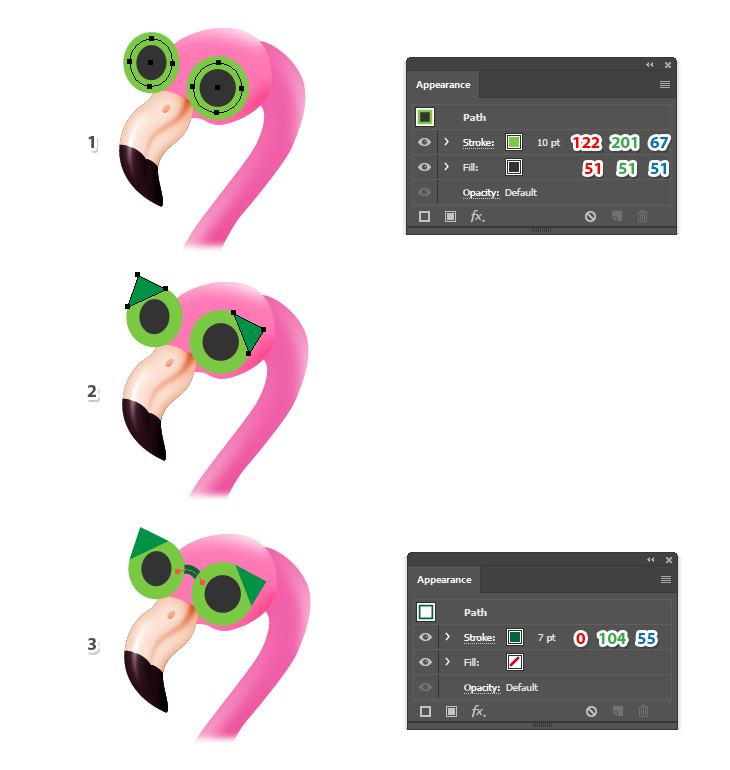
34. Use the Ellipse Tool (L) to draw two circles on the head of the flamingo as the sunglasses. Give them a dark gray fill and also a 10 pt light green Stroke (1). Switch to the Pen Tool (P) and draw a triangle on each side (2) followed by a curved path as the bridge in between (3).
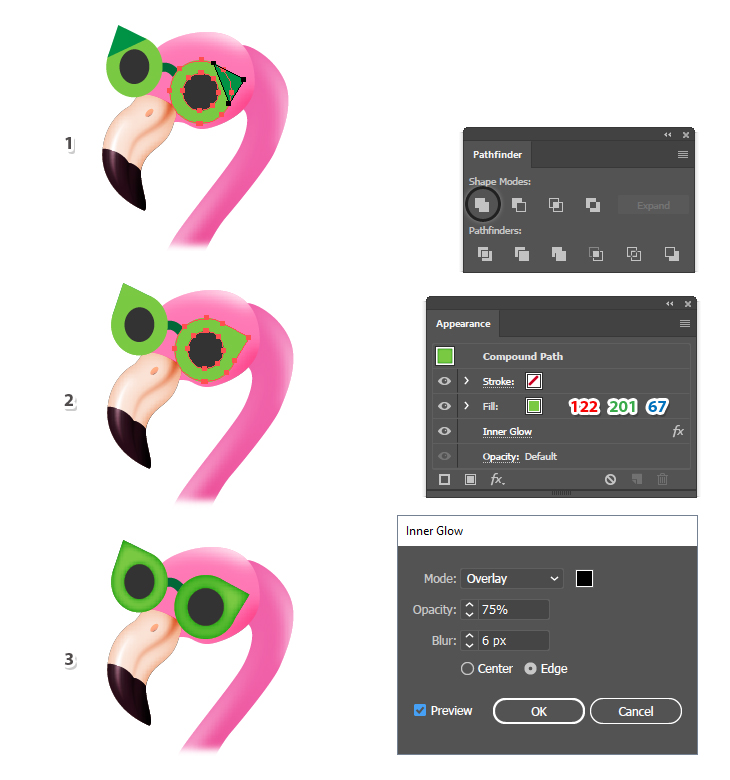
35. Select the right circle and go to Object > Expand in order to turn the stroke into a fill; then Ungroup (Shift-Control-G) to separate the green frame from the dark glass. Now, select the green frame along with the triangle (1) and press Unite in the Pathfinder panel to merge them into a single shape (2). Fill the newly obtained frame with the same light green and then go to Effect > Stylize > Inner Glow and apply the settings shown. You can see the result in the image below (3).
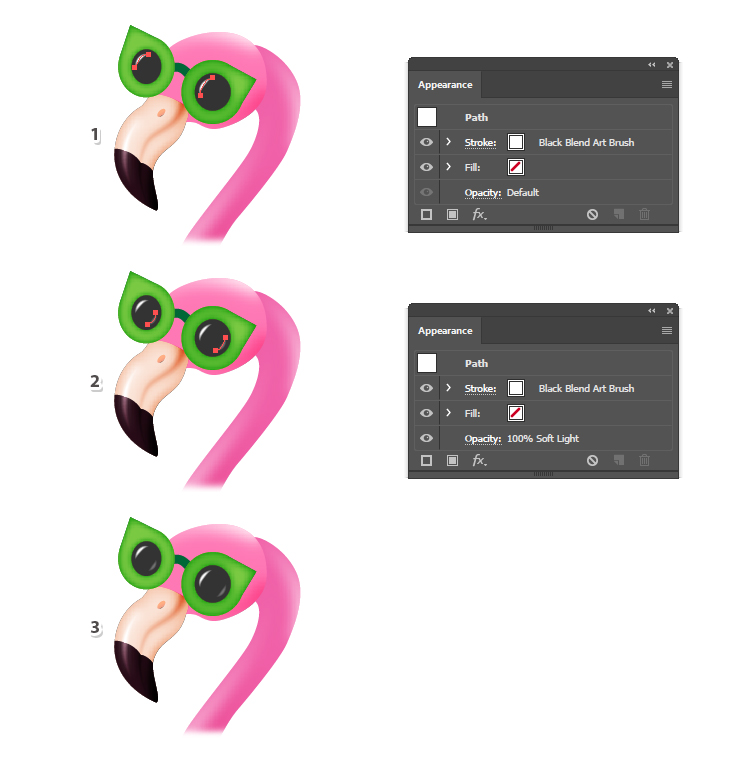
36. Use the Pen Tool (P) to draw a slightly curved path in the left side of each dark glass. Give them a 1 pt white Stroke and use the Black Blend Art Brush (1).
Draw other two short paths in the right side and give them a 1 pt white Stroke using the Black Blend Art Brush again. This time, set the Blending Mode to Soft Light for both of them (2). You can see the result in the image below (3).
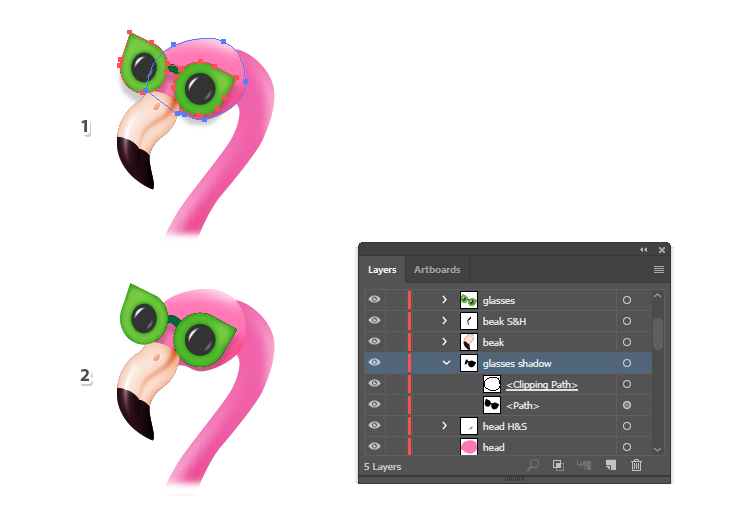
37. Select the green frames, the dark glass and the bridge shape in between them (without the highlights) and then Copy and Paste in Back (Control-B). Press Unite in the Pathfinder panel to merge these copies into a new shape (1). Fill the newly obtained shape with black and then apply the Drop Shadow effect to create a shadow (2).

38. Let’s mask the shadow that goes over the edges of the head. First, select the shape of the head and Copy and Paste in Place (Shift-Control-V) to make a copy of it (the blue path). Remove all existing appearances (1).
Keep this copy selected and also select the new shape of the sunglasses with the Drop Shadow effect applied to it and go to Object > Clipping Mask > Make (Control-7). Name the resulting group “glasses shadow” and move it under the beak but in front of the head (2) whilst the actual glasses remain above the beak.
Draw the Legs of the Flamingo
39. Grab the Pen Tool (P) and draw two shapes like in the next image to create the appearance of a few small feathers at the top of the legs. Keep the blue shape in front of the body and send the red shape behind it (1). Fill both shapes with pink and apply the Inner Glow effect (2).
40. Select the shape drawn in the previous step that is in front of the body and then Copy and Paste in Front (Control-F). Remove the existing appearances and use the linear gradient shown at a 90 degrees Angle (1). We are going to create an opacity mask so the black needs to be above and that part will become invisible. The white is at the bottom so the small feathers will remain visible.
Select the original shape along with the copy on top filled with the white to black gradient and choose Make Opacity Mask from the fly-out menu of the Transparency panel (2).

41. Let’s finish the actual legs. Select the shapes that make up one of the legs (the two rectangles and the ellipse between them) (1) and press Unite in the Pathfinder panel to merge them. This will be the new leg shape. Repeat the same thing for the other leg and fill them with light brown (2).
Follow the same technique to create a similar but thinner shape on each leg. Fill them with a lighter shade (3).
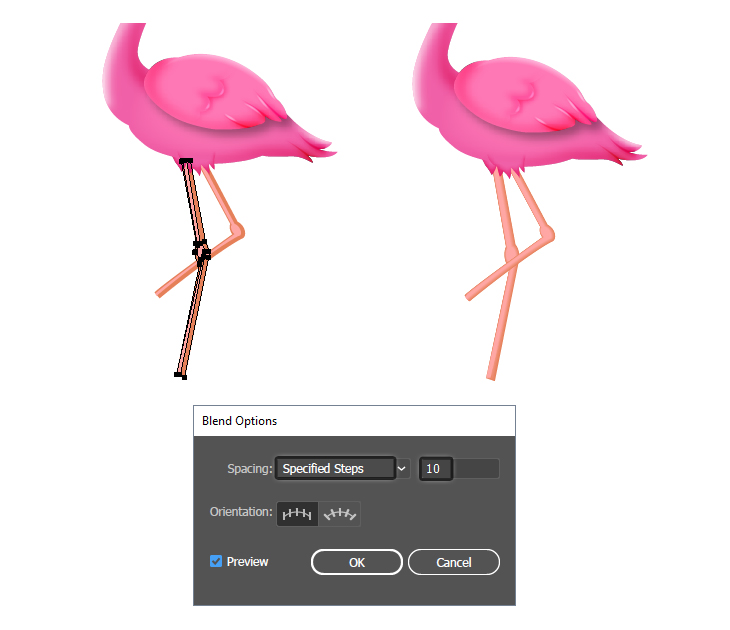
42. Select the two shapes that make up one of the legs and go to Object > Blend > Blend Options. Choose 10 Specified Steps and then go back to Object > Blend > Make (Alt-Control-B). Repeat the same thing for the other leg.
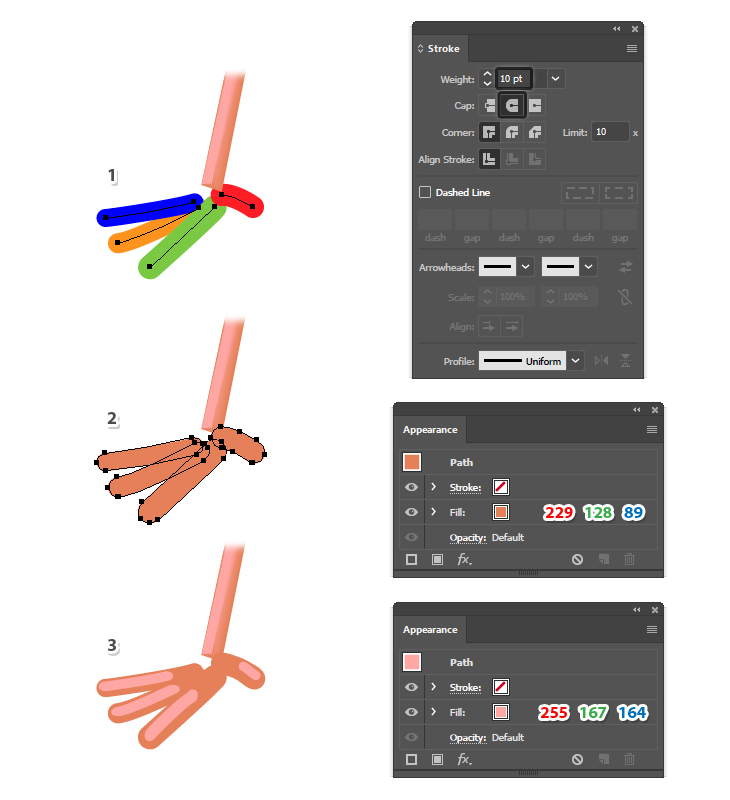
43. To create the foot, grab the Pen Tool (P) and draw four paths like in the following image as the fingers. Give them a 10 – 12 pt Stroke and press the Round Cap option in the Stroke panel to obtain the rounded ends (1).
While the four paths stay selected, choose Expand from the Object menu to turn the strokes into fills. Use light brown as the fill color (2).
Follow the same technique to create four similar but smaller shapes on the fingers and fill them with a lighter shade (3).
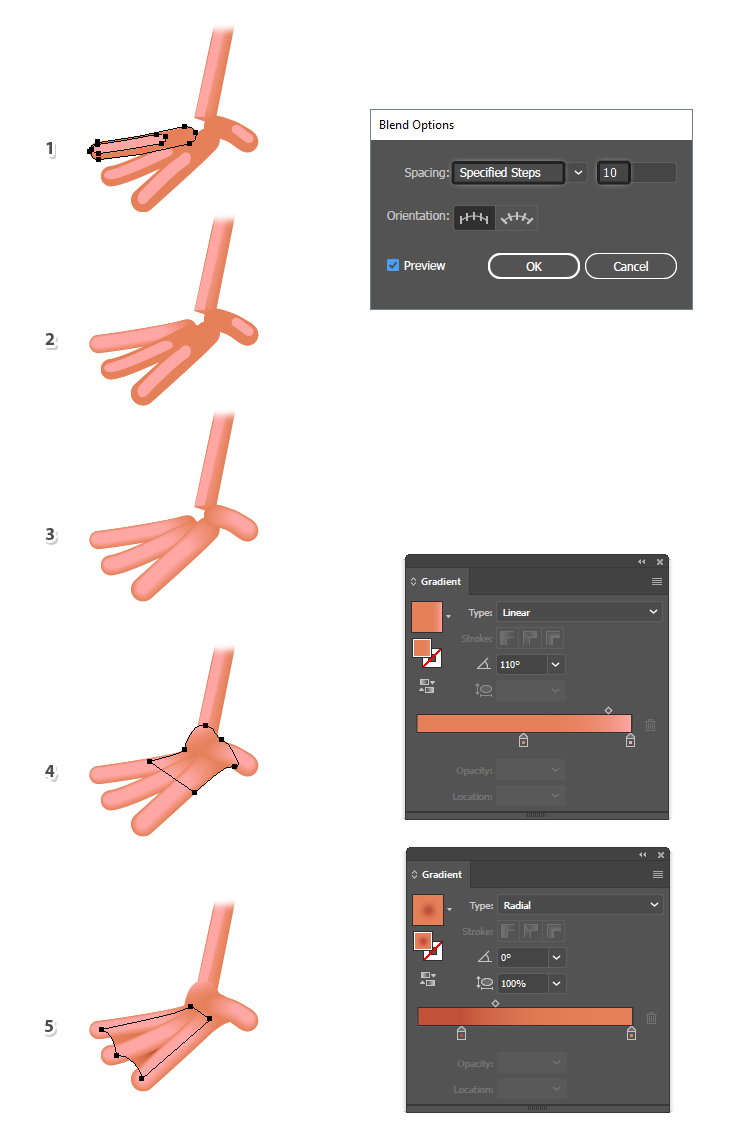
44. Select the two shapes that make up one of the fingers (1) and blend them using 10 Specified Steps (2). Repeat the same thing for the other fingers and make sure they are in the correct order (3).
Next, draw a shape behind the finger like in the image below and fill it with the linear gradient shown (4). Draw a new shape in back as the web between the fingers and fill it with the radial gradient shown (5).
45. At this point one foot is ready (1) and you can create the other one in a similar way (2).
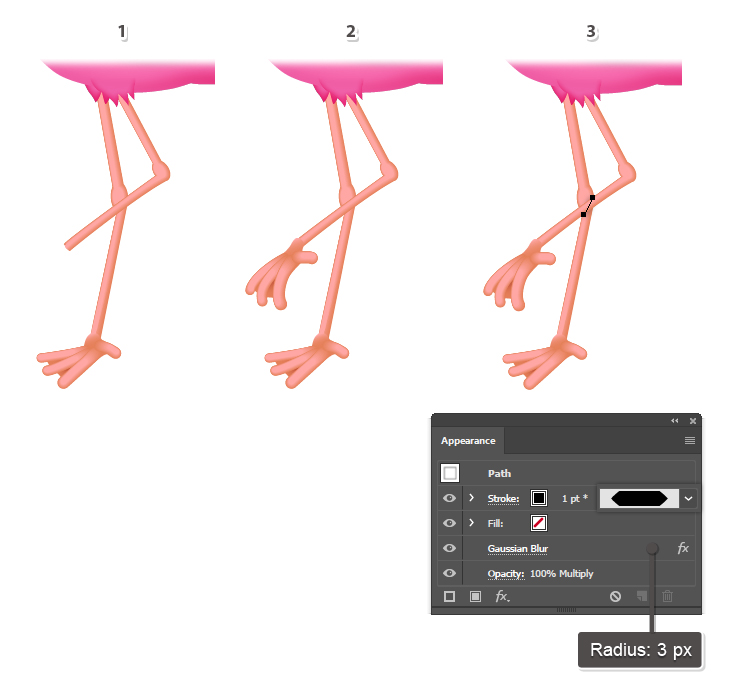
Also, let’s add a small shadow where the legs are overlapping. Use the Pen Tool (P) to draw a short path, give it a 1 pt black Stroke and use the Width Profile 3 from the Stroke panel. Next, go to Effect > Blur > Gaussian Blur and apply a Radius of 3 px; then set the Blending Mode to Multiply (3).
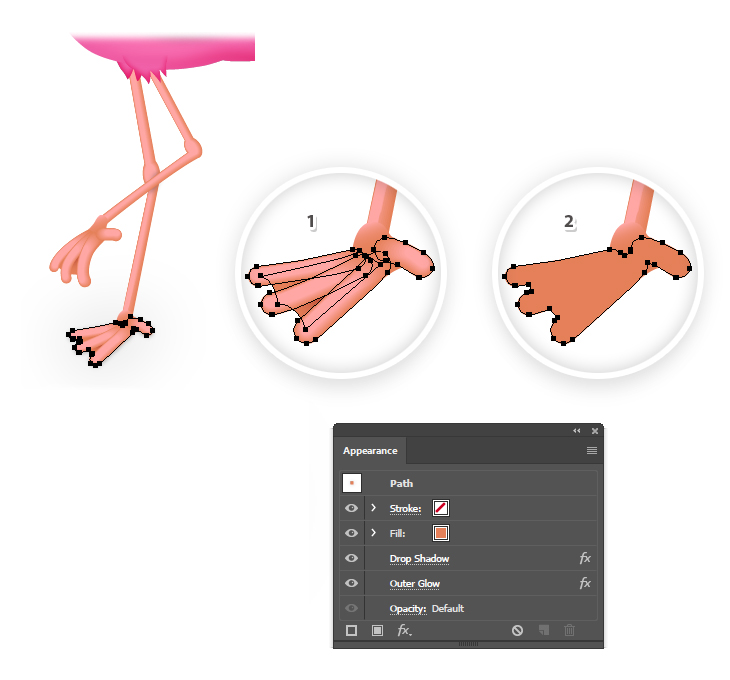
46. Use the Direct Selection Tool (A) to select only the bigger shapes of the fingers from the blend-groups along with the web shape and then Copy and Paste in Place (Shift-Control-V) to make copies of them. Press Unite in the Pathfinder panel to merge them into a single shape (2).
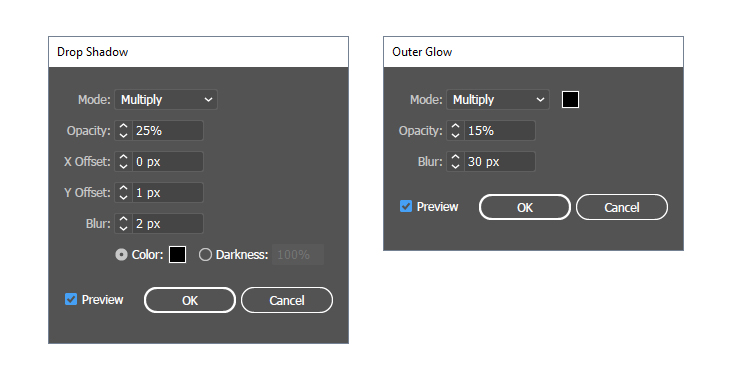
Move the newly obtained shape behind the foot and then apply the Drop Shadow and the Outer Glow effects to create the shadow.
Here are the settings for the Drop Shadow and the Outer Glow effects:
47. At this point the flamingo is ready.

Awesome work!
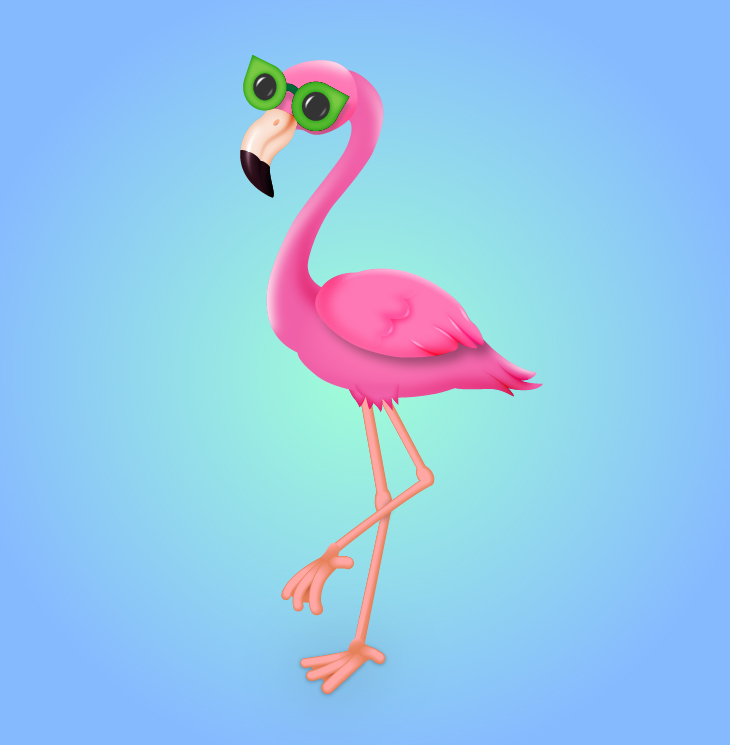
Here is the final image of the cute flamingo character. I hope you enjoyed this tutorial and that you learned new things today.