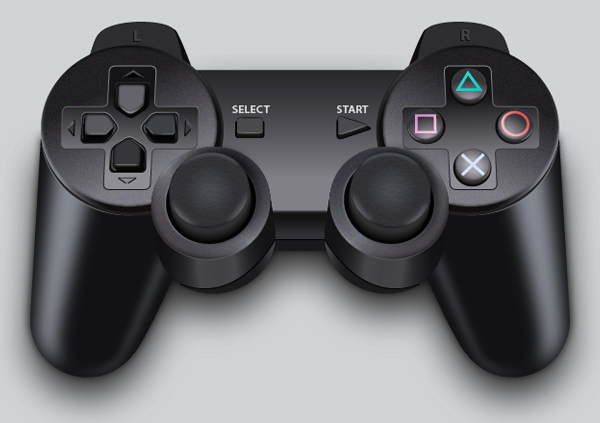
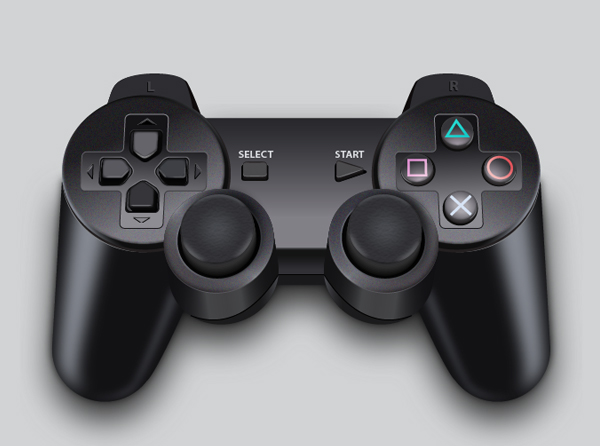
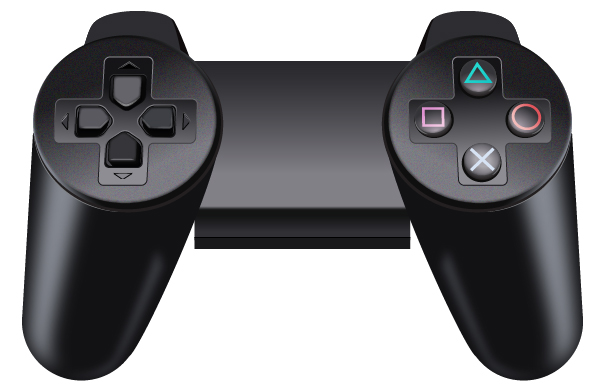
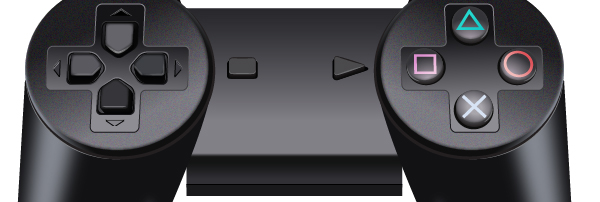
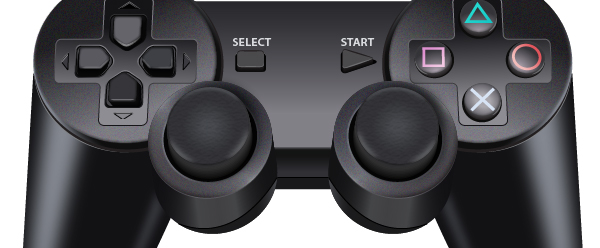
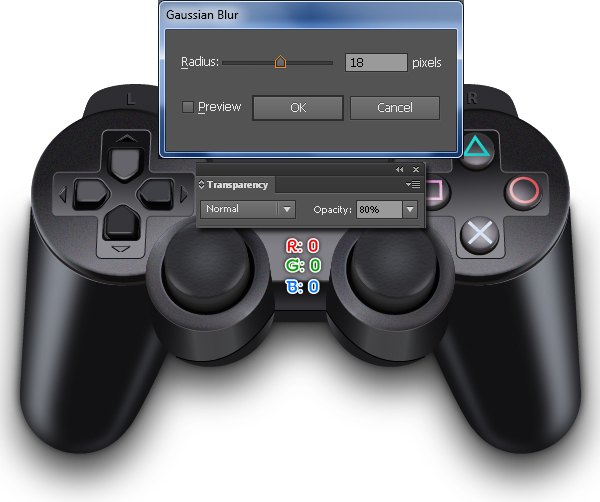
In the following tutorial you will learn to create a realistic 3D Game Controller by using some basic tools, the Pathfinder palette, vector shape building techniques, gradients, duplicated shapes and more. So let’s start.
Create a New Document
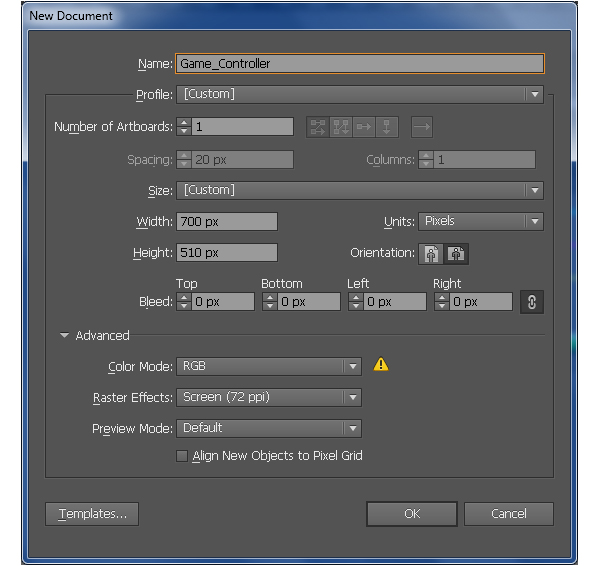
1. Launch Illustrator and then press (Ctrl + N) to create a New document. Select Pixels from the Units drop-down menu, enter 700 in the width box and 510 in the height box then click on the Advanced button. Select RGB, Screen (72ppi) and make sure that the Align New Objects to Pixel Grid box is unchecked before you click OK.
Create the Left Controller Area
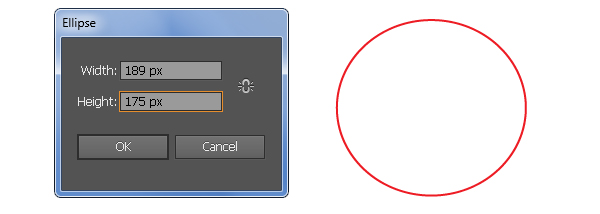
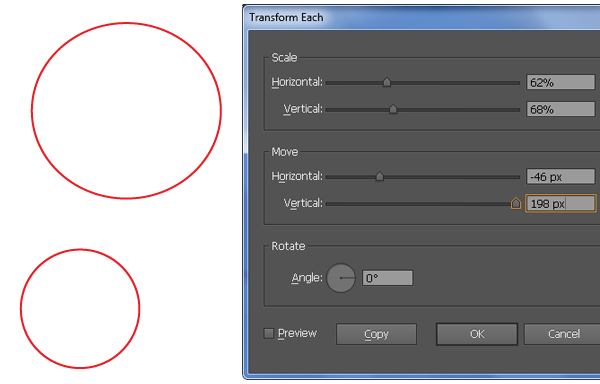
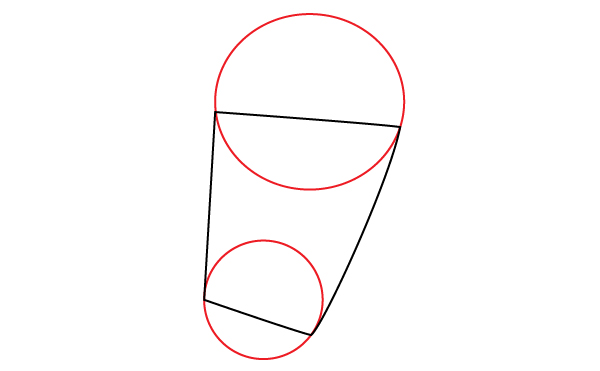
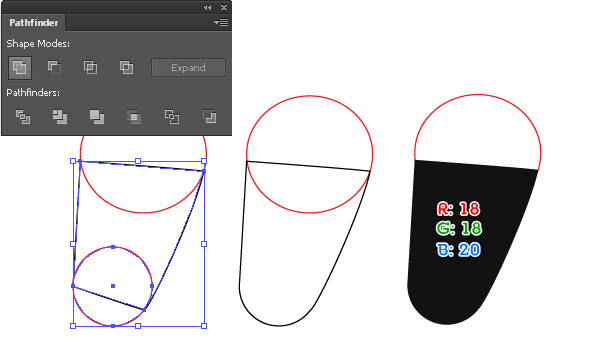
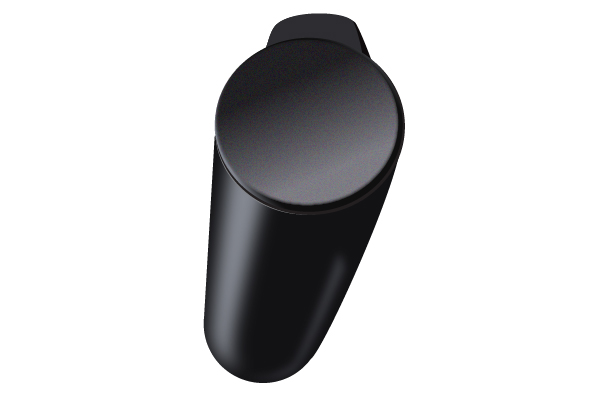
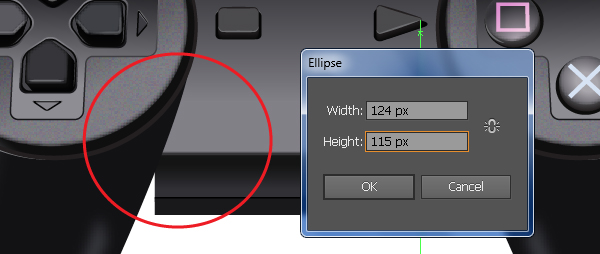
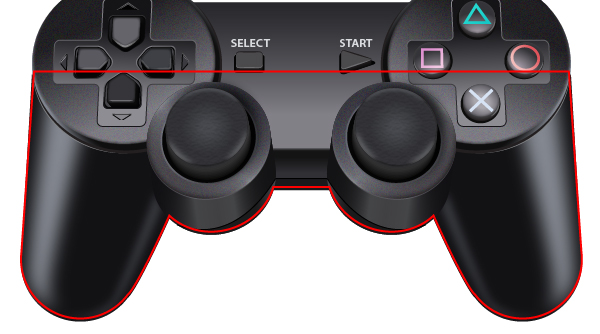
2. Start with drawing an ellipse using the Ellipse Tool (L). Keep this ellipse selected, go to the Object > Transform > Transform Each… Follow the data as shown below and then click Copy. Next pick the Pen Tool (P) and create a black object like you see in the third image below.
3. Select the black object and the small ellipse, then open the Pathfinder palette (Window > Pathfinder) and click on the Unite button. Fill the resulting object with R=18, G=18, B=20.
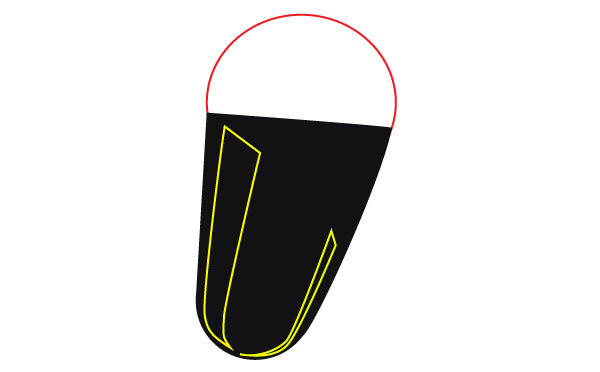
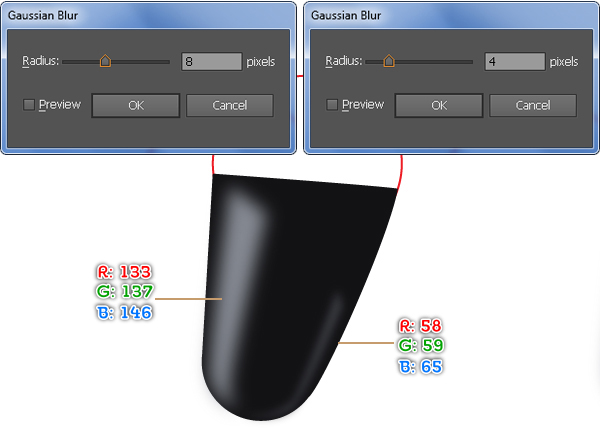
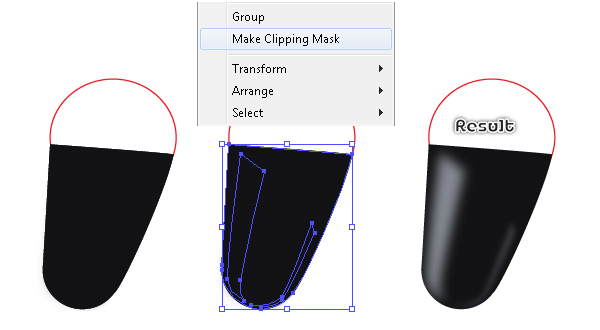
4. We are going to start making highlights on the new shape to give it more of a 3D look. First create two objects with the Pen Tool (P) like in the image. Once your objects are drawn, select the big object and fill it with R=133, G=137, B=146, then go to the Effect > Blur > Gaussian Blur… Enter a 8px Radius and click OK. Next select the remaining object, fill it with R=58, G=59, B=65 and then apply a 4px Gaussian Blur effect for the resulting shape. Before you continue, select two newly created shapes and group (Ctrl +G) them. Now select the black shape created in the step 3, duplicate (Ctrl +C, Ctrl +F) it once and then bring the copy to front (Ctrl +Shift +Right Square Bracket). Make sure that the new shape is still selected, hold down the Shift, click on the new group and go to the Object > Clipping Mask > Make (Ctrl +7).
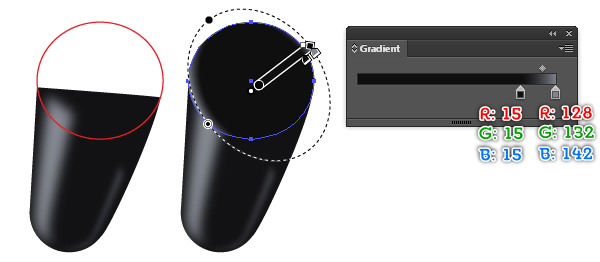
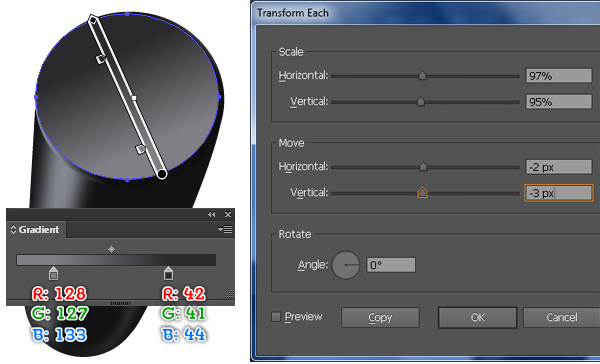
5. Select the red ellipse created in the step 2, bring it to front (Ctrl +Shift +Right Square Bracket) and make a copy of it (Ctrl +C, Ctrl +F), then hide the copy (Ctrl +3). Reselect the red ellipse and fill it with the radial gradient as shown below. Keep the resulting shape selected, go to the Object > Transform > Transform Each… Enter the data like you see in the third image and click Copy, then replace the existing color of the new shape with the linear gradient. Next go to the Effect > Stylize > Feather… Enter a 4px Radius and then click OK.
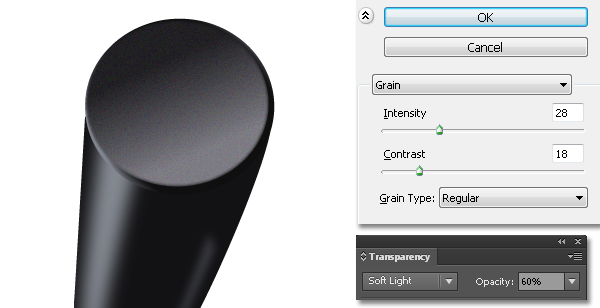
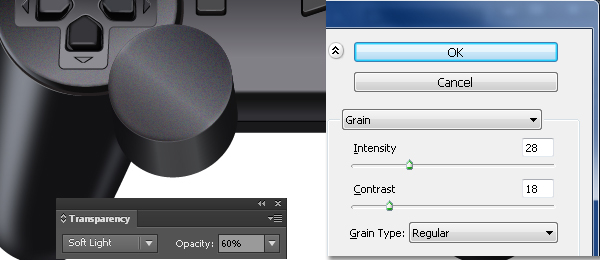
6. Make a copy of the newly created shape and go to the Appearance palette (Window > Appearance), then remove the Feather section. Keep the resulting shape selected, go to the Effect > Texture > Grain… Follow the data as shown below and then click OK. Next set the Blending Mode of the new shape to Soft Light and reduce the Opacity to 60%.
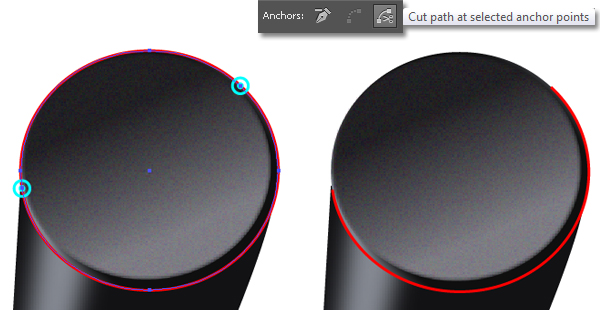
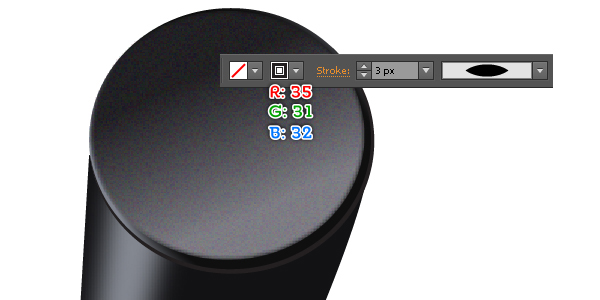
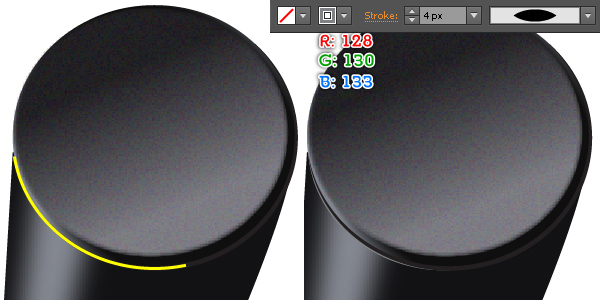
7. Press (Ctrl +Alt +3) to show the red ellipse hidden in the step 5 and bring it to front. Pick the Add Anchor Point Tool (+) and add two anchor points highlighted with blue. Reselect two new anchor points and click on the “Cut path at selected anchor points” button from the Properties bar. Before you continue, select the top path and remove it. Next reselect the remaining path, fill it with none and add a 3px stroke (R=35, G=31, B=32), then apply the Width Profile 1 for the result. Continue create another curved path like you see in the fourth image. Once your path is drawn, fill it with none and add a 4px stroke (R=128, G=130, B=133), then apply the Width Profile 1 for the result.
Create a Top Button
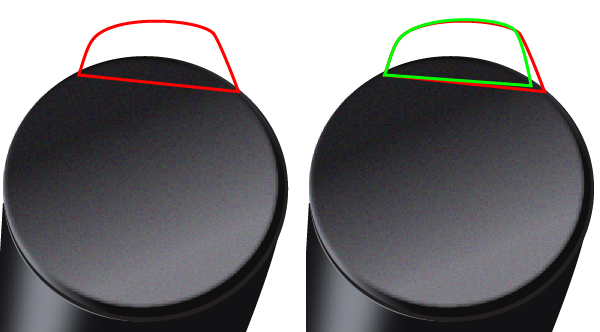
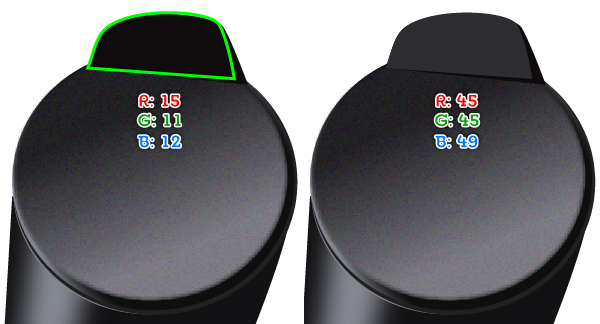
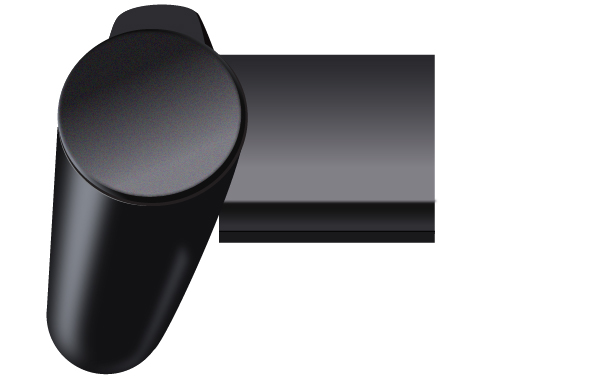
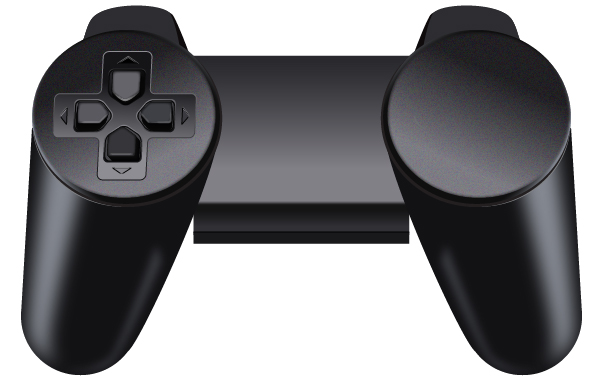
8. With the Pen Tool (P) draw two shapes like below. Next fill the red object with R=15, G=11, B=12 and fill the green object with R=45, G=45, B=49. Reselect these newly created shapes and send them to back (Ctrl +Shift +Left Square Bracket). Finally select and group (Ctrl + G) all shapes created from beginning step 2 to this time.
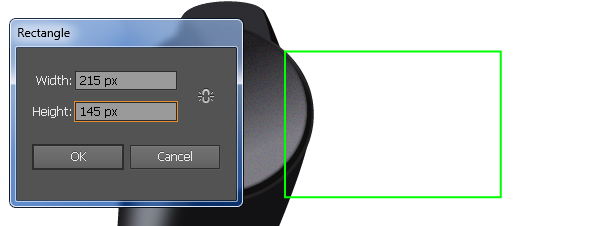
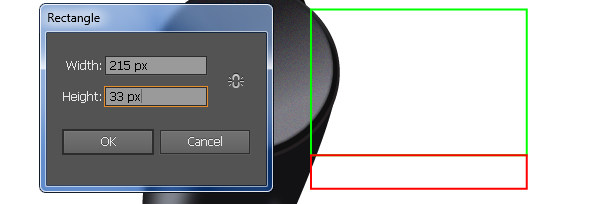
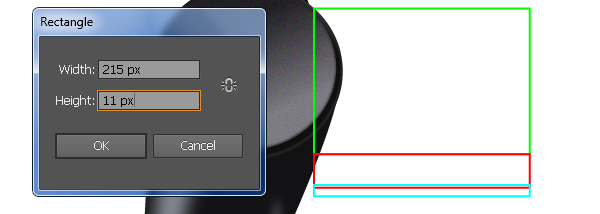
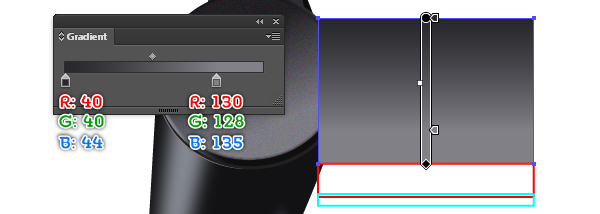
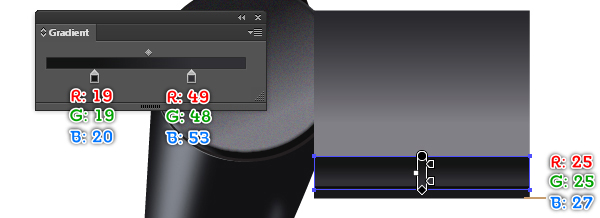
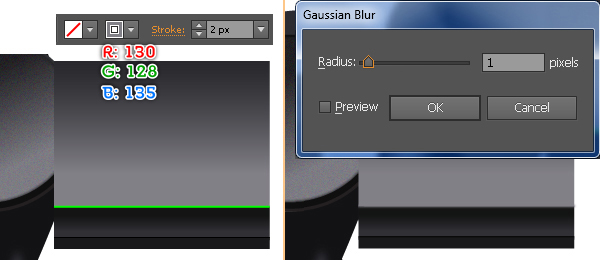
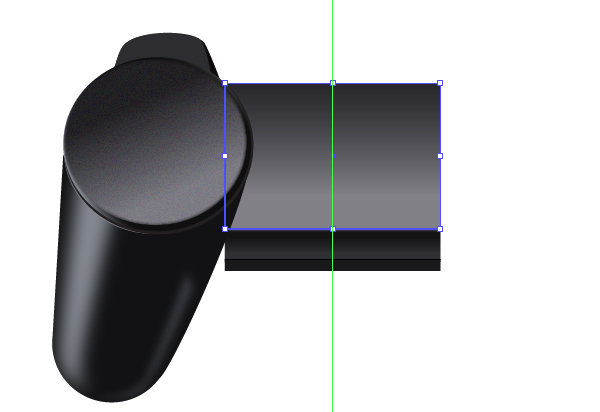
9. Use the Rectangle Tool (M) to create objects, place them to the correct positions and then fill them as shown in the images below.
10. With the help of the Line Segment Tool (\), create a horizontal path like you see in the image below. Once your path is drawn, fill it with none and add a 2px stroke (R=130, G=128, B=135), then apply a 1px Gaussian Blur effect for the result. In the end your artwork should look roughly like the third image.
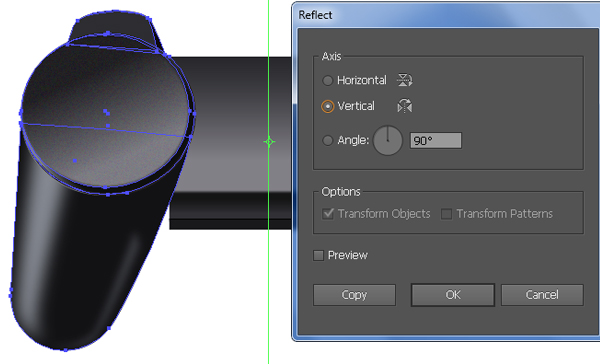
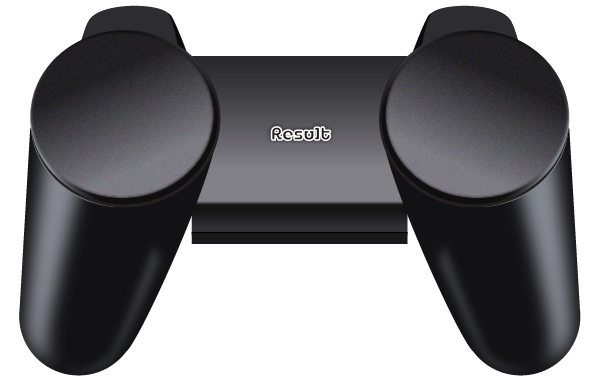
11. Show the Rulers (View > View Rulers > Show Ruler) or (Ctrl +R). Next drag a vertical guide from the Rulers (if the guides locked, go to the View > Guides > Lock Guides) or (Ctrl +Alt + ;). Now select the biggest object created in the step 9, hold down the Shift, click on the newly created guides, release the Shift and then click on the biggest object created in the step 9 again (to fixed its position). Next open the Align palette (Window > Align) and click on the Horizontal Align Center button. Now select the group created in the step 8, pick the Reflect Tool (O), hold down the Alt key and click on the guide. In the Reflect box, check the Vertical and click Copy. The last thing to do is go to the View > Guides > Hide Guides (Ctrl +;).
Create the Crossed Area and the Buttons
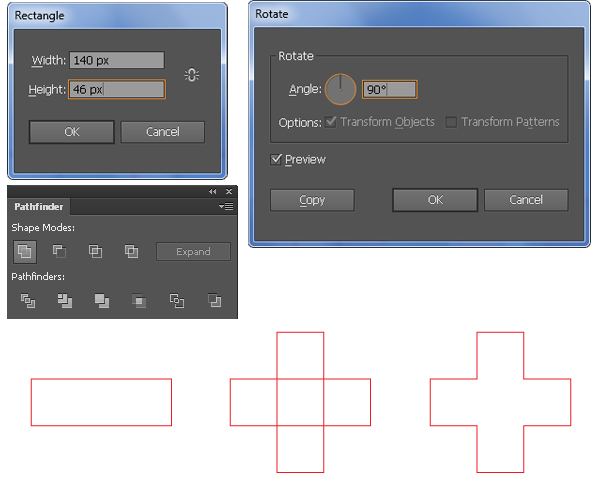
12. With the Rectangle Tool (M) create a 140 by 46px object, then double-click on the Rotate Tool. In the Rotate box, enter a 90 degrees Angle and then click Copy. Reselect two newly created objects, open the Pathfinder palette (Window > Pathfinder) and click on the Unite button.
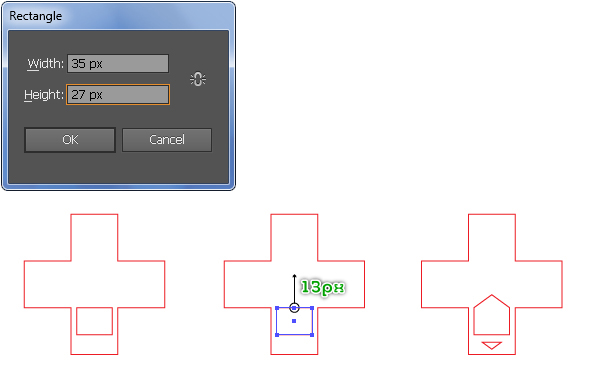
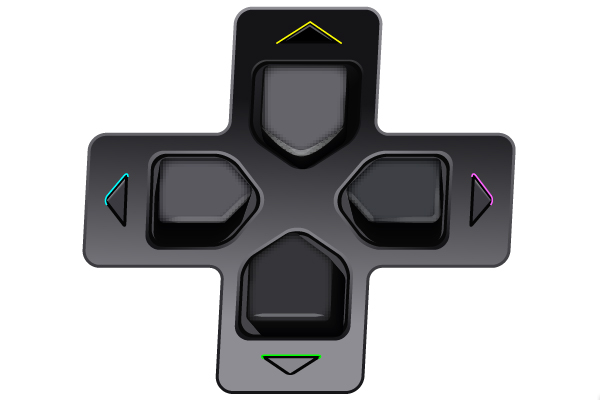
13. Using the Rectangle Tool (M) create a 35 by 27px object as shown in the picture below. Reselect the newly created object, pick the Add Anchor Point Tool (+) and add an anchor point highlighted with black, then move this new anchor point 13px up. Continue create a triangle like you see in the third image. Now select three newly created objects and then click on the cross object again (to fixed its position). Next open the Align palette (Window/ Align), click on the Horizontal Align Center button.
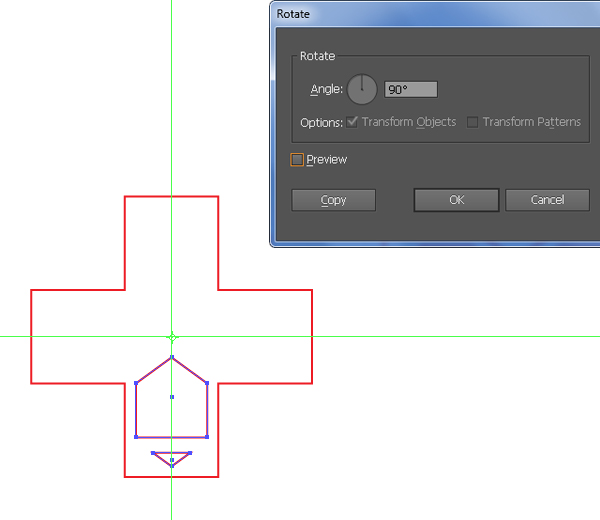
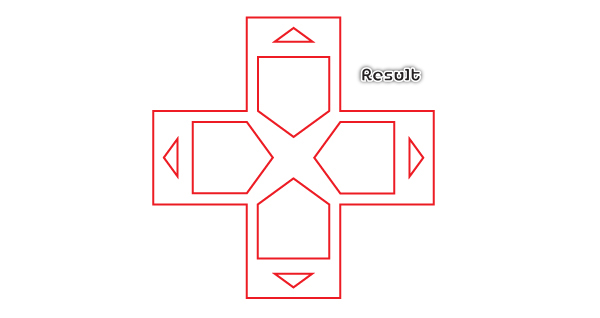
14. Drag a horizontal and vertical guide from the Rulers. Next select the cross object, hold down the Shift, click on two newly created guides, release the Shift and then click on the cross object again (to fixed its position). Next open the Align palette (Window/ Align), click on the Horizontal Align Center button and then click on the Vertical Align Center button. Now select two objects created in the step 13, pick the Rotate Tool (R), hold down the Alt key and click on the intersection point of two guides. In the Rotate box, enter a 90 degrees Angle and then click Copy. Next press (Ctrl +D) twice to get the result like you see in the second image below.
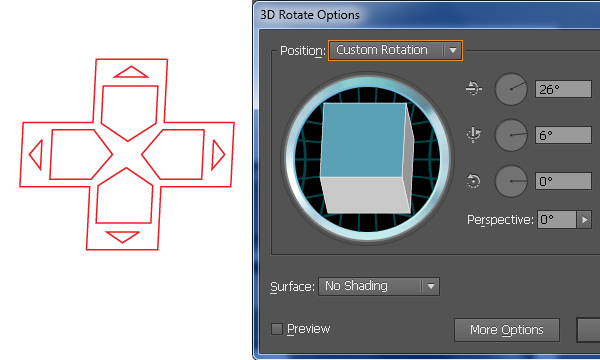
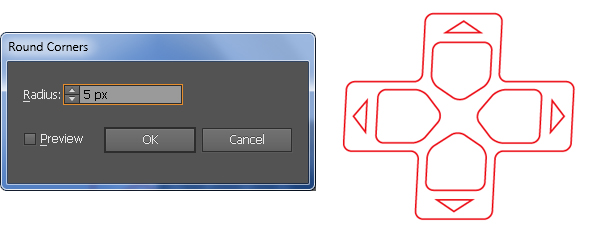
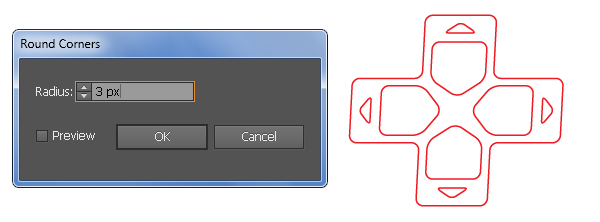
15. Select all objects created from beginning step 12 to this time and go to the Effect > 3D > 3D Rotate Options… Enter the data as shown below and then click OK. Keep the results selected, hold down the Shift and click on the four triangles to unselect them, then go to the Effect > Stylize > Round Corners… Enter a 5px Radius and then click OK. Next select four triangles and go to the Effect > Stylize > Round Corners… Enter a 3px Radius and then click OK.
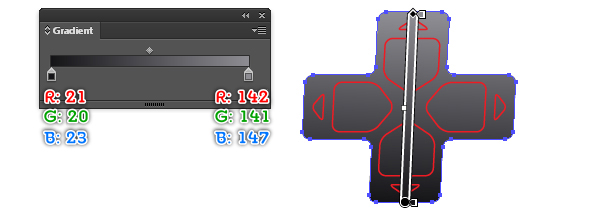
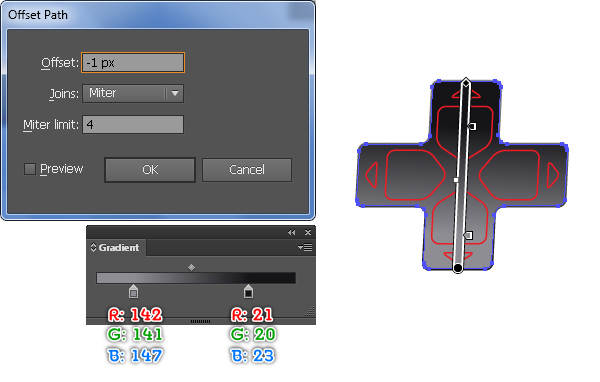
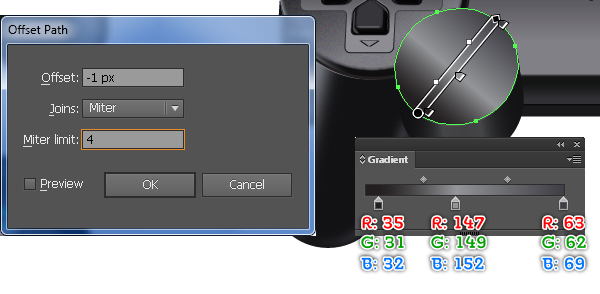
16. Fill the cross object with the linear gradient. Keep the resulting shape selected, go to the Object > Path > Offset Path… Enter a -1px Offset and then click OK. Next replace the existing color of the new shape with new linear gradient.
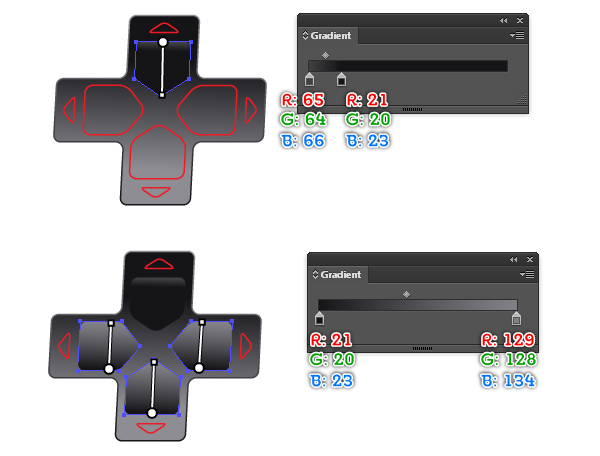
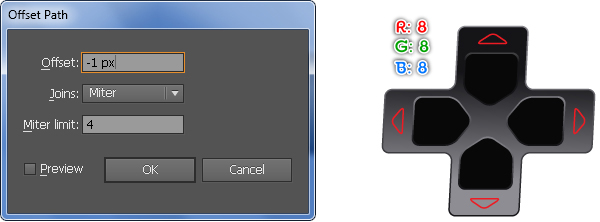
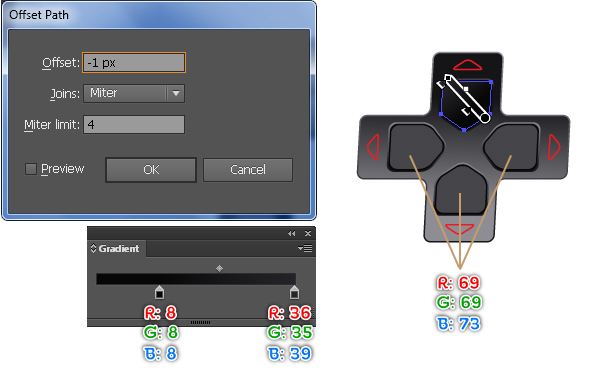
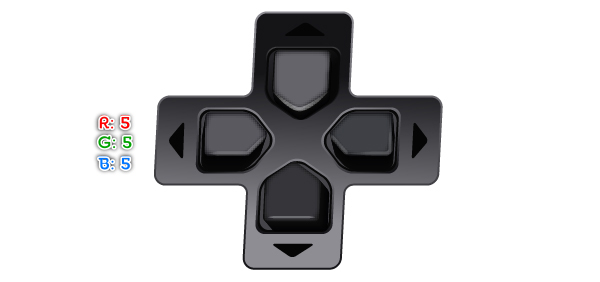
17. Continue fill four objects like you see in the images below. Next reselect these four shapes and go to the Object > Path > Offset Path… Enter a -1px Offset and then click OK. Replace the existing color of the new shapes with R=8, G=8, B=8. Make sure that four newly created shapes are still selected, go to the Object > Path > Offset Path… Enter a -1px Offset and then click OK. Next replace the existing color of the new shapes like you see in the final image.
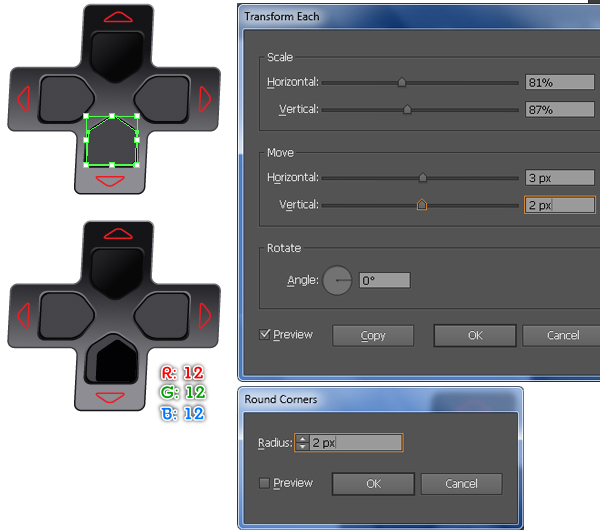
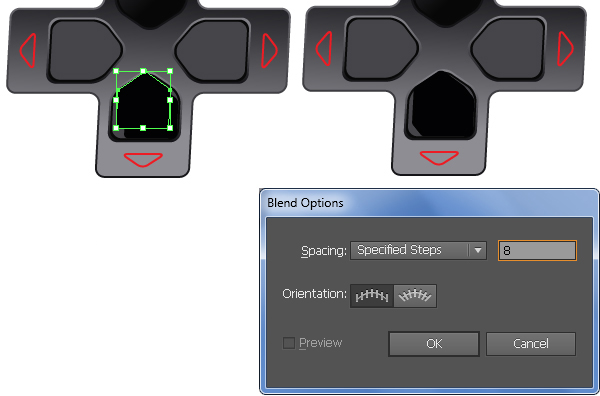
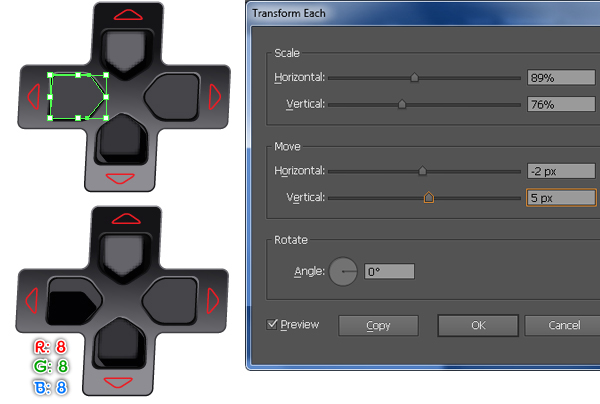
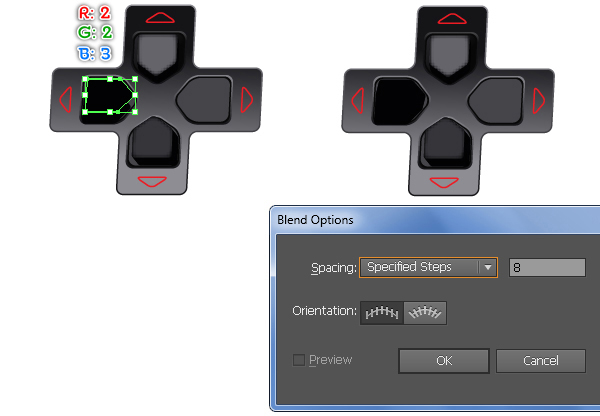
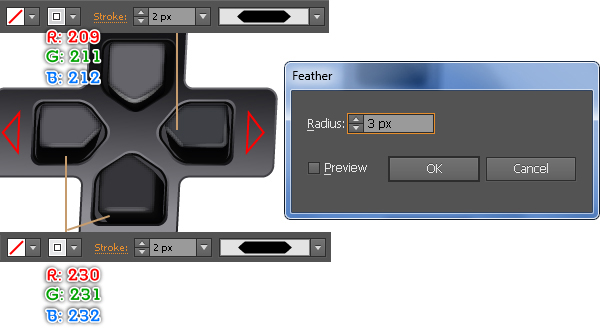
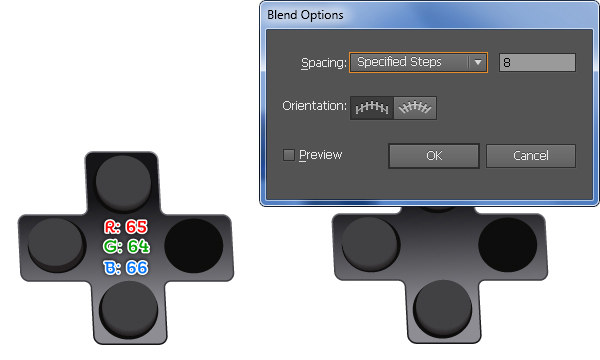
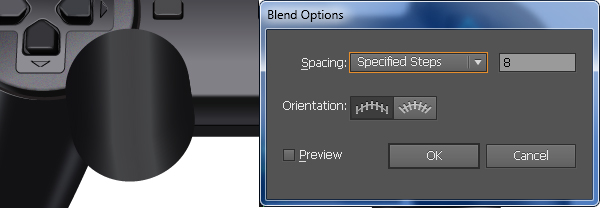
18. Select the new shape as shown below and go to the Object > Transform > Transform Each… Enter the data as shown below and then click Copy. Keep the newly created shape selected, go to the Appearance palette (Window > Appearance) and click on the Round Corners section. In the Round Corners box, enter a 2px Radius and then click OK. Next replace the existing color of the resulting shape with R=12, G=12, B=12, then duplicate (Ctrl +C, Ctrl +F) it once. Move the copy 5px up and 4px to the left, then duplicate it once and hide (Ctrl +3) the copy. Reselect two newly created shapes and go to the Object > Blend > Blend Options… Follow the data as shown in the fourth image and then click OK. Next go to the Object > Blend > Make (Ctrl +Alt +B). Now press (Ctrl +Alt +3) to show the shape hidden in this step, replace the existing color of this shape with R=54, G=53, B=57 and then apply a 3px Feather effect for the resulting shape.
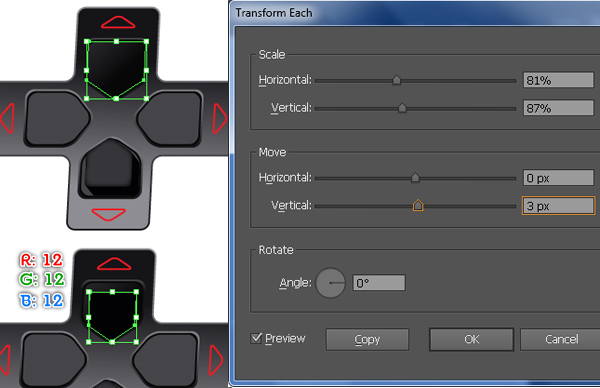
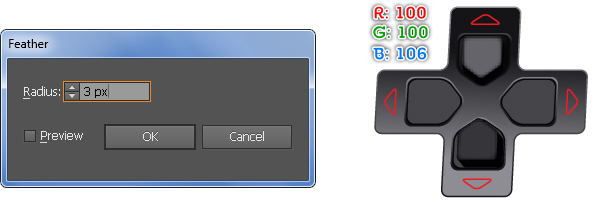
19. Select the shape as shown below and go to the Object > Transform > Transform Each… Enter the data as shown below and then click Copy. Replace the existing color of the resulting shape with R=12, G=12, B=12, then duplicate (Ctrl +C, Ctrl +F) it once. Move the copy 5px up and 1px to the left, then duplicate it once and hide (Ctrl +3) the copy. Reselect two newly created shapes and go to the Object > Blend > Blend Options… Follow the data as shown in the third image and then click OK. Next go to the Object > Blend > Make (Ctrl +Alt +B). Now press (Ctrl +Alt +3) to show the shape hidden in this step, replace the existing color of this shape with R=100, G=100, B=106 and then apply a 3px Feather effect for the resulting shape.
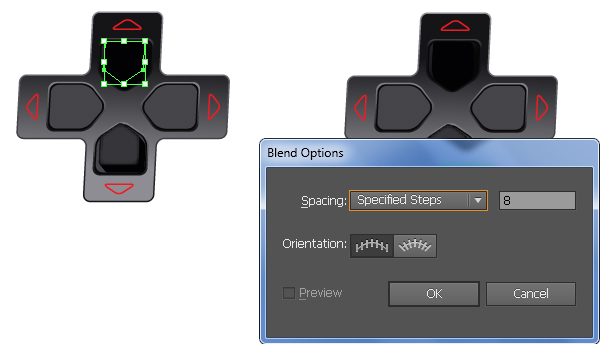
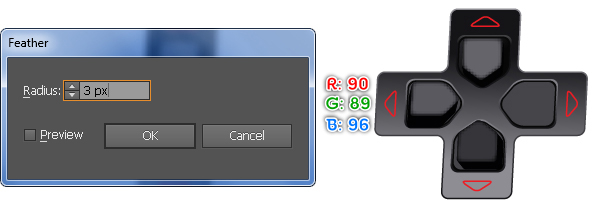
20. Select the shape as shown below and go to the Object > Transform > Transform Each… Enter the data as shown below and then click Copy. Replace the existing color of the resulting shape with R=8, G=8, B=8, then duplicate (Ctrl +C, Ctrl +F) it once. Move the copy 8px up and 2px to the right, then replace the existing color of the copy with R=2, G=2, B=3. Next duplicate the new shape once and hide (Ctrl +3) the copy. Reselect two newly created shapes and go to the Object > Blend > Blend Options… Follow the data as shown in the third image and then click OK. Next go to the Object > Blend > Make (Ctrl +Alt +B). Now press (Ctrl +Alt +3) to show the shape hidden in this step, replace the existing color of this shape with R=90, G=89, B=93 and then apply a 3px Feather effect for the resulting shape.
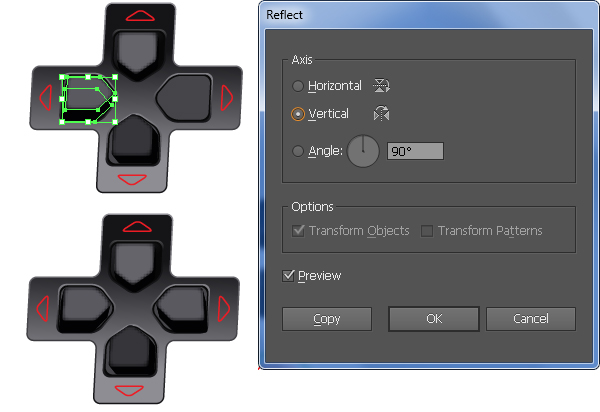
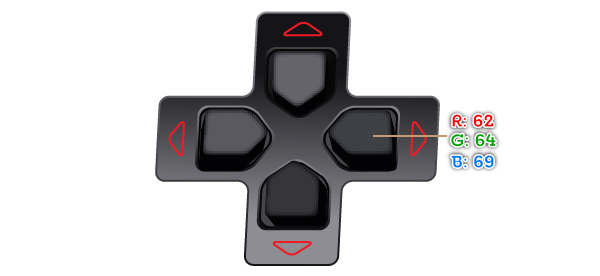
21. Select shapes created in the step 20 and double-click on the Reflect Tool. In the Reflect box, check the Vertical and click Copy. Next move these copies to the correct position as shown in the second image. Finally replace the existing color of the new top shape with R=62, G=64, B=69.
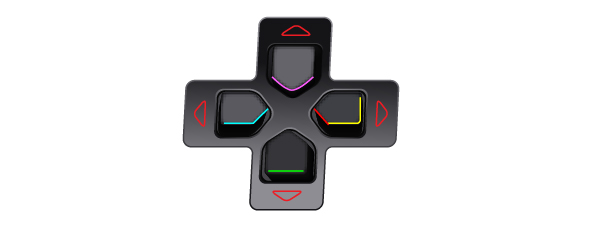
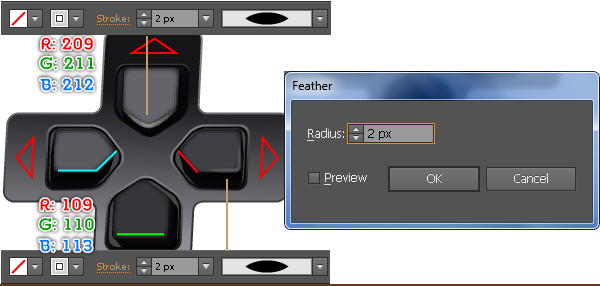
22. To give a more realistic look I’m going to be adding some highlights on the buttons. First draw some paths as shown below. Once your paths are drawn, reselect the magenta path, fill it with none and add a 2px stroke (R=209, G=211, B=212), then apply the Width Profile 1 and 2px Feather effect for the result. Next select the yellow path, fill it with none and add a 2px stroke (R=109, G=110, B=113), then apply the Width Profile 1 and 2px Feather effect for the result. Likewise, repeat the same techniques for the remaining paths.
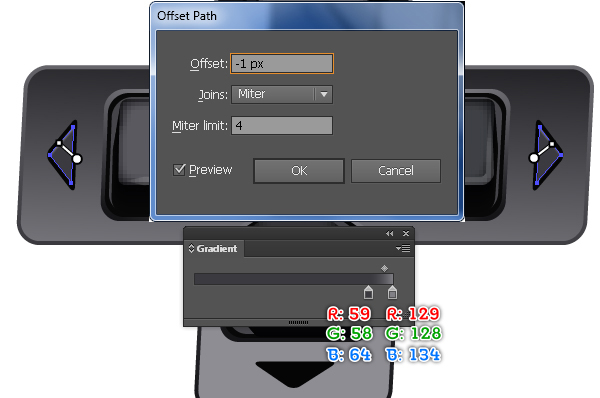
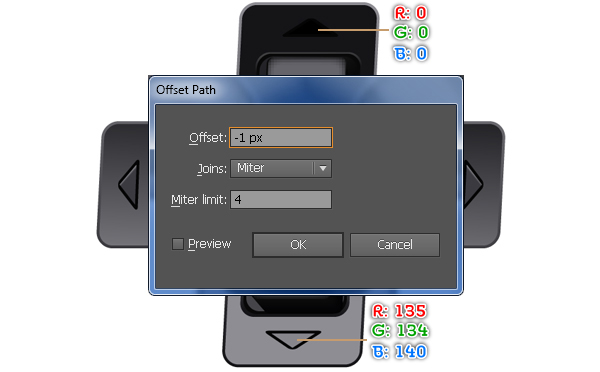
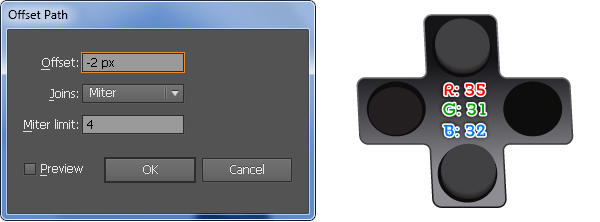
23. Select four triangles and fill them with R=5, G=5, B=5. Next select the right and left triangles, then go to the Object > Path > Offset Path… Enter a -1px Offset and then click OK. Replace the existing color of two new shapes with the linear gradient. Now select the top and bottom triangles, then go to the Object > Path > Offset Path… Enter a -1px Offset and then click OK. Replace the existing color of the top triangle with R=0, G=0, B=0 and replace the existing color of the new bottom triangle with R=135, G=134, B=140.
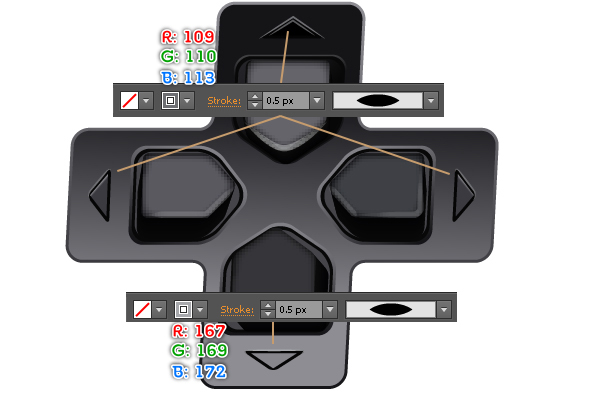
24. We’ve going to be adding some highlights on the triangles. First draw four paths as shown below. Once your paths are drawn, reselect the bottom path, fill it with none and add a 0.5px stroke (R=167, G=169, B=172), then apply the Width Profile 1 for the result. Next select remaining paths, fill them with none and add a 0.5px stroke (R=109, G=110, B=113), then apply the Width Profile 1 for the results. Now select all shapes created from beginning step 12 to this time and place them to the correct position like you see in the third image.
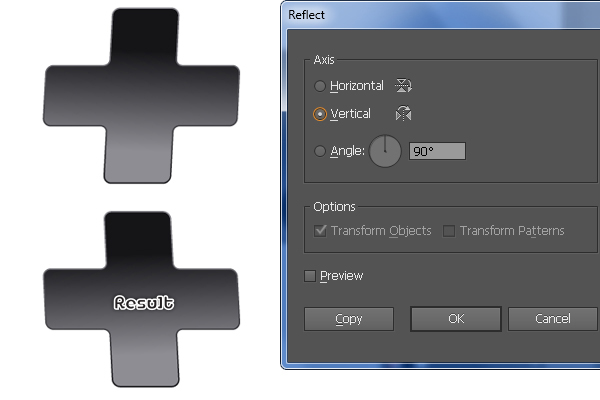
25. Select two “cross” shapes created in the step 16 and go to the Object > Transform > Reflect… In the Reflect box, check the Vertical and click Copy, place the copies to the different position.
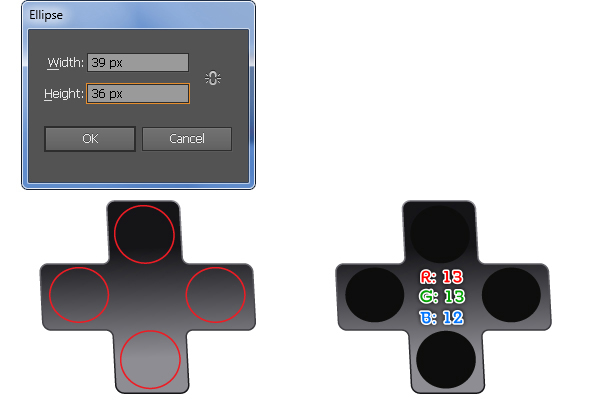
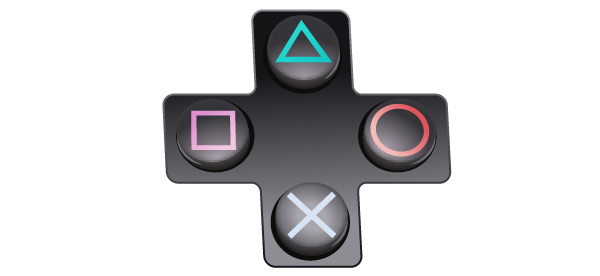
26. Draw four ellipes (39 by 36px) with the Ellipse Tool (L) like in the image. Next fill these ellipses with R=13, G=13, B=12.
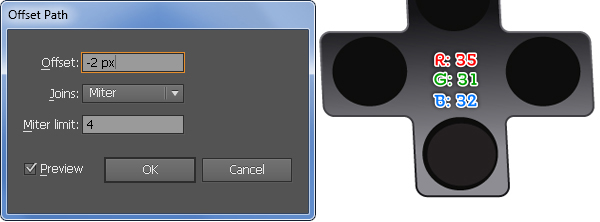
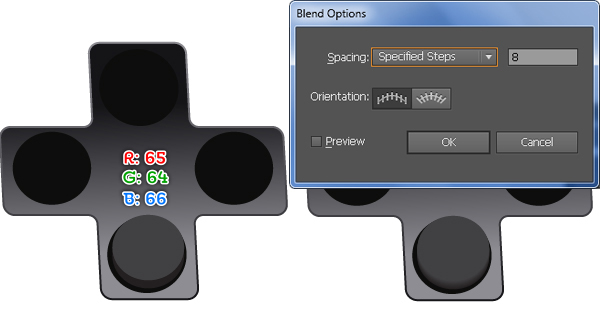
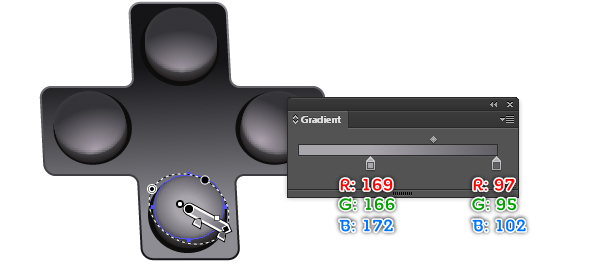
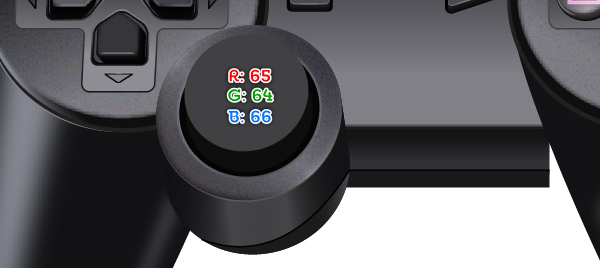
27. Select the bottom ellipse and go to the Object > Path > Offset Path… Enter a -2px Offset and click OK, then replace the existing color of the new shape with R=35, G=31, B=32. Make sure that the new shape is still selected, duplicate (Ctrl +C, Ctrl +F) it once, move the copy 4px up, then replace the existing color of it with R=65, G=64, B=66. Next make a copy of the resulting shape and hide the copy (Ctrl +3). Now reselect two newly created ellipses and create a blend between them.
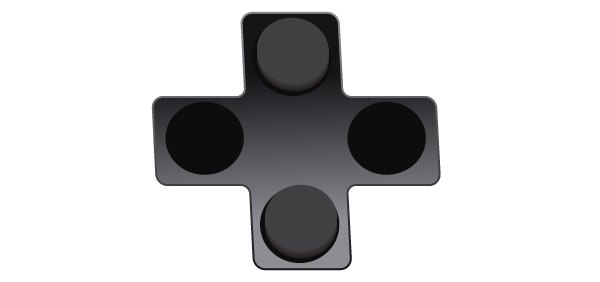
28. Press (Ctrl +Alt +3) to show the ellipse hidden in the previous step. Next select all shapes created in the step 27, duplicate them once and then place the copies to the correct position as shown below.
29. Select the left ellipse and go to the Object > Path > Offset Path… Enter a -2px Offset and click OK, then replace the existing color of the new shape with R=35, G=31, B=32. Make sure that the new shape is still selected, duplicate (Ctrl +C, Ctrl +F) it once, move the copy 4px up and 1px to the left, then replace the existing color of it with R=65, G=64, B=66. Next make a copy of the resulting shape and hide the copy (Ctrl +3). Now reselect two newly created ellipses and create a blend between them.
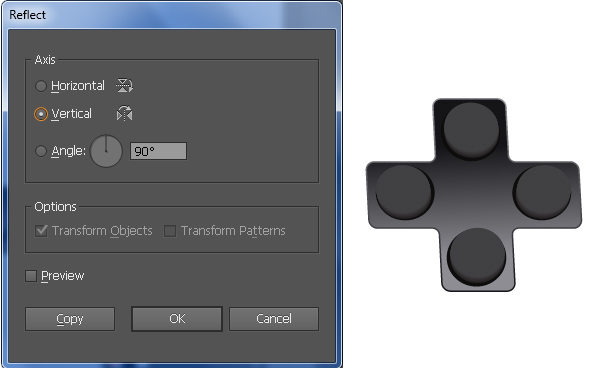
30. Press (Ctrl +Alt +3) to show the ellipse hidden in the previous step. Next select all shapes created in the step 29 and go to Object > Transform > Reflect. Check the Vertical then hit the Copy button. Next place the copies to the correct position like you see in the image below.
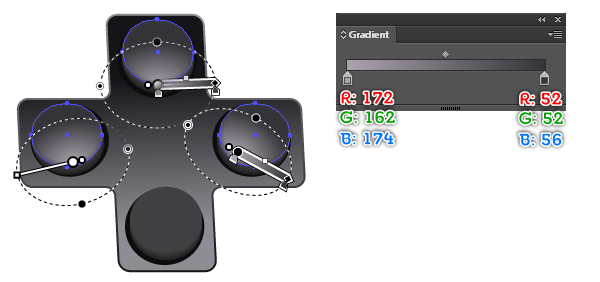
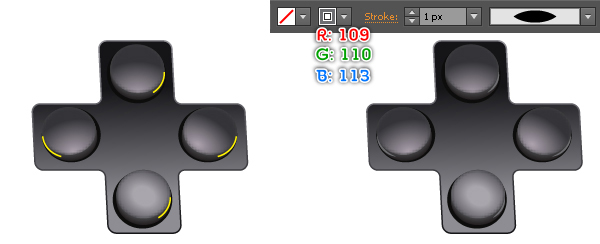
31. Replace the existing color of the shapes with the radial gradients as shown in the images below. To give a more realistic look I’m going to be adding some highlights on new buttons. First draw four curved paths as shown in the third image. Once your paths are drawn, fill them with none and add a 1px stroke (R=109, G=110, B=113), then apply the Width Profile 1 for the results.
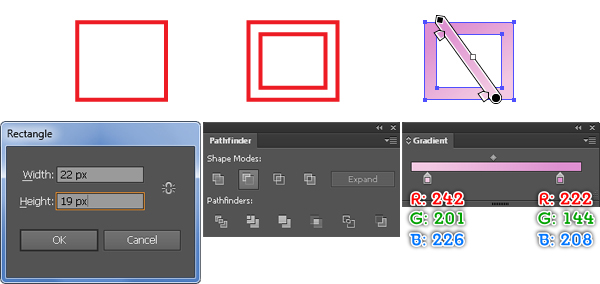
32. Start with drawing a 22 by 19px object using the Rectangle Tool (M). Keep the new object selected, go to the Object > Path > Offset Path… Enter a -3px Offset and then click OK. Make sure that the newly created shape is still selected, hold down the Shift and click on the remaining rectangle. Open the Pathfinder palette (Window > Pathfinder) and click on the Minus Front button, then fill the resulting object with the linear gradient.
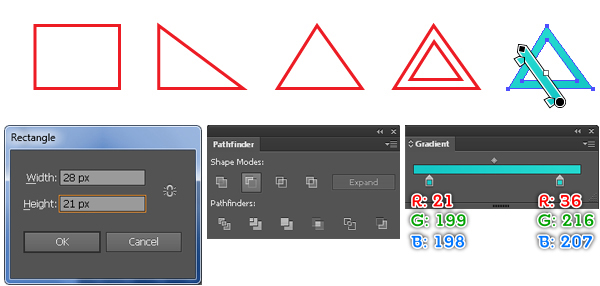
33. Continue with the Rectangle Tool (M), create a 28 by 21px object. Next remove the top-right anchor point of the new rectangle and then move the top-left anchor point 13px to the right. Reselect the new object, go to the Object > Path > Offset Path… Enter a -3px Offset and then click OK. Make sure that the newly created shape is still selected, hold down the Shift and click on the remaining triangle, then click on the Minus Front button from the Pathfinder palette. Finally fill the resulting object with the linear gradient as shown below.
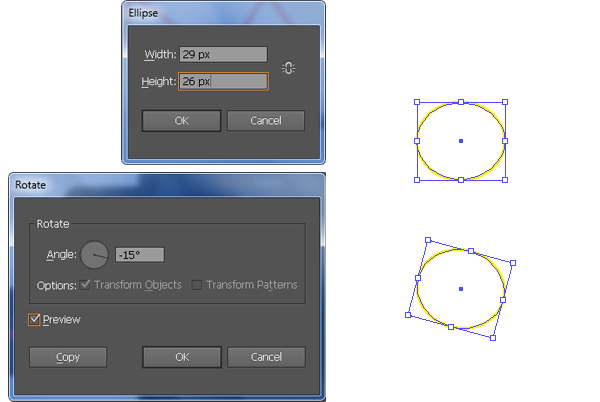
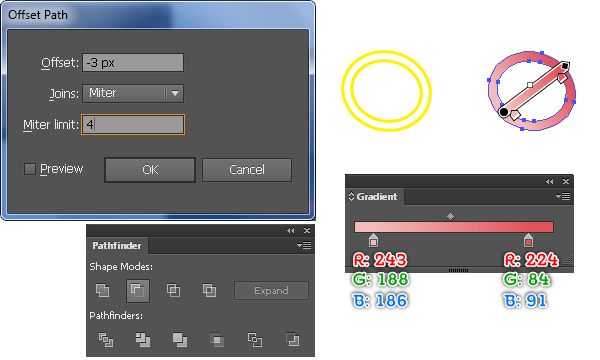
34. With the Ellipse Tool (L) create a 29 by 26px object. Once your object is drawn, rotate it an angle of about -15 degrees. Keep the new object selected, go to the Object > Path > Offset Path… Enter a -3px Offset and then click OK. Make sure that the newly created shape is still selected, hold down the Shift and click on the remaining ellipse, then click on the Minus Front button from the Pathfinder palette. Finally fill the resulting object with the linear gradient as shown below.
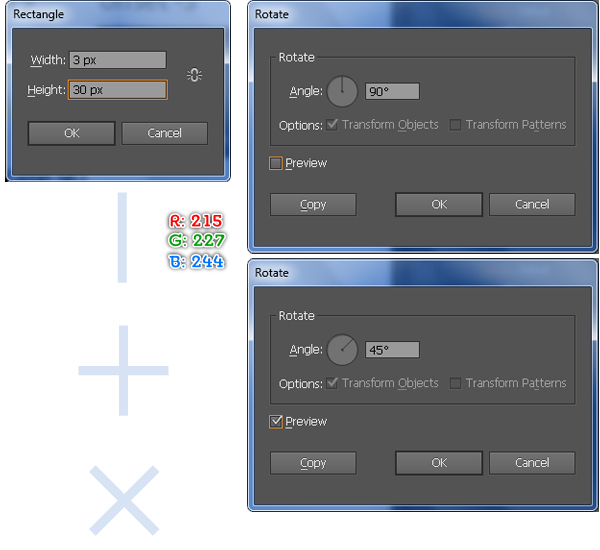
35. With the help of the Rectangle Tool (M), create a 3 by 30px object and then fill it with R=215, G=227, B=244. Keep the resulting shape selected, double click on the Rotate Tool. In the Rotate box, enter a 45 degrees Angle and then click Copy. Reselect two newly created shapes and rotate them an angle of about 45 degrees. Keep the resulting shapes selected and click on the Unite button from the Pathfinder palette.
36. Place four newly created shapes to the positions as shown below. Next select all shapes created from beginning step 25 to this time and place them to the correct position like you see in the second image.
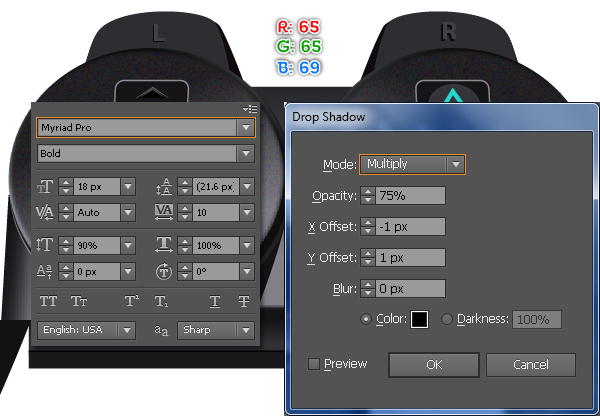
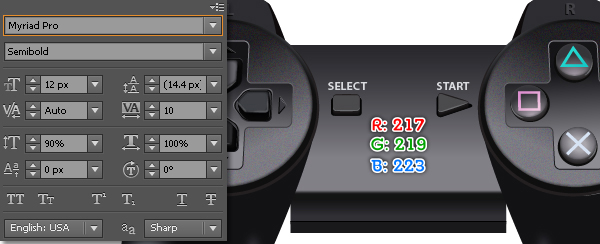
37. Now pick the Type Tool (T), open the Character palette (Window > Type > Character) and set the data as shown below. Next simply click on your artboard and add the text “R” and “L”. Reselect two new text and go to the Effect > Stylize > Drop Shadow… Follow the data as shown below and then click OK.
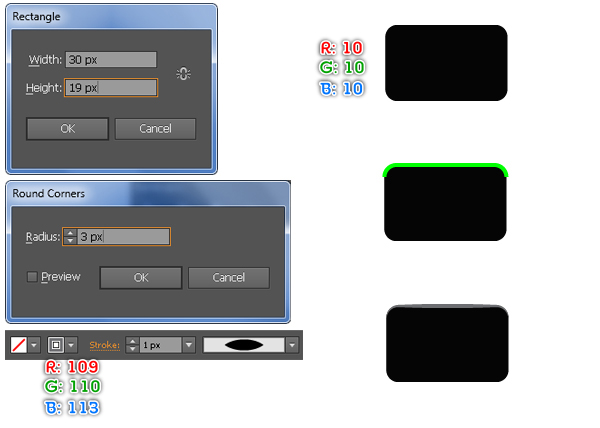
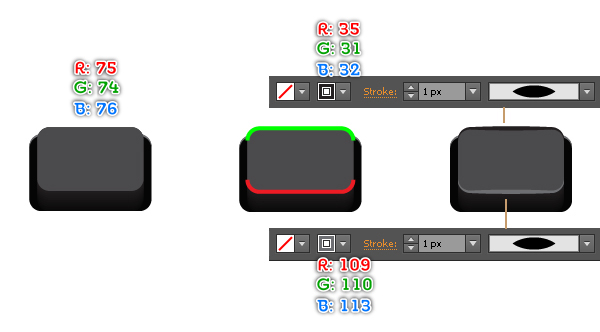
38. With the Rectangle Tool (M) create a 30 by 19px object and then fill it with R=10, G=10, B=10. Keep the resulting shape selected, go to the Effect > Stylize > Round Corners… Enter a 3px Radius and then click OK. Next draw a curved path like you see in the second image. Once your path is drawn, fill it with none and add a 1px stroke (R=109, G=110, B=113), then apply the Width Profile 1 for the result.
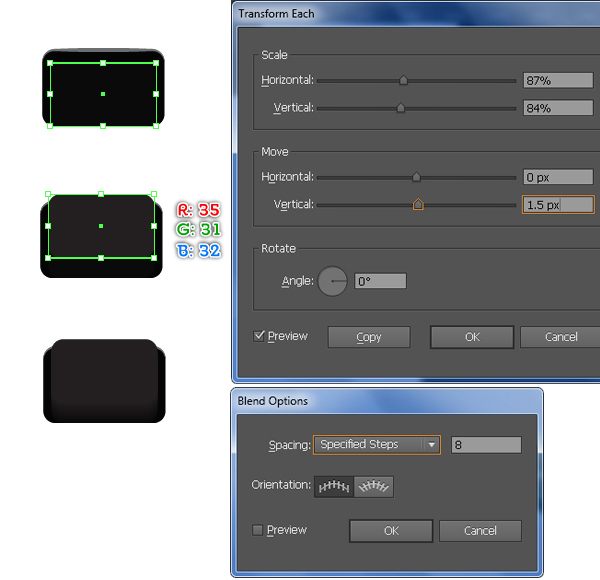
39. Reselect the rounded rectangle and go to the Object > Transform > Transform Each… Enter the data as shown below and then click Copy. Make a copy of the new shape, move this copy 5px up and then replace the existing color of it with R=35, G=31, B=32. Duplicate the resulting shape once and hide the copy. Next select two newly created shapes and create a blend between them.
40. Press (Ctrl +Alt +3) to show the shape hidden in the previous step and then replace the existing color of it with R=75, G=74, B=76. Next with the help of the Pen Tool (P) create two curved paths as shown below. Once your paths are drawn, select the green path, fill it with none and add a 1px stroke (R=35, G=31, B=32), then apply the Width Profile 1 for the result. Next reselect the remaining path, fill it with none and add a 1px stroke (R=109, G=110, B=113), then apply the Width Profile 1 for the result. Finally select and group (Ctrl +G) all shapes created from beginning step 38 to this time.
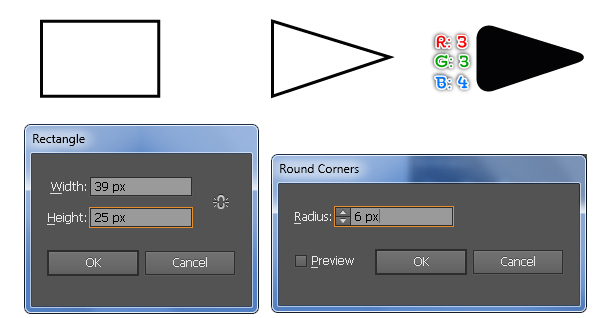
41. With the help of the Rectangle Tool (M) create a 39 by 25px object. Next remove the top-left anchor point of the new rectangle and then move the bottom-left anchor point 13px up. Reselect the new object and go to the Effect > Stylize > Round Corners… Enter a 6px Radius and click OK, then fill the resulting object with R=3, G=3, B=4.
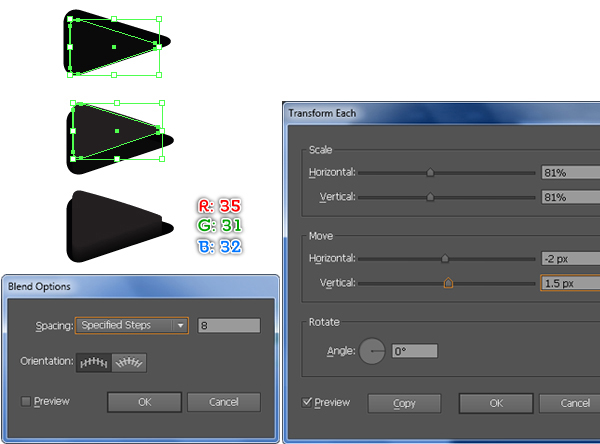
42. Reselect the rounded triangle and go to the Object > Transform > Transform Each… Enter the data as shown below and then click Copy. Make a copy of the new shape, move this copy 5px up and then replace the existing color of it with R=35, G=31, B=32. Duplicate the resulting shape once and hide the copy. Next select two newly created shapes and create a blend between them.
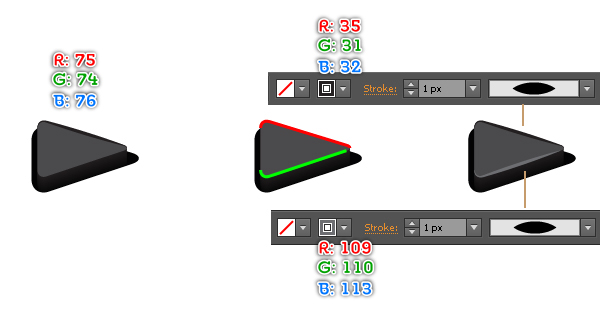
43. Press (Ctrl +Alt +3) to show the shape hidden in the previous step and then replace the existing color of it with R=75, G=74, B=76. Next with the help of the Pen Tool (P) create two curved paths as shown below. Once your paths are drawn, select the red path, fill it with none and add a 1px stroke (R=35, G=31, B=32), then apply the Width Profile 1 for the result. Next reselect the remaining path, fill it with none and add a 1px stroke (R=109, G=110, B=113), then apply the Width Profile 1 for the result. Finally select and group (Ctrl +G) all shapes created from beginning step 41 to this time.
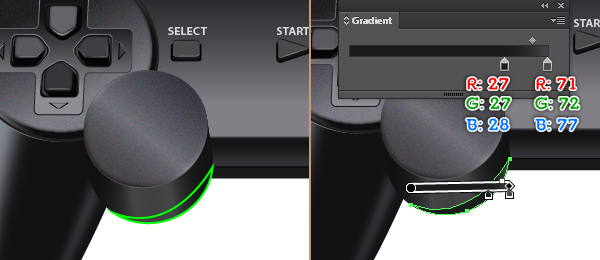
44. Place two newly created groups to the correct positions like you see in the image below. Now pick the Type Tool (T), open the Character palette (Window > Type > Character) and set the data as shown below. Next simply click on your artboard and add the text like you see in the second image. At this point your artwork should look like in the final image.
Create the Analog Sticks
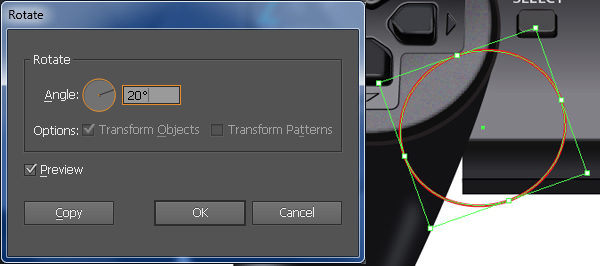
45. Let’s work on creation of the left analog stick. Start with drawing a 124 by 115px using the Ellipse Tool (L). Once your ellipse is drawn, rotate it an angle of about 20 degrees. Next fill it with the linear gradient as shown in the third image.
46. Make two copy (Ctrl +C, Ctrl +F, Ctrl +F) of the newly created shape and then hide a copy (Ctrl +3). Reselect the remaining copy and replace the existing color of it with new linear gradient. Next move the resulting shape 36px down and 5px to the right, then press (Ctrl +Left Square Bracket) to send it backward. Now select two newly created shapes and create a blend between them.
47. Press (Ctrl +Alt +3) to show the ellipse hidden in the previous step and then replace the existing color of it with new linear gradient. Keep the resulting shape selected, go to the Object > Path > Offset Path… Enter a -1px Offset and then click OK. Replace the existing color of the new shape with new linear gradient like you see in the second image.
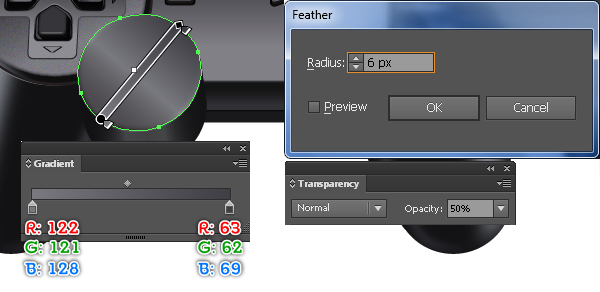
48. Duplicate the new shape created in the previous step once and then replace the existing color of the copy with new linear gradient. Next apply a 6px Feather effect of the resuling shape then reduce the Opacity to 50%. Continue make a copy of the new shape and go to the Appearance palette (Window > Appearance), then remove the Feather section. Make sure that the resulting shape is still selected, go to the Effect > Texture > Grain…. Follow the data as shown below and then click OK. Finally change the Blending Mode of the new shape to Soft Light and lower the Opacity to 60%.
49. To add some details, first draw an object and then fill it with the linear gradient as shown in the images below.
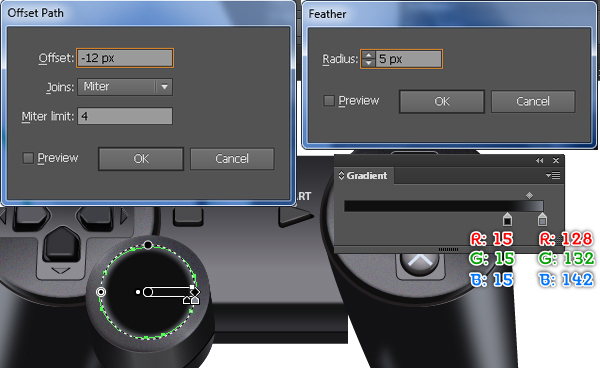
50. Reselect the shape created in second image of the step 48 and go to the Object > Path > Offset Path… Enter a -12px Offset and then click OK. Make sure that the new shape is still selected, go to the Appearance palette and remove the Grain effect. Next change the Blending Mode of the resulting shape to Normal and increase the Opacity to 100%. Replace the existing color of the new shape with the radial gradient and then apply a 5px Feather effect for the result.
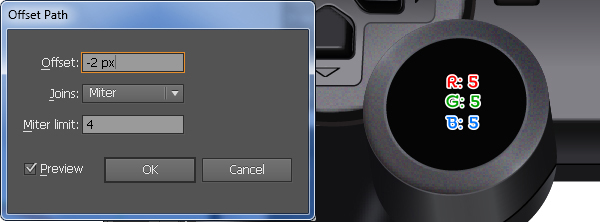
51. Select the shape created in the step 50 and go to the Object > Path > Offset Path… Enter a -2px Offset and then click OK. Next remove the Feather effect of the new shape and then eplace the existing color of it with R=5, G=5, B=5.
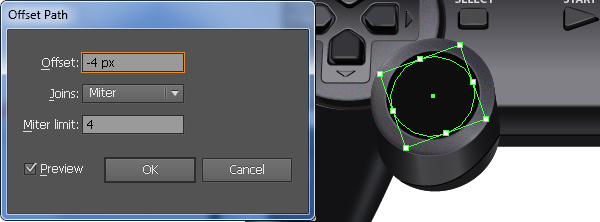
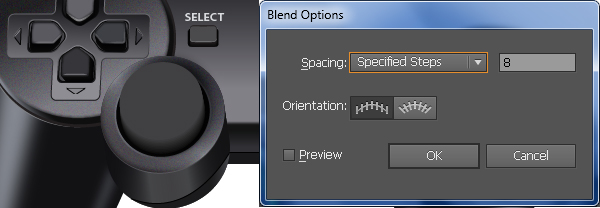
52. Reselect the shape created in the step 51 and go to the Object > Path > Offset Path… Enter a -4px Offset and click OK, then move the new shape 1px down. Duplicate the resulting shape once, move the copy 13px up and 2px to the left, then replace the existing color of it with R=65, G=64, B=66. Next make a copy of the new shape and then hide the copy. Now select two newly created ellipses and create a blend between them.
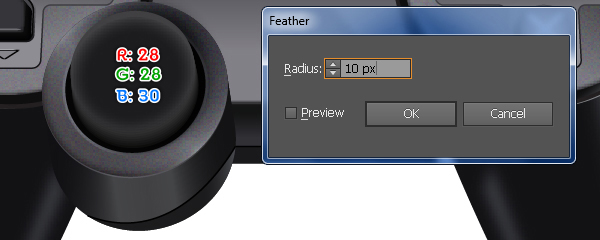
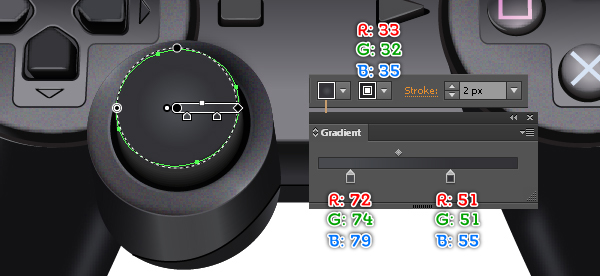
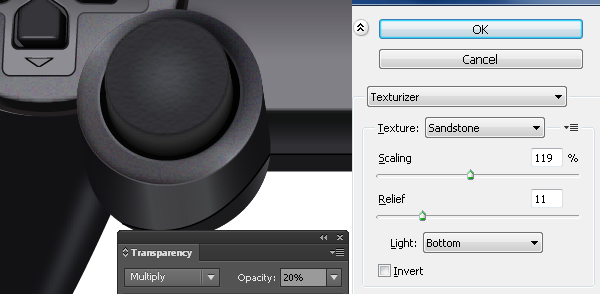
53. Press (Ctrl +Alt +3) to show the ellipse hidden in the previous step. Make a copy of this ellipse and then hide the copy. Reselect the original ellipse, move it 4px down and replace the existing color of it with R=28, G=28, B=30, then apply a 10px Feather of the resulting shape. Now press (Ctrl +Alt +3) to show the ellipse hidden in this step. Replace the existing color of this ellipse with the radial gradient and add a 2px stroke (R=33, G=32, B=35). Next make a copy of the resulting shape and go to the Effect > Texture > Texturizer… Follow the data like you see in the third image and then click OK. Finally change the Blending Mode of the new shape to Multiply and lower the Opacity to 20%.
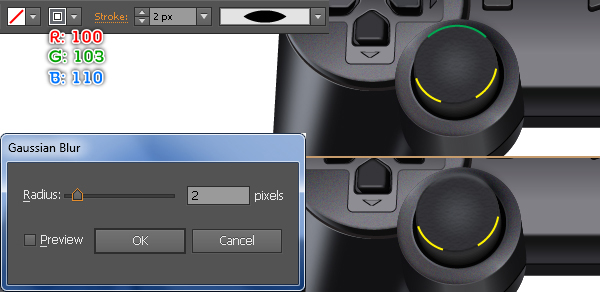
54. To give a more realistic look I’m going to be adding some highlights on this analog stick. First drawn three curved paths with the Pen Tool (P) like in the image. Once your paths are drawn, select the green path, fill it with none and add a 2px stroke (R=100, G=103, B=110), then apply the Width Profile 1 and 2px Gaussian Blur effect for the result. Next select two remaining paths, fill them with none and add a 3px stroke (R=128, G=130, B=133), then apply the Width Profile 1 and 3px Gaussian Blur effect for the results. Finally select and group (Ctrl +G) three newly created objects.
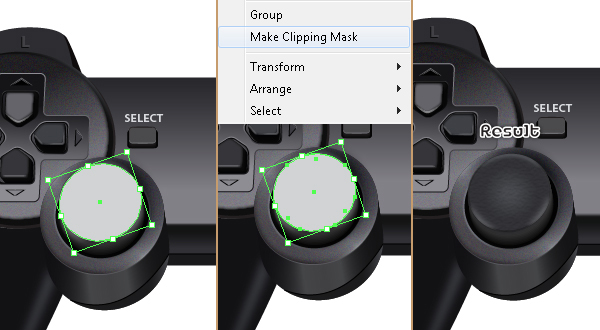
55. Select the shape created in the third image of the step 53 and duplicate it once, then bring the copy to front. Make sure that the copy is still selected, remove the Texturizer effect and change the Blending Mode to Normal and increase the Opacity to 100%. Keep the new shape selected, hold down the Shift, click on the newly created group and go to the Object > Clipping Mask > Make (Ctrl +7).
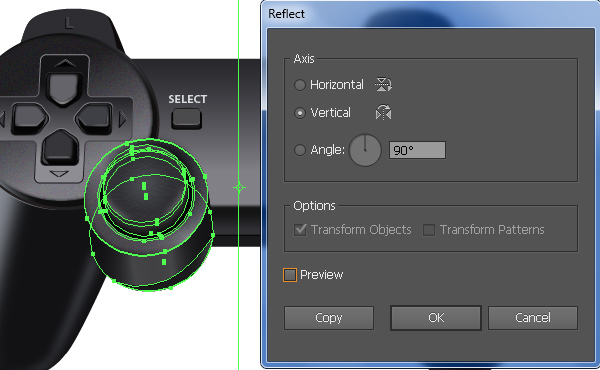
56. Select and group (Ctrl + G) all shapes created from beginning step 45 to this time. Next go to the View > Guides > Show Guides (Ctrl +;) to show the vertical guide hidden in the step 11. Now reselect the newly created group, pick the Reflect Tool (O), hold down the Alt and click on the guide. In the Reflect box, check the Vertical and then click Copy. Finally press (Ctrl +;) to hide the guide.
Adding the Shadows
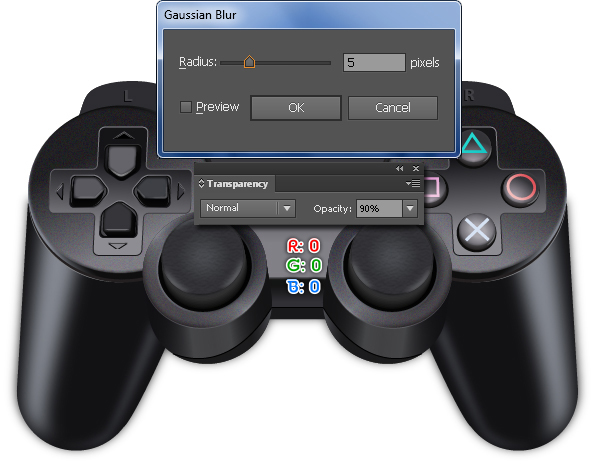
57. We are going to start making shadows on the game controller to give it more of a 3D look. Pick the Pen Tool (P) and use this tool to create an object as shown below. Once your object is drawn, fill it with R=0, G=0, B=0. Next apply a 5px Gaussian Blur effect for the resulting shape and reduce its Opacity to 90%, then send it to back.
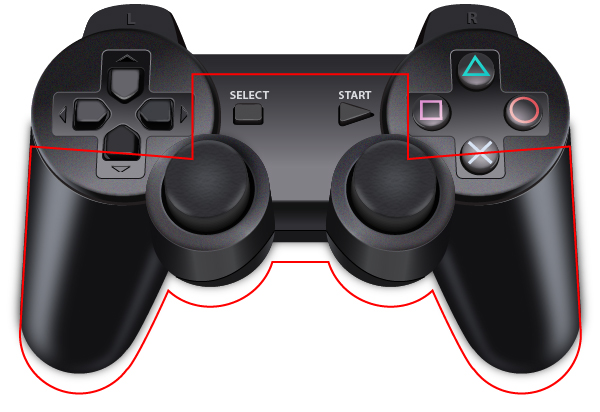
58. Draw another object with the Pen Tool (P) like in the image and fill this object with R=0, G=0, B=0. Next apply a 18px Gaussian Blur effect for the resulting shape and reduce its Opacity to 80%, then send it to back.
Create the Background
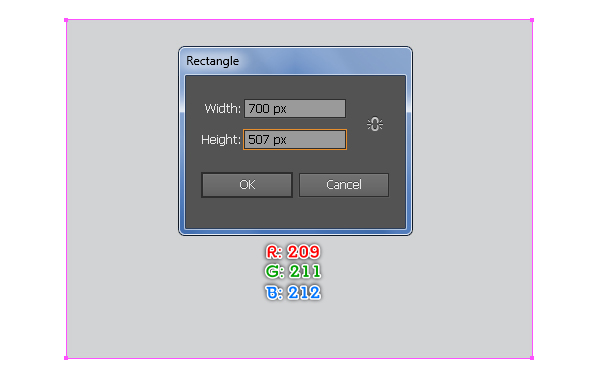
59. With the help of the Rectangle Tool (R) create a 700 by 507px object and then fill this object with R=209, G=211, B=212. The last thing to do is place your game controller to the position as shown in the second image. We are done with the game controller for the moment. I hope you enjoy this tutorial.
