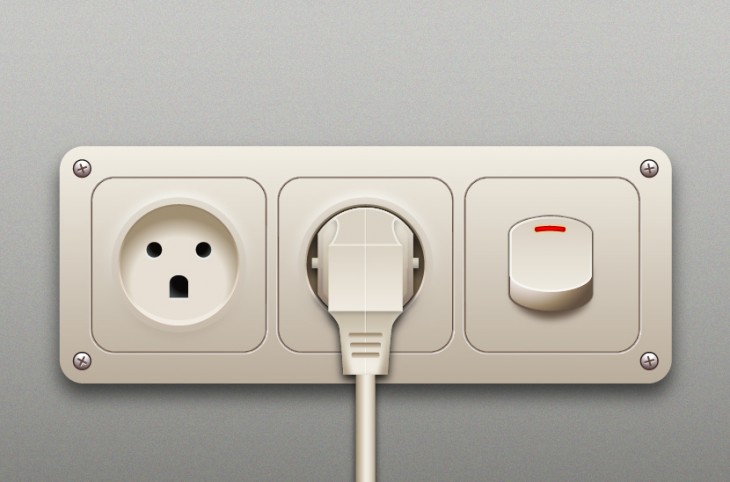
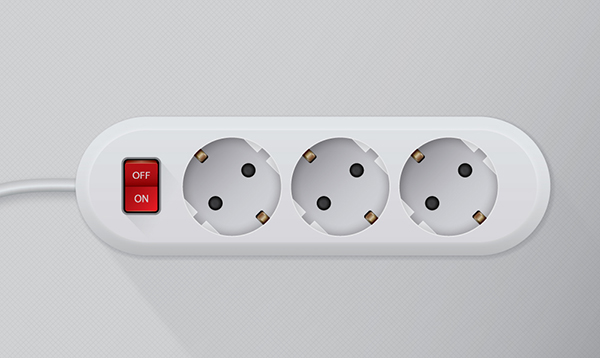
In this tutorial we’re going to create a Realistic Outlet Adapter in Adobe Illustrator. You will learn how to create the main shape using several rectangles and ellipses, the Offset Path, the Align and the Pathfinder palettes. Ready to start drawing? Let’s begin!
Create a New Document
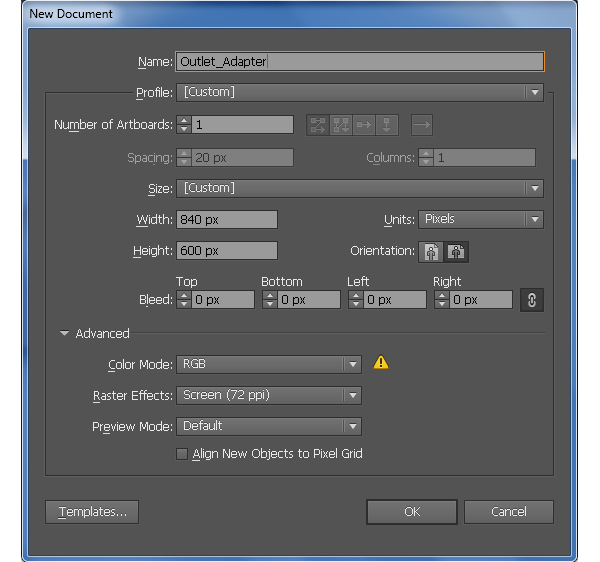
1. Launch Illustrator and then press (Ctrl + N) to create a New document. Select Pixels from the Units drop-down menu, enter 840 in the width box and 600 in the height box then click on the Advanced button. Select RGB, Screen (72ppi) and make sure that the Align New Objects to Pixel Grid box is unchecked before you click OK.
Create the Main Shape
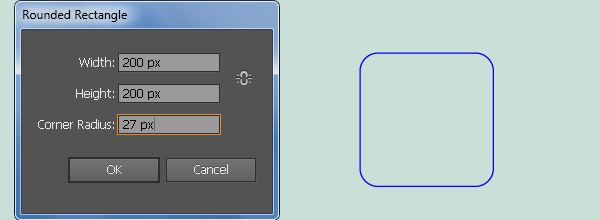
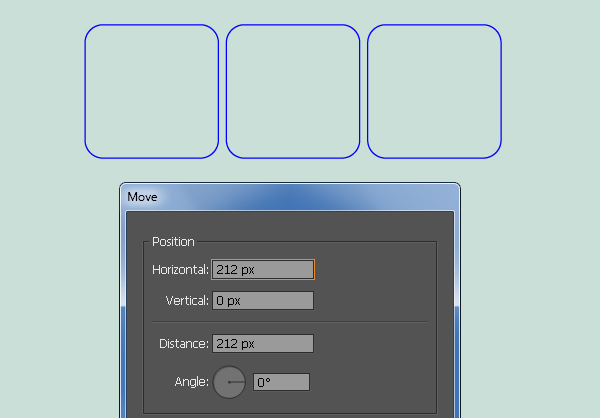
2. Pick the Rounded Rectangle Tool, simply click on your artboard and enter the data as shown below, then click OK. Make sure that the newly created rectangle is still selected and go to the Object > Transform > Move… Enter a 212px in the Horizontal box and click Copy, then press (Ctrl +D) once to get the results like you see in the second image.
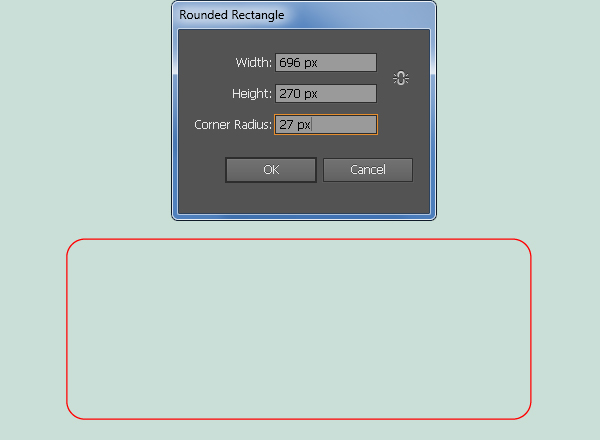
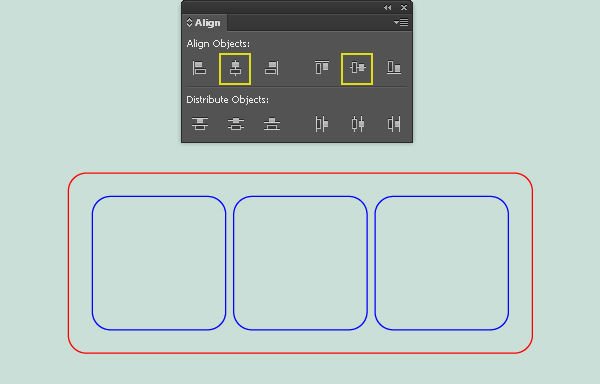
3. With the help of the Rounded Rectangle Tool, create a red rectangle as shown in the first image below. Now select the center blue rectangle created in the step 2, hold down the Shift, click on the newly created rectangle, release the Shift and then click on the center blue rectangle again (to fixed its position). Next open the Align palette (Window > Align), click on the Horizontal Align Center button and then click on the Vertical Align Center button.
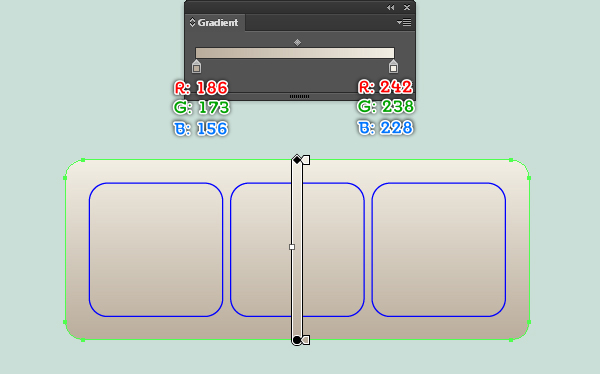
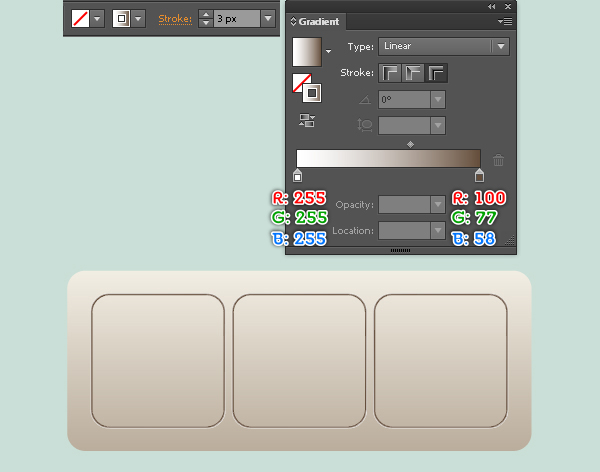
4. Select the red rectangle and remove its stroke, then fill this rectangle with the linear gradient as shown below. Next select three blue rectangles and change the stroke weight of them to 3px, then replace the existing stroke color with the linear gradient across stroke.
Create the Outlet
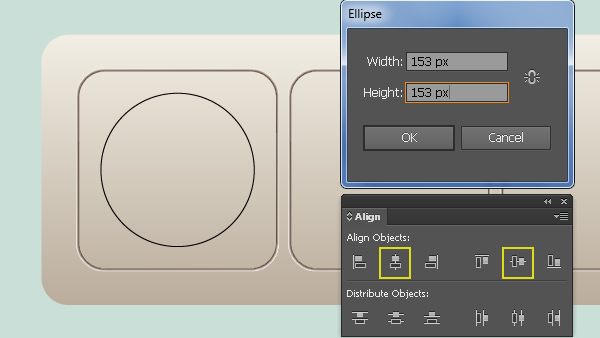
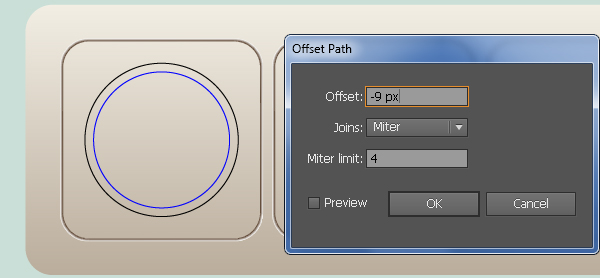
5. Pick the Ellipse Tool (L) and create a 153 by 153px ellipse of black color. Keep the newly created ellipse selected, hold down the Shift, click on the left rectangle created in the step 4, release the Shift and then click on the left rectangle again (to fixed its position). Next open the Align palette (Window > Align), click on the Horizontal Align Center button and then click on the Vertical Align Center button. Now select the black ellipse created in this step and go to the Object > Path > Offset Path… Enter a -9px Offset and click OK, then replace the existing stroke color of the newly created ellipse with blue.
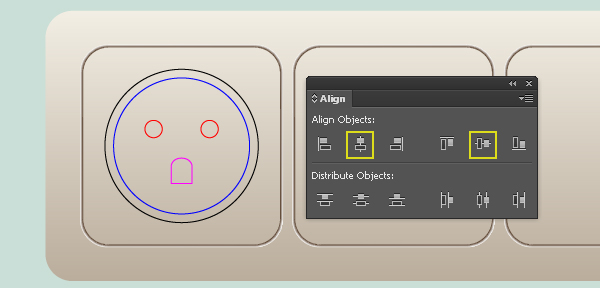
6. Pick the Rectangle Tool (M) and make a magenta rectangle of 21 by 18px size. With the Add Anchor Point Tool (+), click on the top-center point of the magenta rectangle to add a new anchor point, then move this anchor point 8px up. Now with the help of the Convert Anchor Point Tool (Shift +C), click on the anchor point just moved, hold mouse and drag it to the left. The resulting object should look like the third image below. Continue with the Ellipse Tool (L), create a 17 by 17px ellipse. Make a copy (Ctrl +C, Ctrl +F) of the newly created ellipse and then move the copy 56px to the right. Next select and group (Ctrl +G) the two ellipses created in this step.


7. Select the group created in the step 6, hold down the Shift and click on the magenta object. Open the Align palette (Window > Align) and click on the Horizontal Align Center button, then click on the Vertical Align Top button. Next select the magenta object and move it 38px down. Before you continue, select the magenta object and the group created in the step 6, then group (Ctrl +G) them. Keep this group selected, hold down the Shift, click on the blue ellipse created in the step 5, release the Shift and then click on the blue ellipse again (to fixed its position). Next click on the Horizontal Align Center button from the Align palette and then click on the Vertical Align Center button.

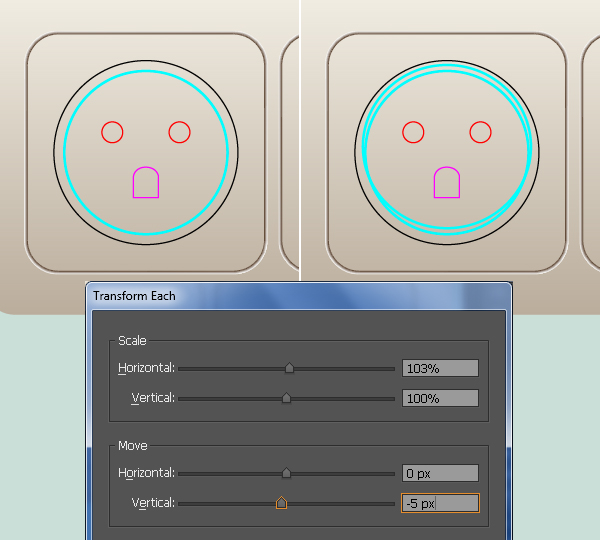
8. Select the blue ellipse created in the step 5 and make a copy (Ctrl +C, Ctrl +F) of it, then replace the existing stroke color of the copy with turquoise. Keep the turquoise ellipse selected and go to the Object > Transform > Transform Each… Enter the data as shown below and then click Copy. Now select the two turquoise ellipses, then open the Pathfinder palette (Window > Pathfinder) and click on the Minus Front button.
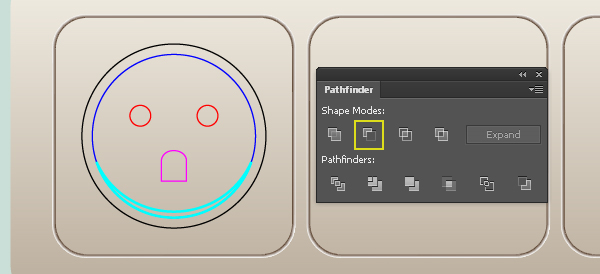
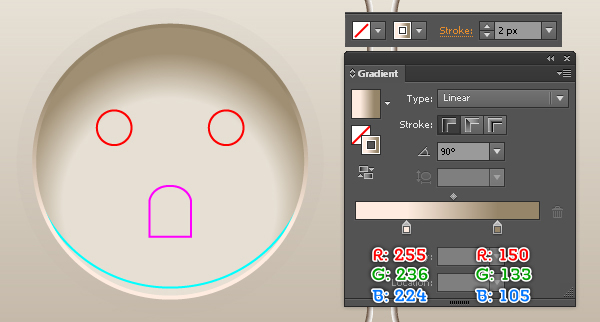
9. Select the black ellipse and remove its stroke, then fill this ellipse with the linear gradient as shown below. Before you continue, select the blue ellipse and make a copy (Ctrl +C, Ctrl +F) of it, then press (Ctrl +3) to hide the copy. Next select the blue original ellipse and remove its stroke, then fill this ellipse with the radial gradient like you see in the second image. Now press (Ctrl +Alt +3) to show the blue ellipse hidden in this step. Change the stroke weight of this ellipse to 2px and replace the existing stroke color with linear gradient within stroke, then bring the resulting ellipse to front (Ctrl +Shift +Right Square Bracket). Finally select the turquoise object and remove its stroke, then fill this object with the linear gradient as shown in the last image.
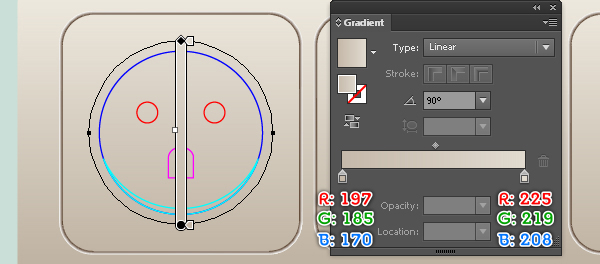
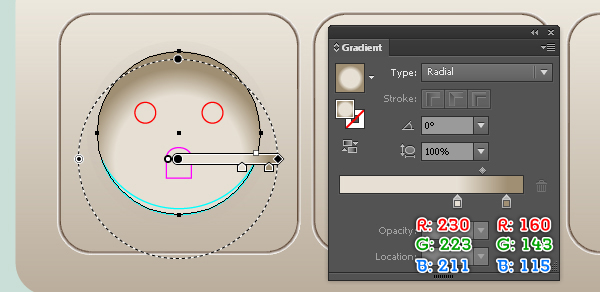
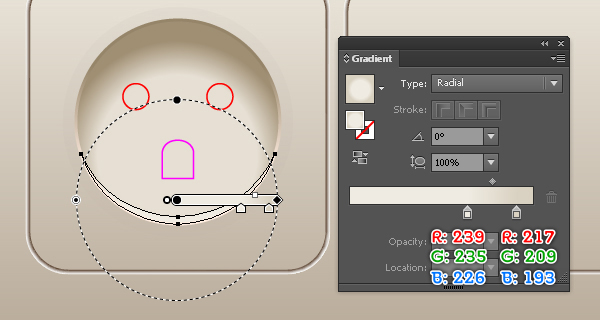
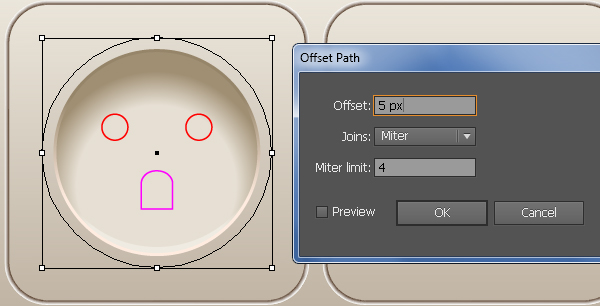
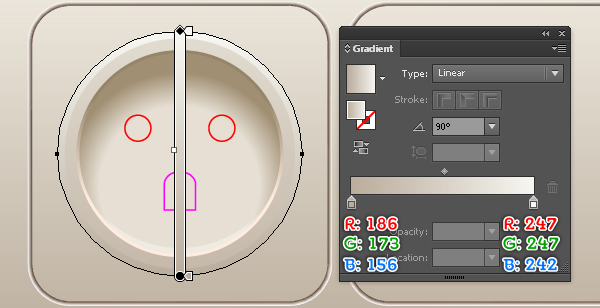
10. Select the biggest ellipse and go to the Object > Path > Offset Path… Enter a 5px Offset and click OK, then replace the existing color of the newly created ellipse with the new linear gradient as shown in the second image. Keep the resulting ellipse selected and go to the Effect > Blur > Gaussian Blur… Enter a 5px Radius and then click OK.
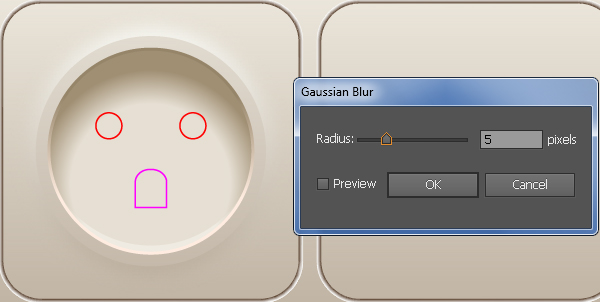
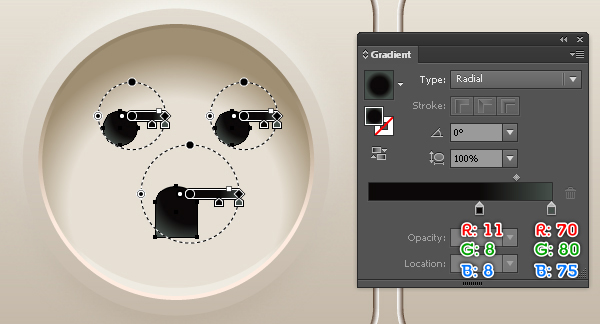
11. Select the group created in the step 7 and remove its stroke, then fill it with the radial gradient as shown below. Keep the resulting group selected and make a copy (Ctrl +C, Ctrl +F) of it. Replace the existing color of the copy with R=237, G=235, B=235 and then press (Ctrl +Left Square Bracket) to hide this group behind the original group.
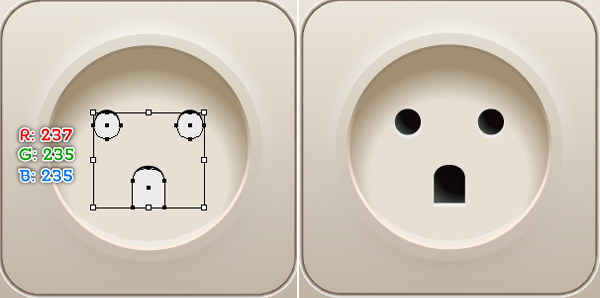
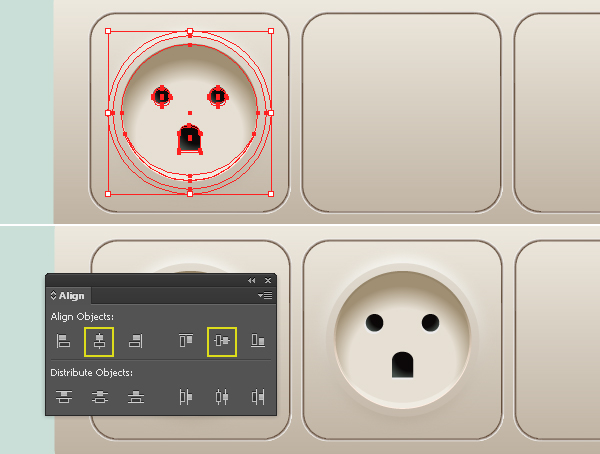
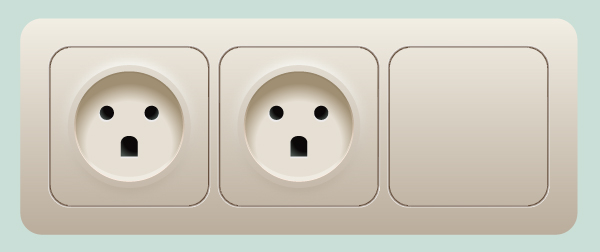
12. Select and group (Ctrl +G) all objects created from beginning step 5 to this time, then make a copy (Ctrl +C, Ctrl +F) of this group. Keep the newly created group selected, hold down the Shift, click on the center rectangle created in the step 4, release the Shift and click on the center rectangle again (to fixed its position). Open the Align palette (Window > Align) and click on the Horizontal Align Center button, then click on the Vertical Align Center button. Next select the newly created group and press (Ctrl +Shift +G) to ungroup it. At this point your adapter should look like in the last image below.
Create the Plug
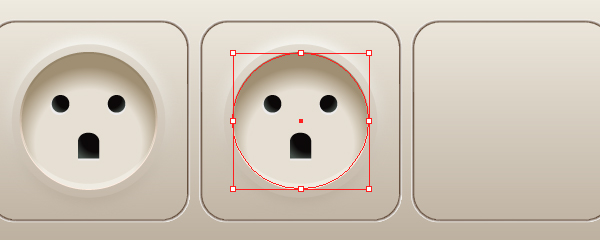
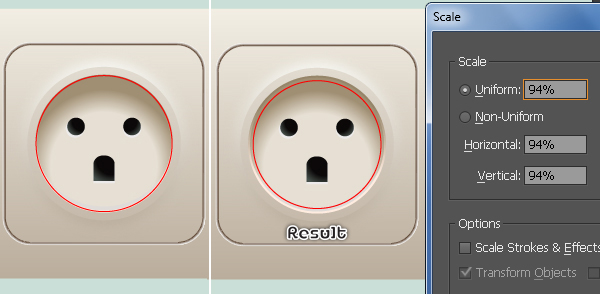
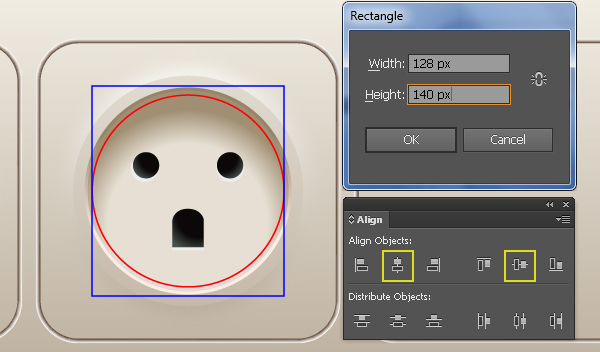
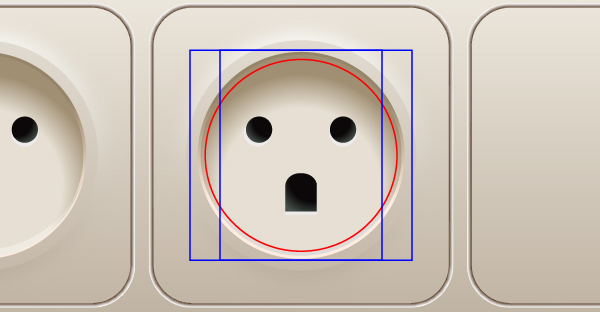
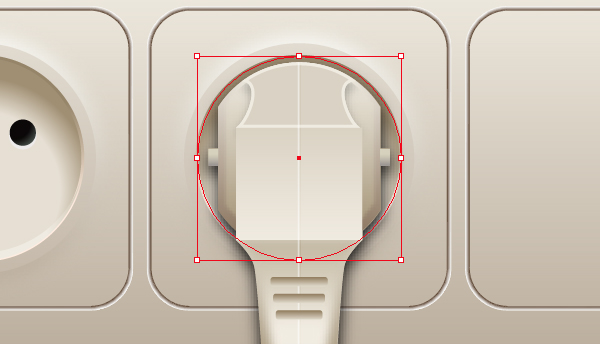
13. Next come the plug. Select the ellipse as shown in the first image and make a copy (Ctrl +C, Ctrl +F) of it, then bring the copy to front (Ctrl +Shift +Right Square Bracket). Keep the copy selected, remove the fill color of it and then add a red stroke for this ellipse. Make sure that the red ellipse is still selected and go to the Object > Transform > Scale… Check the Uniform and enter a 94 in the Scale box, then click OK. With the Rectangle Tool (M), make a blue rectangle of 128 by 140px size. Keep this rectangle selected, hold down the Shift, click on the red ellipse created in this step, release the Shift and click on the red ellipse again. Next open the Align palette (Window > Align) and click on the Horizontal Align Center button, then click on the Vertical Align Center button. Now select the blue rectangle and make a copy of it, then move the copy 10px to the left. Next select the original blue rectangle and move it 10px to the right. Finally select the two blue rectangles and the red ellipse created in this step, then open the Pathfinder palette (Window > Pathfinder) and click on the Intersect button. The resulting object should look like the last image below.
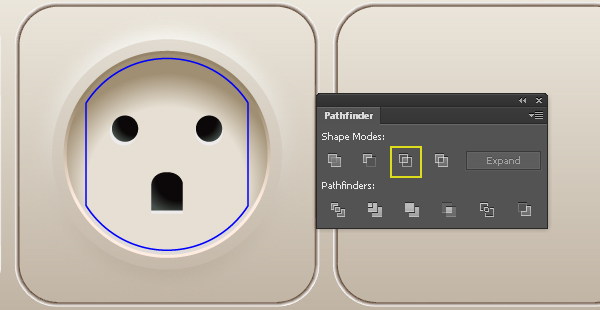
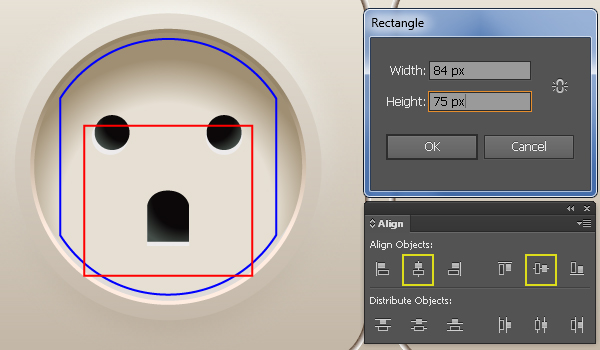
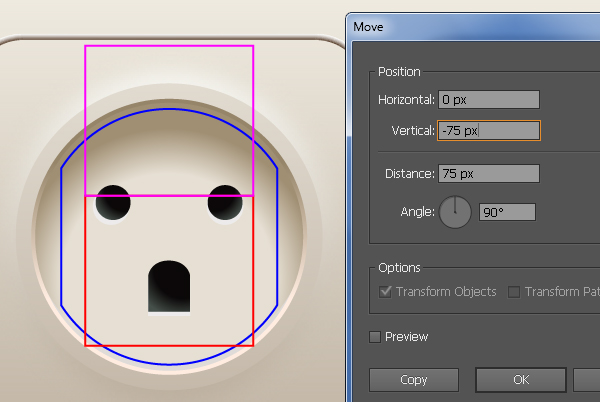
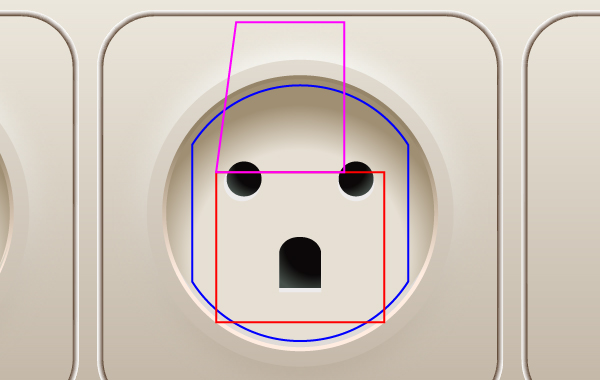
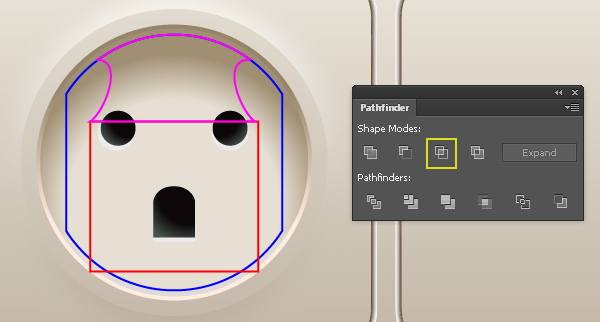
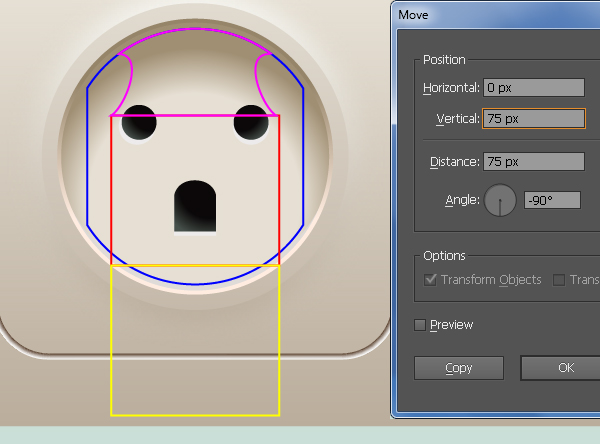
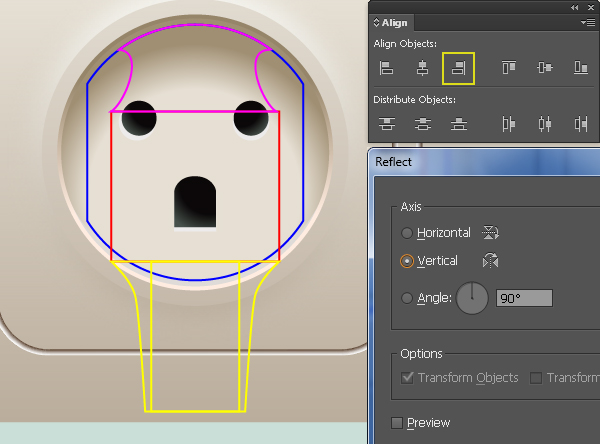
14. Pick the Rectangle Tool (M) and create a 84 by 75px rectangle of red color. Select the blue object created in the step 13, hold down the Shift, click on the red rectangle created in this step, release the Shift and click on the blue object again. Next click on the Horizontal Align Center button from the Align palette and click on the Vertical Align Center button. Then select the red rectangle and move it 17px down. Keep the red rectangle selected and go to the Object > Transform > Move… Enter the data as shown in the second image and click Copy, then replace the existing stroke color of the copy with magenta. With the help of the Direct Selection Tool (A) and the Shift, select the top-right and the bottom-right of the magenta rectangle, then move them 20px to the left. Next select the top-left anchor point of the magenta object and move it 10px to the right. Now with the help of the Add Anchor Point Tool (+), click on the point highlighted with yellow of the magenta object to add a new anchor point. Finally pick the Convert Anchor Point Tool (Shift +C), click on the anchor point just added, hold mouse and drag it to the left.
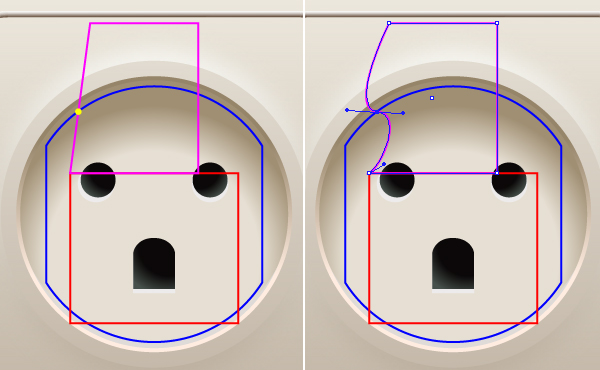
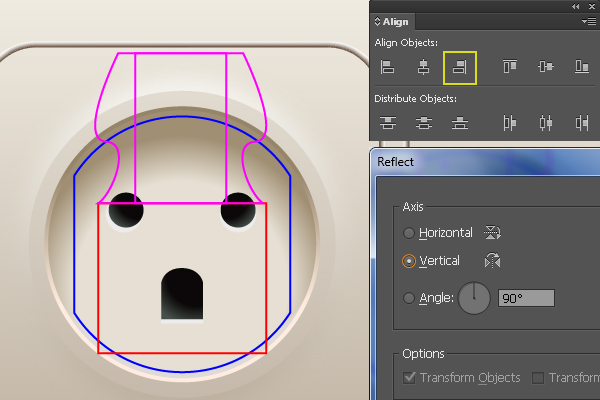
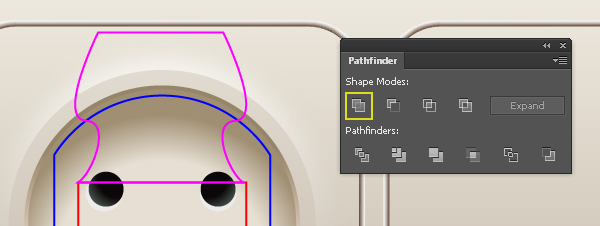
15. Select the magenta object created in the step 14 and double-click on the Reflect Tool from the Tool palette. In the Reflect dialog box, check the Vertical and click Copy. Keep the copy selected, hold down the Shift, click on the red rectangle created in the step 14, release the Shift and click on the red rectangle again. Open the Align palette (Window > Align) and click on the Horizontal Align Right button. Next select the two magenta objects and click on the Unite button from the Pathfinder palette. Now select the blue object created in the step 13 and make a copy (Ctrl +C, Ctrl +F) of it. Keep the copy selected, hold down the Shift and click on the magenta object created in this step, then click on the Intersect button from the Pathfinder palette. The resulting object should look like the last image below.
16. Select the red rectangle created in the step 14 and go to the Object > Transform > Move… Enter the data as shown in the first image and click Copy, then replace the existing stroke color of the copy with yellow. With the help of the Direct Selection Tool (A) and the Shift, select the top-right and the bottom-right of the yellow rectangle, then move them 20px to the left. Next select the bottom-left anchor point of the yellow object and move it 17px to the right. Focus on the third image, with the help of the Add Anchor Point Tool (+), click on the point highlighted with black of the yellow object to add a new anchor point, then move this anchor point 8px to the right. Next pick the Convert Anchor Point Tool (Shift +C), click on the anchor point just added, hold mouse and drag it up.
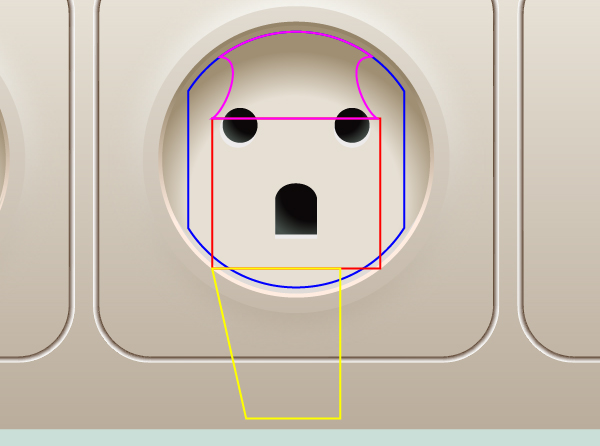
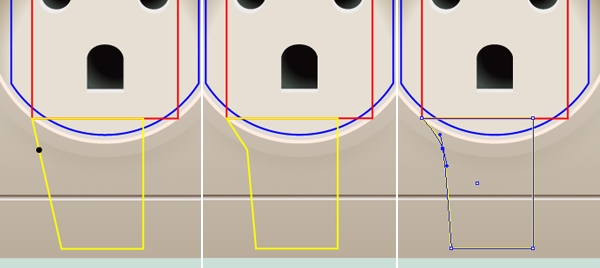
17. Select the yellow object created in the step 16 and double-click on the Reflect Tool icon from the Tool palette. In the Reflect dialog box, check the Vertical and click Copy. Keep the copy selected, hold down the Shift, click on the red rectangle created in the step 14, release the Shift and click on the red rectangle again. Open the Align palette (Window > Align) and click on the Horizontal Align Right button. Next select the two yellow objects and click on the Unite button from the Pathfinder palette. The resulting object should look like the last image below.
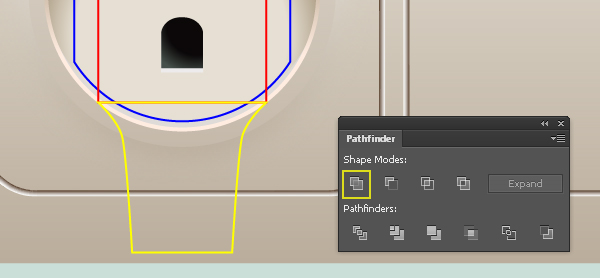
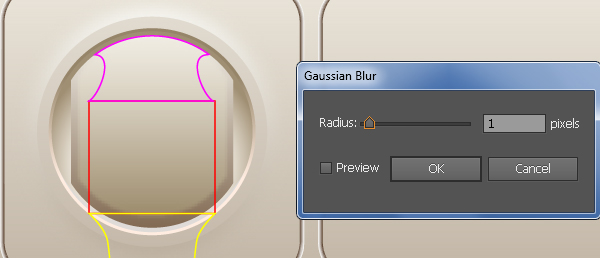
18. Select the blue object, remove its stroke and then fill this object with the linear gradient as shown below. Keep the resulting shape selected and go to the Object > Path > Offset Path… Enter a -5px Offset and click OK. Make sure that the newly created shape is still selected, move it 3px up and then replace the existing color of this shape with new linear gradient as shown in the second image. Finally apply a 1px Gaussian Blur effect for the resulting shape.
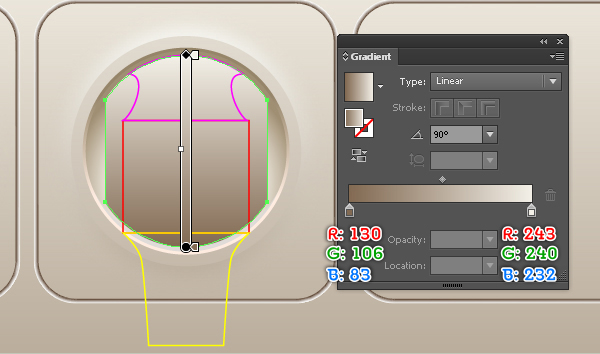
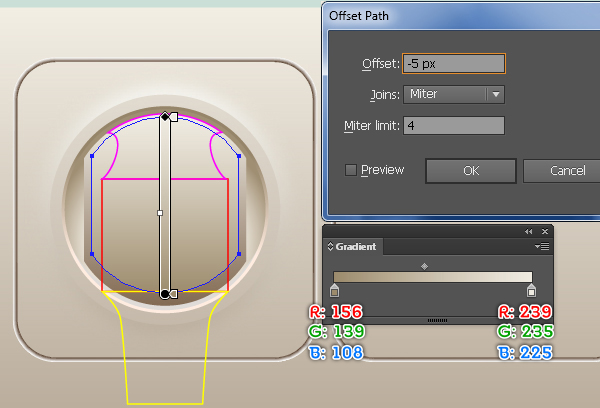
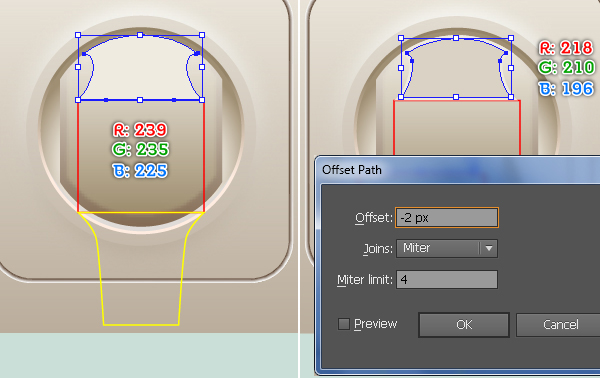
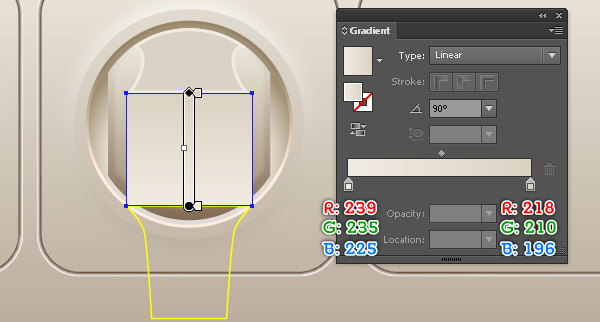
19. Select the magenta object and remove its stroke, then fill this object with R=239, G=235, B=225. Still having the resulting shape selected and go to the Object > Path > Offset Path… Enter a -2px Offset and click OK, then replace the existing color of the newly created shape with R=218, G=210, B=196. Next select the red rectangle, remove its stroke and fill this rectangle with the linear gradient like you see in the last image.
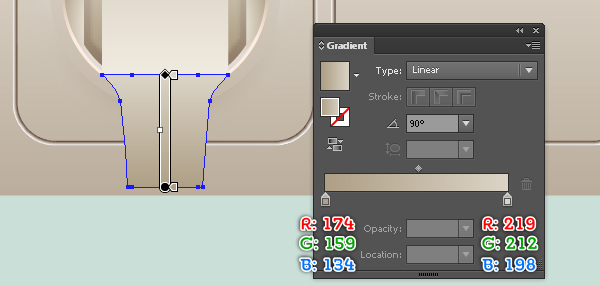
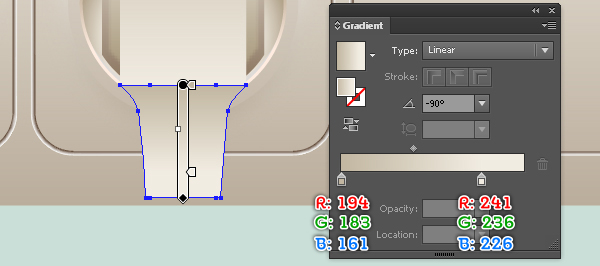
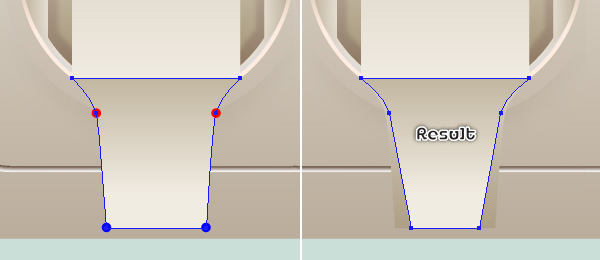
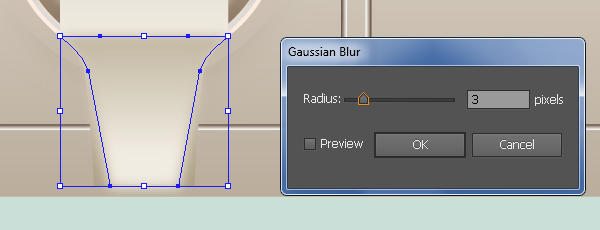
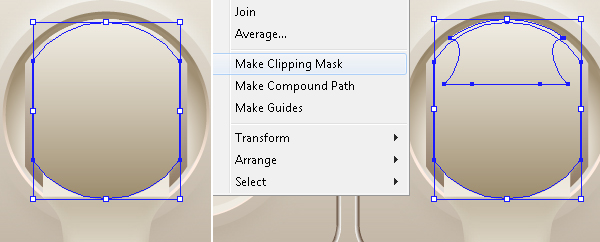
20. Select the yellow object, remove its stroke and fill this object with the linear gradient as shown below. Keep the resulting shape selected and make a copy (Ctrl +C, Ctrl +F) of it, then replace the existing color of the copy with new linear gradient like you see in the second image. Now focus on the third image, with the Direct Selection Tool (A), select the left anchor point highlighted with red of the newly created shape and move it 2px to the right. Next select the left anchor point highlighted with blue and move it 8px to the right. Likewise, repeat the same process for the other side of the newly created shape. In the end, your shape should look roughly like the fourth image. Next select the newly created shape and apply a 3px Gaussian Blur effect for it. Now select the first shape created in this step and make a copy of it, then bring the copy to front (Ctrl +Shift +Right Square Bracket). Keep this copy selected, hold down the Shift and click on the shape with blur effect applied in this step, then go to the Object > Clipping Mask > Make (Ctrl +7).

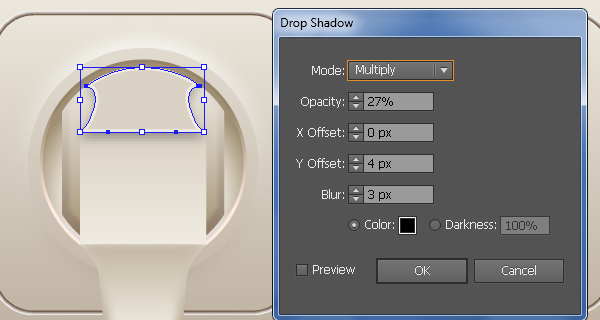
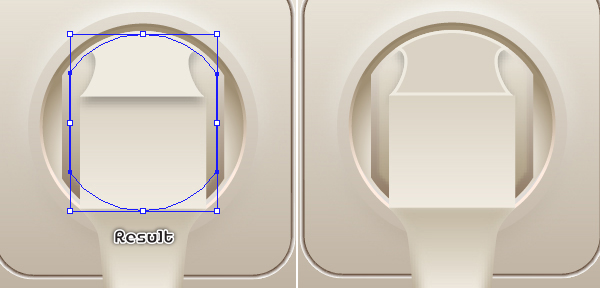
21. Select the first shape created in the step 19 and make a copy (Ctrl +C, Ctrl +F) of it. Make sure that the copy is still selected and go to the Effect > Stylize > Drop Shadow… Follow the data as shown below and click OK. Now select the shape with blur effect applied in the step 18 and make a copy of it. Remove the blur effect of this copy and then bring it to front (Ctrl +Shift +Right Square Bracket). Keep this newly created shape selected, hold down the Shift and click on the shape with shadow effect applied in this step, then go to the Object > Clipping Mask > Make (Ctrl +7). Finally hide the clipping set behind the first shape created in the step 19.
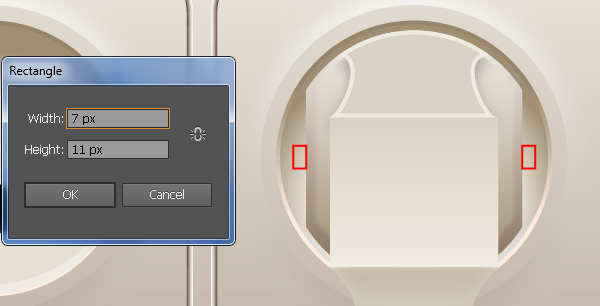
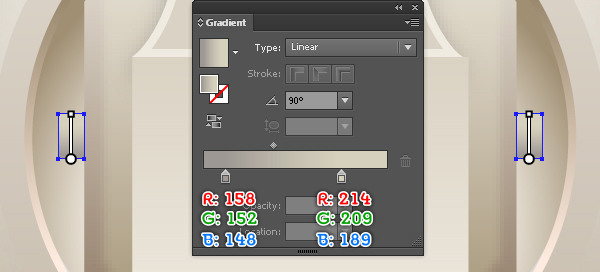
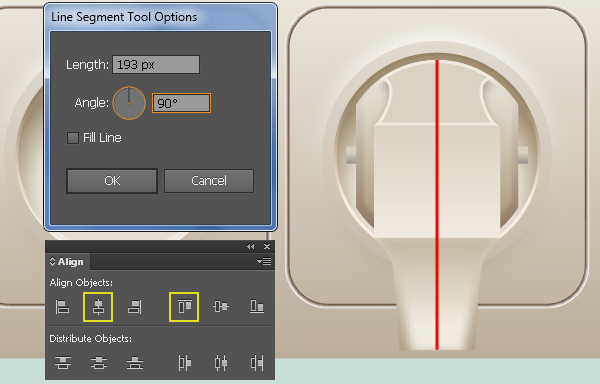
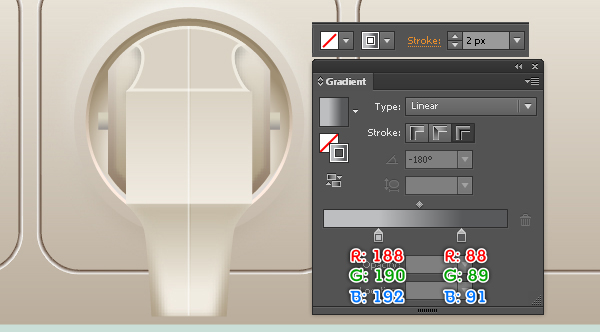
22. With the Rectangle Tool (M), create a 7 by 11 px rectangle of red color. Make a copy (Ctrl +C, Ctrl +F) of this rectangle and then place these two newly created rectangles to the positions as shown below. Next select two red rectangle created in this step, remove the stroke of them and fill them with the linear gradient like you see in the second image. Now with the help of the Line Segment Tool (\) create a vertical line of length 193px, with a 2px red stroke and no fill. Keep this line selected, hold down the Shift, click on the first shape created in the step 18, release the Shift and click on the first shape created in the step 18 again (to fixed its position). Next open the Align palette (Window > Align) and click on the Horizontal Align Center button, then click on the Vertical Align Top button. Finally select the vertical line and replace the existing stroke color with the linear gradient across stroke as shown in the last image.
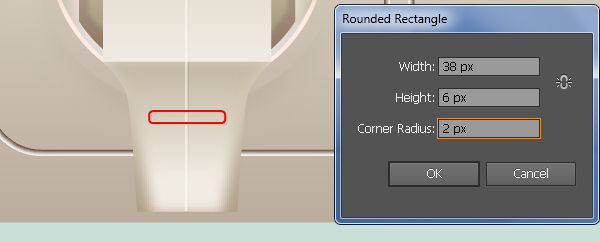
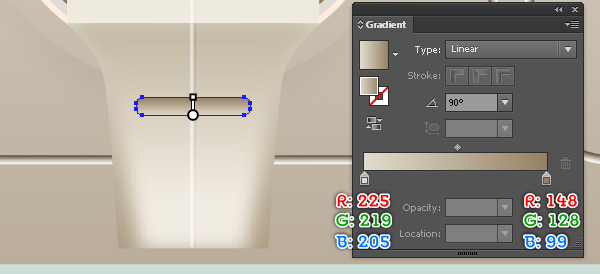
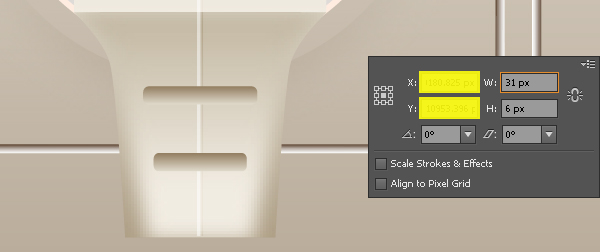
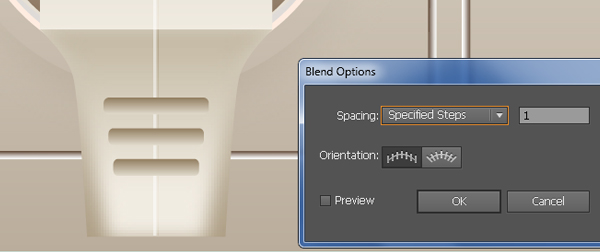
23. Pick the Rounded Rectangle Tool, simply click on your artboard, enter the data as shown below and click OK, then place the newly created rectangle to the position like you see in the first image. Having the newly created rectangle selected, remove its stroke and fill it with the linear gradient as shown in the second image. Keep the resulting rectangle selected and make a copy of it, then move the copy 22px down. Make sure that the newly created rectangle is still selected, open the Transform palette (Window > Transform) and enter a 31 in the W box. Now select the two rectangles created in this step and go to the Object > Blend > Blend Options… Follow the data like you see in the last image and click OK, then go to the Object > Blend > Make (Ctrl +Alt +B).
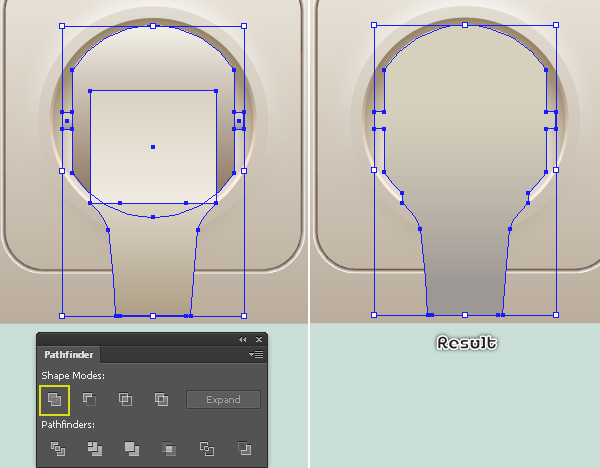
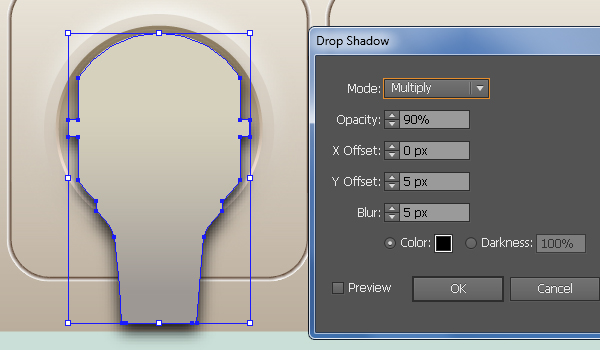
24. Pick the Selection Tool (V) along with the Shift, select five shapes like you see in the first image and make a copy (Ctrl +C, Ctrl +F) of them. Then bring these copies to front (Ctrl +Shift +Right Square Bracket) and click on the Unite button from the Pathfinder palette. Keep the resulting shape selected and go to the Effect >Stylize > Drop Shadow… Follow the data as shown in the third image and click OK. Finally hide the resulting shape behind the first shape created in the step 18.
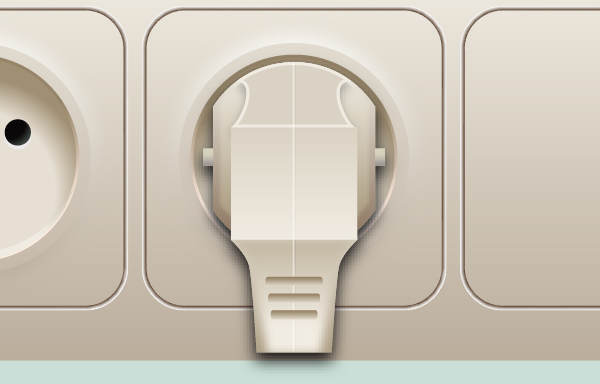
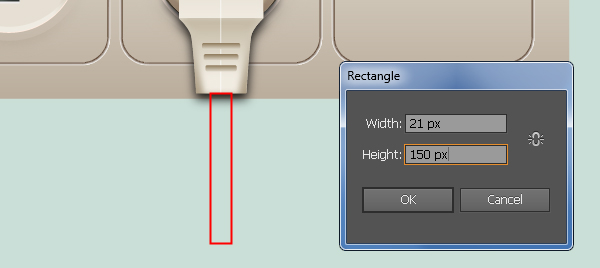
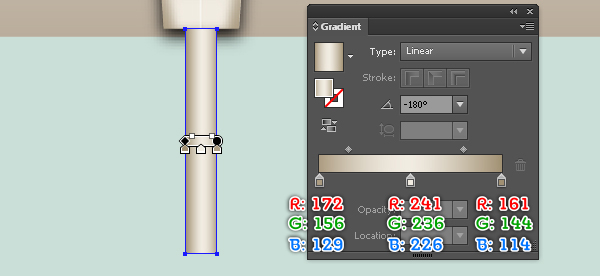
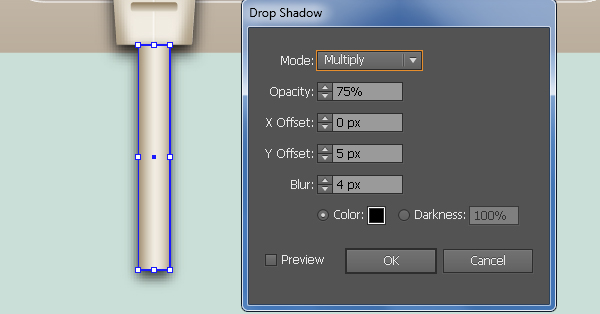
25. Pick the Rectangle Tool (M) and create a 21 by 150px rectangle, then place it to the position as shown below. Keep the newly created rectangle selected, remove its stroke and fill this rectangle with the linear gradient like you see in the second image. Make sure that the resulting rectangle is still selected and go to the Effect > Stylize > Drop Shadow… Follow the data as shown in the last image and click OK.
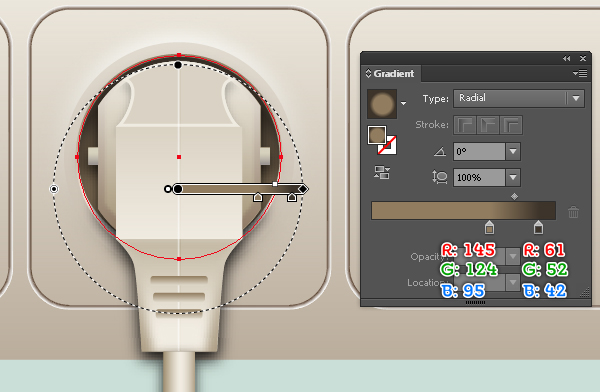
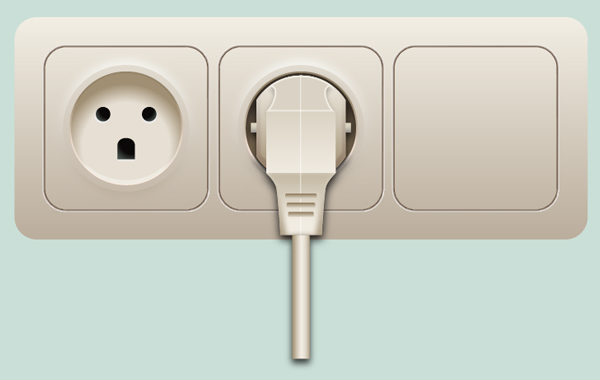
26. Select the ellipse as shown in the first image and then replace the existing color of it with new radial gradient like you see in the second image. At this point your adapter should look like in the last image below.
Create the Switch Button
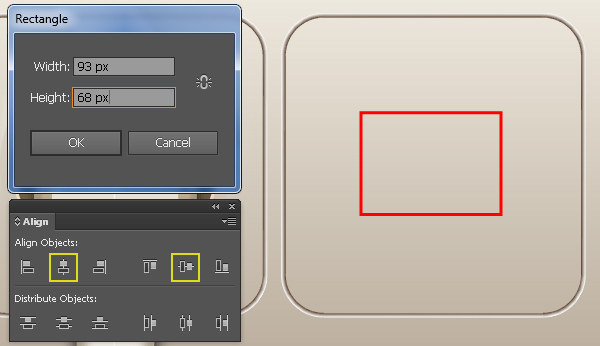
27. It’s time to draw the switch button. Pick the Rectangle Tool (M) and create a red rectangle of 93 by 68px size. Having the newly created rectangle selected, hold down the Shift, click on the right rectangle created in the step 4, release the Shift and click on the right rectangle created in the step 4 again (to fixed its position). Next open the Align palette (Window > Align), click on the Horizontal Align Center button and click on the Vertical Align Center button. Now pick the Add Anchor Point Tool (+) and click on the top-middle point of the red rectangle to add a new anchor point, then move this anchor point 20px up. With the help of the Convert Anchor Point Tool (Shift +C), click on the anchor point just moved, hold mouse and drag it to the right. Keep working with the Convert Anchor Point Tool (Shift +C), click on the top-left anchor point of the red object, hold mouse and drag it up. Next click on the top-right anchor point, hold mouse and drag it down. Likewise, repeat the same process for the bottom of the red object. In the end your red object should look like the fourth image shown.
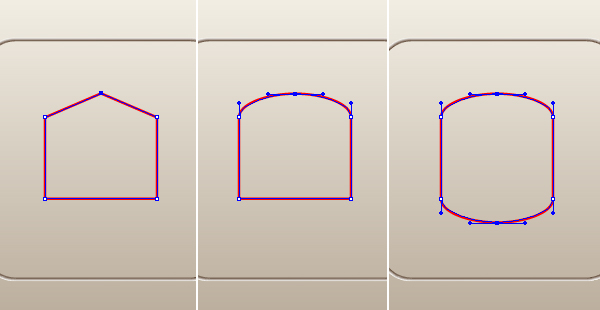
28. After you are done adjusting the shape of the red object, remove its stroke and then apply a nice radial gradient as it is shown below. Make a copy (Ctrl +C, Ctrl +F) of the resulting shape and then replace the existing color of the copy with the linear gradient like you see in the second image. Now with the Direct Selection Tool (A) and the Shift, select three anchor points highlighted with red of the newly created shape and move them 22px up.
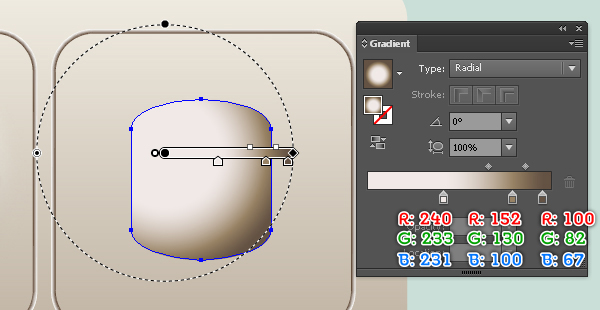
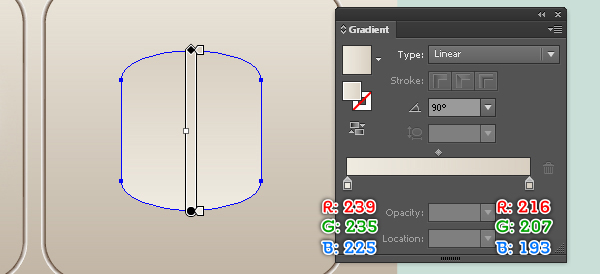
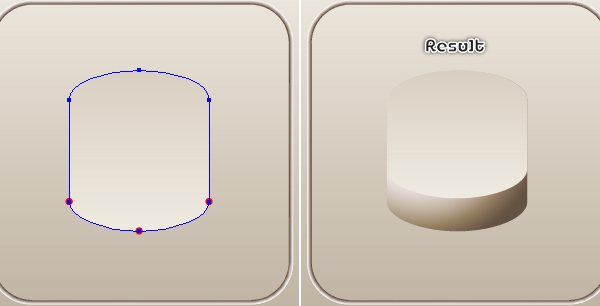
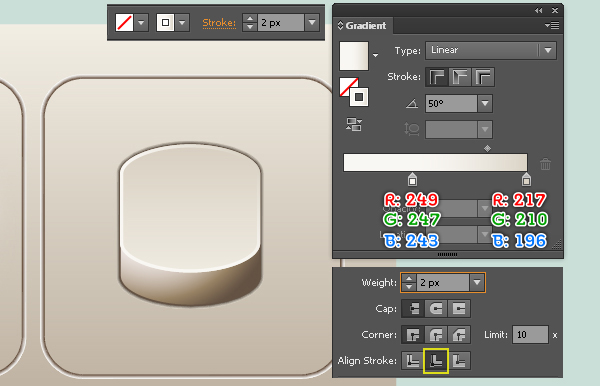
29. Select the bigger shape created in the step 28 and make a copy (Ctrl +C, Ctrl +F) of it. Then remove the fill color of this copy and add a 3px stroke (apply the linear gradient across stroke). Next select the remaining shape created in the step 28 and make a copy of it. Remove the fill color of this copy and then add a 2px stroke (apply the linear gradient within stroke). Keep the resulting object selected, open the Stroke palette (Window > Stroke) and click on the Align Stroke to Inside button.

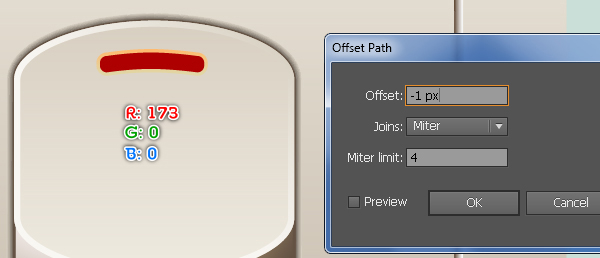
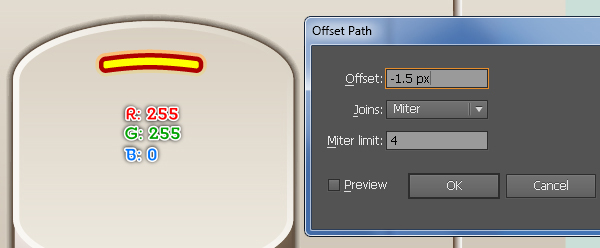
30. Pick the Pen Tool (P) and create an object as shown below. Once your object is drawn, remove its stroke and then fill this object with the linear gradient like you see in the second image. Make sure that the resulting shape is still selected and go to the Object > Path > Offset Path… Enter a -1px Offset and click OK, then replace the existing color of the newly created shape with R=173, G=0, B=0. Keep the resulting shape selected and go to the Object > Path > Offset Path… Enter a -1.5px Offset and click OK, then replace the existing color of the newly created shape with R=255, G=255, B=0. Next set the Blending Mode of the resulting shape to Overlay. Finally select the first shape created in this step and apply a 1px Gaussian Blur effect for it.
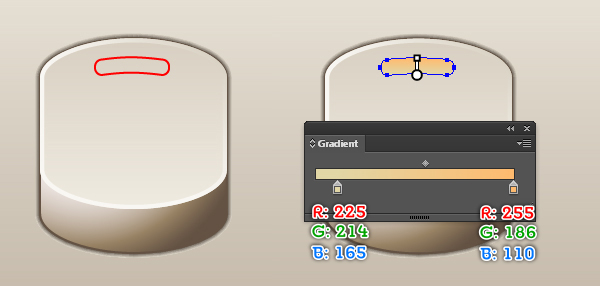


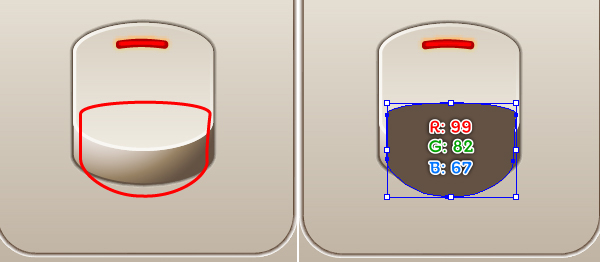
31. With the Pen Tool (P) create an object like you see in the first image. Fill this object with R=99, G=82, B=67 and remove the stroke of it. Next apply a 4px Gaussian Blur effect for the resulting shape. Finally hide this shape behind the first shape created in the step 28.
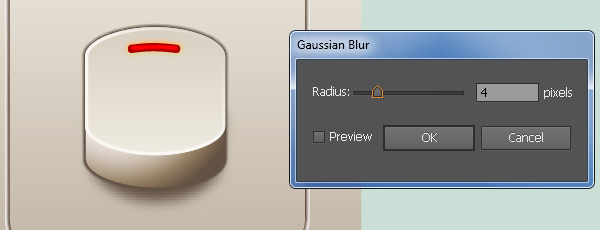
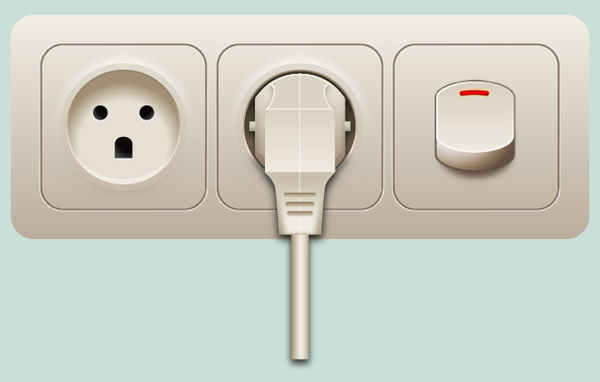
32. At this point your illustrator should look like in the next image:
Create the Screw
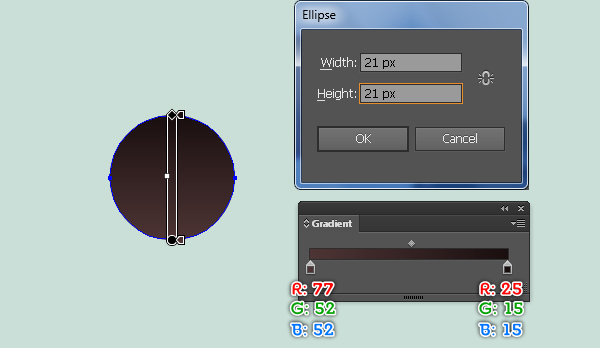
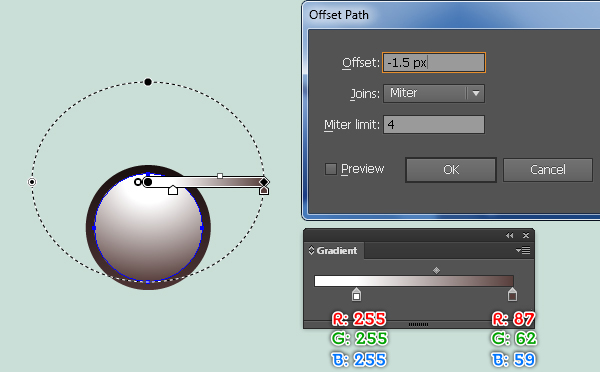
33. We need some screws for the adapter. Pick the Ellipse Tool (L) and create a 21 by 21px ellipse, then fill this ellipse with the linear gradient as shown below. Still having the resulting ellipse selected and go to the Object > Path > Offset Path… Enter a -1.5px Offset and click OK, then replace the existing color of the newly created ellipse with the radial gradient as shown in the second image.
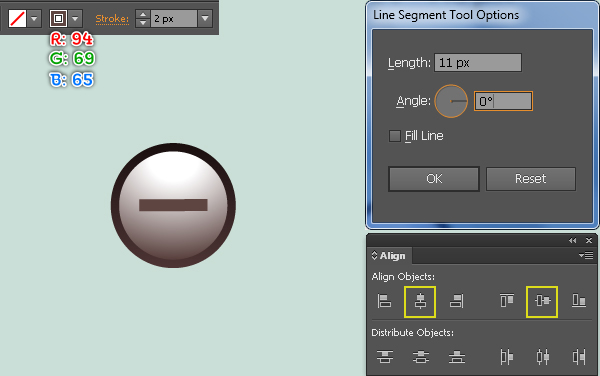
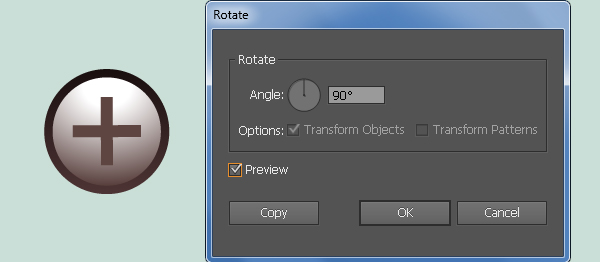
34. Using the Line Segment Tool (\) create a horizontal line of length 11px, with a 2px stroke (R=94, G=69, B=65) and no fill. Keep this line selected, hold down the Shift, click on the smaller ellipse created in the step 33, release the Shift and click on this smaller ellispe again (to fixed its position). Open the Align palette (Window > Align) and click on the Horizontal Align Center button, then click on the Vertical Align Center button. Make sure that the horizontal line is still selected and double-click on the Rotate Tool icon from the Tool palette. In the Rotate dialog box, enter a 90 degrees Angle and click Copy. Next select the horizontal line and make a copy (Ctrl +C, Ctrl +F) of it, then replace the existing stroke color of the copy with white. Move the white horizontal line 1px down and then hide it behind the first horizontal line created in this step. Finally select and group (Ctrl +G) all objects created from beginning step 33 to this time. We are done with the screw for the moment.

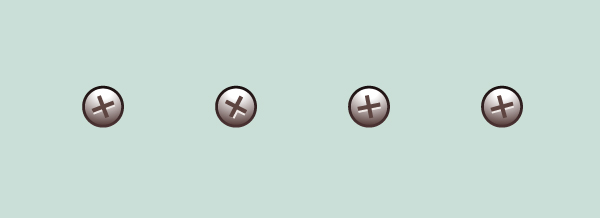
35. Select the screw created in the step 34 and make three copies of it, then rotate these screws as needed. Finally place these screws to the positions like you see in the last image below.
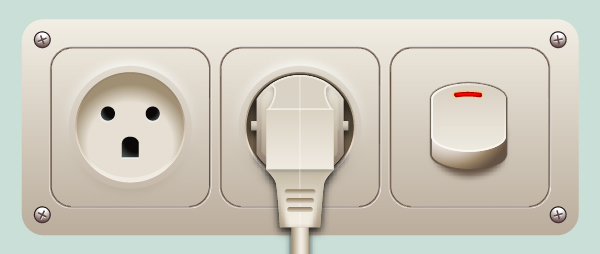
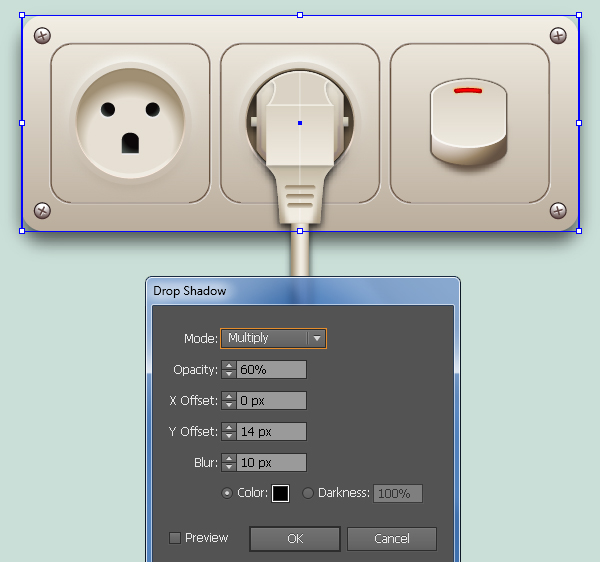
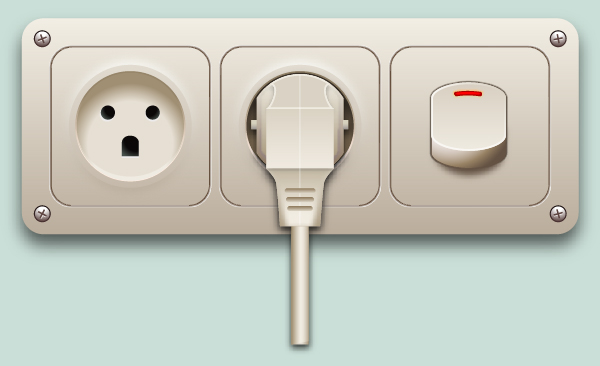
36. Select the biggest rectangle created in the step 4 and go to the Effect > Stylize > Drop Shadow… Follow the data as shown below and click OK. Now select and group (Ctrl +G) all objects created from beginning step 2 to this time. The outlet adapter is ready and looks like in the second image.
Create the Background
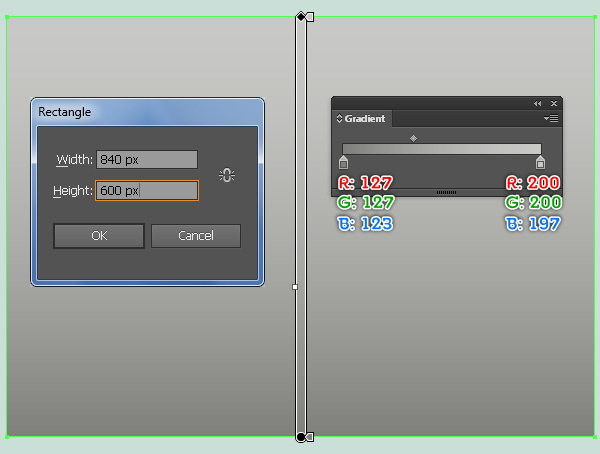
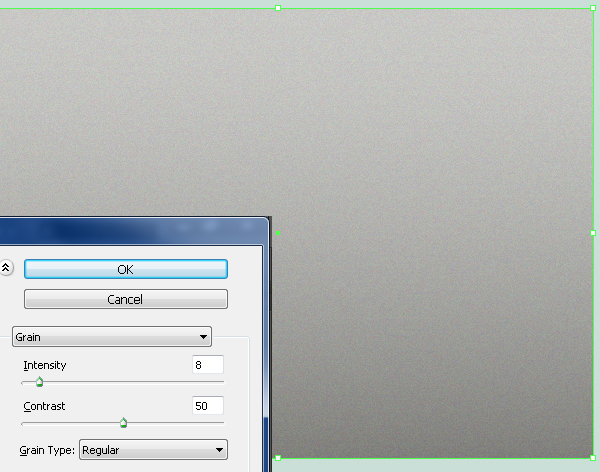
37. We’re done with the outlet adapter. It’s time for the background now. Pick the Rectangle Tool (M) and create a 840 by 600px rectangle, then fill this rectangle with the linear gradient as shown below. Keep this rectangle selected and go to the Effect > Texture > Grain… Follow the data like you see in the second image and then click OK. The last thing to do is place the adapter into the newly created background.
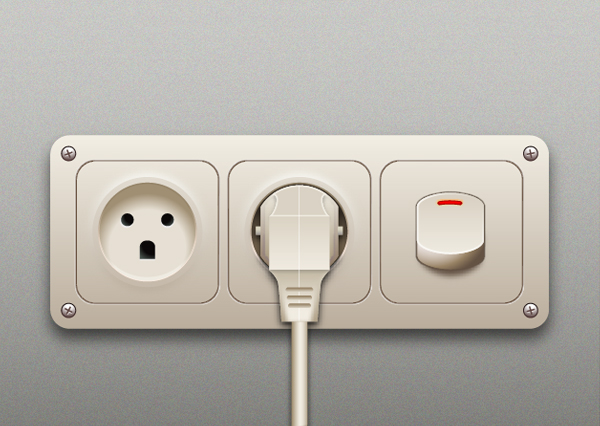
And We’re Done!
Check out this similar, another great tutorial too (click on the image)

